
Piano Basics for Beginners: The Complete Guide to Starting Piano (2026)
Everything a beginner needs to start piano, in the right order, with 12 diagrams and two interactive tools.
On this page
Quick answer
What are the basics of piano?
Piano basics come down to eight things: finding the notes on the keyboard (seven letter names, A to G, repeating in octaves), sitting and holding your hands correctly, finger numbers 1 to 5, reading the grand staff (treble clef for the right hand, bass clef for the left), counting rhythm, playing your first chords (C, F, G and A minor), your first scale (C major), and a short daily practice routine. With 20 minutes a day, most adult beginners can play simple songs with both hands within two to three months.
Free printable guide
Prefer paper? Download this guide as a 31-page PDF. It has all 12 diagrams, the first songs, a note-naming worksheet and a practice log you can fill in. Print it and keep it on your music stand.
Every pianist you have ever heard started in the same place: sitting in front of 88 black and white keys and wondering where on earth to begin. The good news is that the keyboard is far more logical than it looks. It is one small pattern of 12 notes, repeated over and over. Once you can see that pattern, everything else (reading music, chords, scales, songs) builds on it step by step.
This guide covers everything a complete beginner needs, in the order you need it. I teach this material the same way I would in a first set of lessons: the keyboard first, then your hands, then reading and rhythm, then chords, scales and real songs. Every section has a diagram you can keep open while you sit at the piano, and two interactive tools let you hear chords and train your ear right on this page.
If you are still deciding how you want to learn (teacher, app, course or book), the section on ways to learn piano compares them. For a week-by-week plan of what to practise, see my companion guide on how to learn piano by yourself.
What you need to start learning piano
You need three things: an instrument, a way to sit at the right height, and a source of lessons. You do not need a grand piano, expensive lessons or any knowledge of music theory to start.
1. A piano or keyboard
An acoustic piano is wonderful if you already have one (and it is in tune). Most beginners today start on a digital piano, which costs less, never needs tuning, takes headphones, and can connect to learning apps. If you are buying, look for these four features:
- 88 keys, the full range of a real piano. A 61-key keyboard is fine for the first few months, but most piano music soon runs off the end of it.
- Weighted or hammer-action keys. They feel heavier in the bass and lighter in the treble, like an acoustic piano. Unweighted "synth-action" keys build the wrong finger strength.
- Touch-sensitive keys, so playing harder sounds louder. Without this you cannot learn dynamics.
- A sustain pedal. Many keyboards ship with a tiny square footswitch. A piano-style pedal is a cheap upgrade worth making.
My tested picks are in best beginner keyboards and digital pianos. My favourite all-rounder for new players is the Yamaha P-145, and you can read why in my Yamaha P-145 review. If you want something to grow into, see the best digital pianos at every level. Not sure whether to go acoustic or digital? I compare the two honestly in acoustic vs digital piano.
2. A bench or chair at the right height
An adjustable piano bench is ideal. A firm, armless chair works if your forearms end up level with the keys (more on this in posture). Avoid sofas, office chairs that swivel and lean, and anything with arms.
3. A way to learn
That could be a teacher, an online course, an app or a method book. You can start with this guide today and choose the rest later. The comparison table below sets out the pros and cons of each.
Nice to have: headphones, a music stand (most digital pianos include one), a pencil for marking your music, and a metronome (free apps work well, and most digital pianos have one built in).
The piano keyboard: 88 keys and octaves
A standard piano has 88 keys: 52 white keys and 36 black keys. The lowest note is an A on the far left, and the highest is a C on the far right. Notes get lower (deeper) as you move left and higher as you move right.
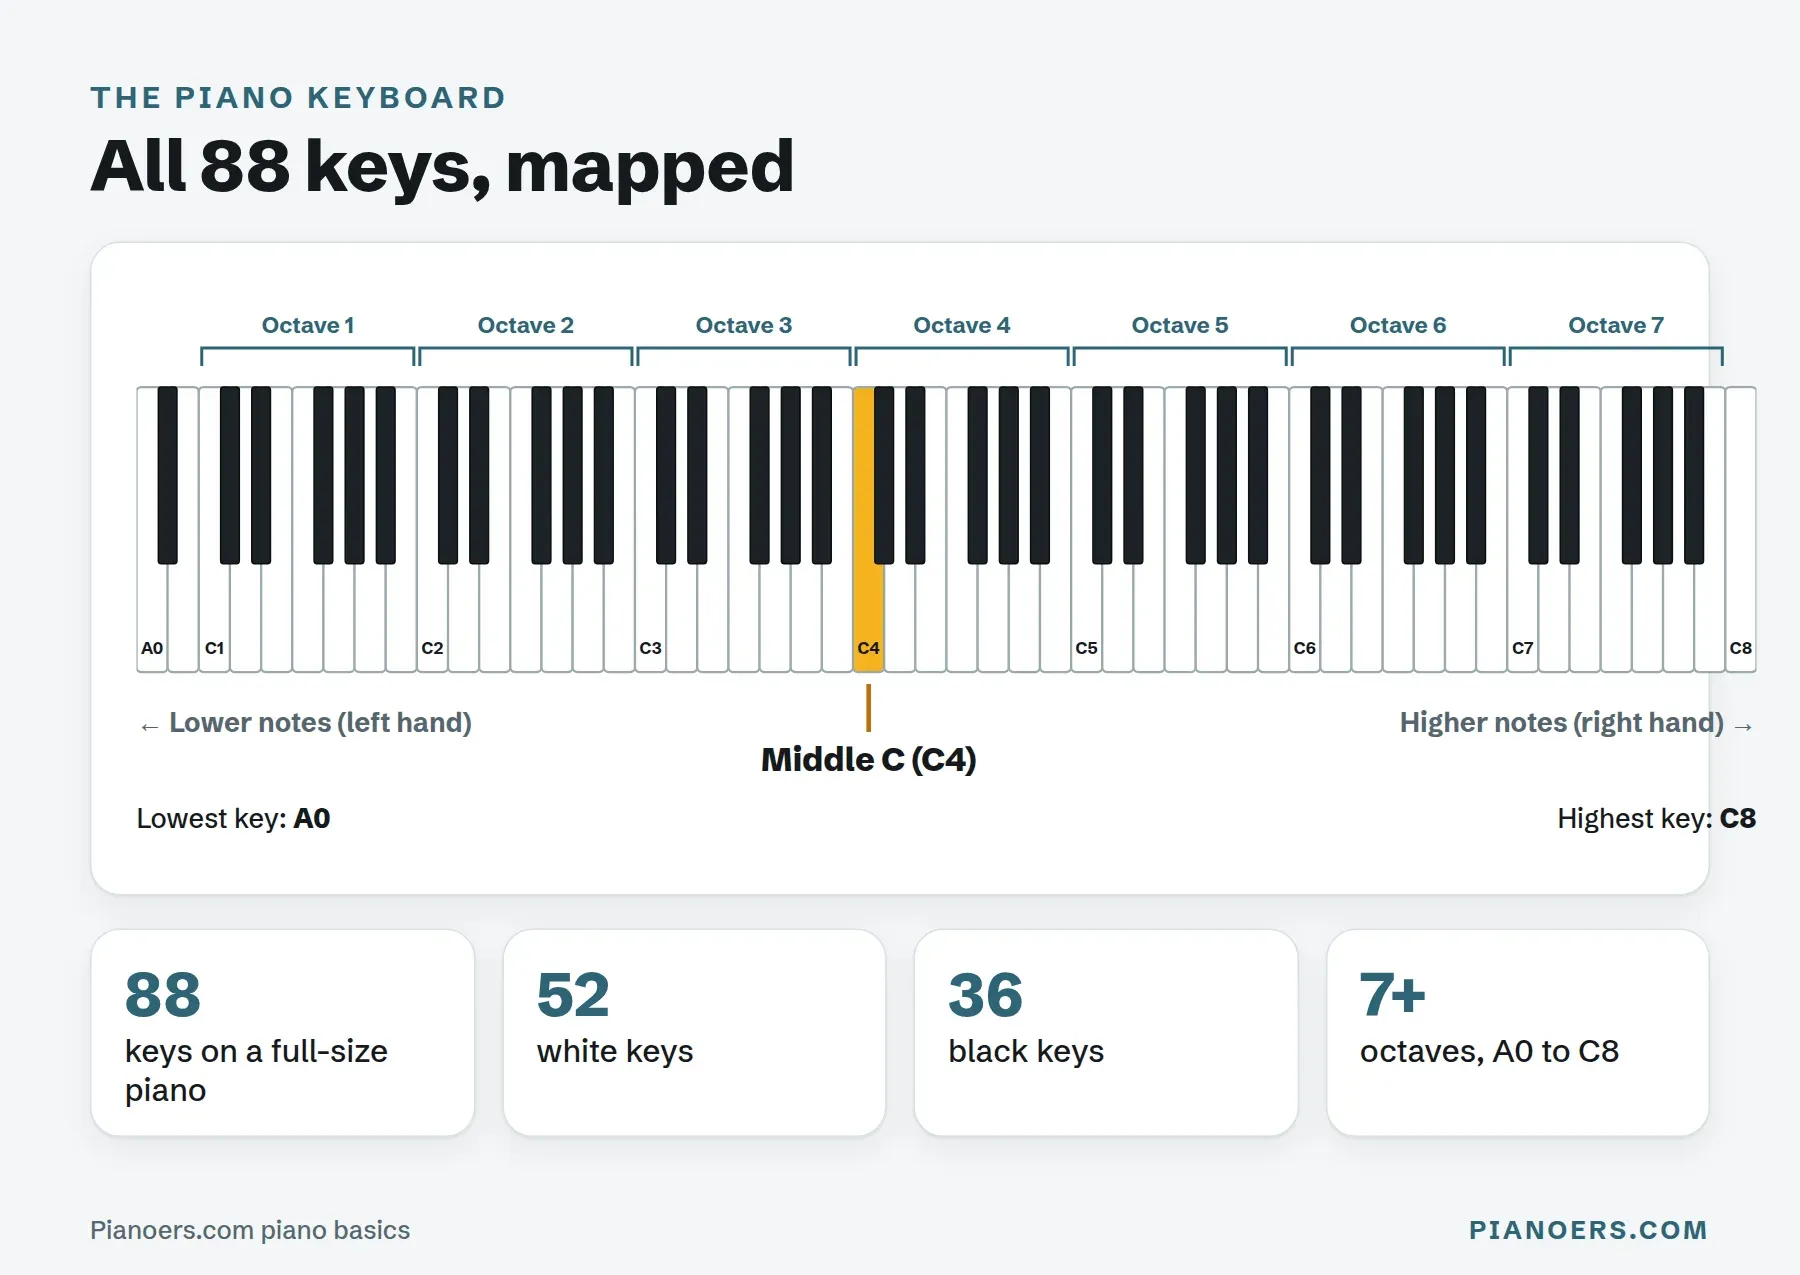
The most important fact about the keyboard is this: it is one pattern repeated. Look at the black keys and you will see they come in groups: a group of two, then a group of three, then two, then three, all the way up. Seven white keys and five black keys make one complete set of 12 notes. That set is called an octave, and an 88-key piano has just over seven of them.
Because the pattern repeats, a C at the bottom of the piano and a C at the top are the same note, just lower or higher. Learn one octave and you know them all.
How many octaves does a piano have?
An 88-key piano spans seven full octaves plus three extra notes (A0, B0 and the top C8). Pianists number the octaves so they can name each note exactly. The C at the start of each octave gives that octave its number: C1, C2, C3 and so on up to C8.
What about 61 and 76-key keyboards?
They have the same pattern, just fewer octaves: 61 keys is five octaves, and 76 keys is six and a bit. Everything in this guide works on any of them. Centre yourself on middle C and you will have plenty of keys for the first months.
Piano key names: the white and black keys
Music uses just seven letter names: A, B, C, D, E, F and G. After G, the alphabet starts again at A. Those seven letters name the white keys. The black keys are named after the white keys next to them (you will see how in the next section).
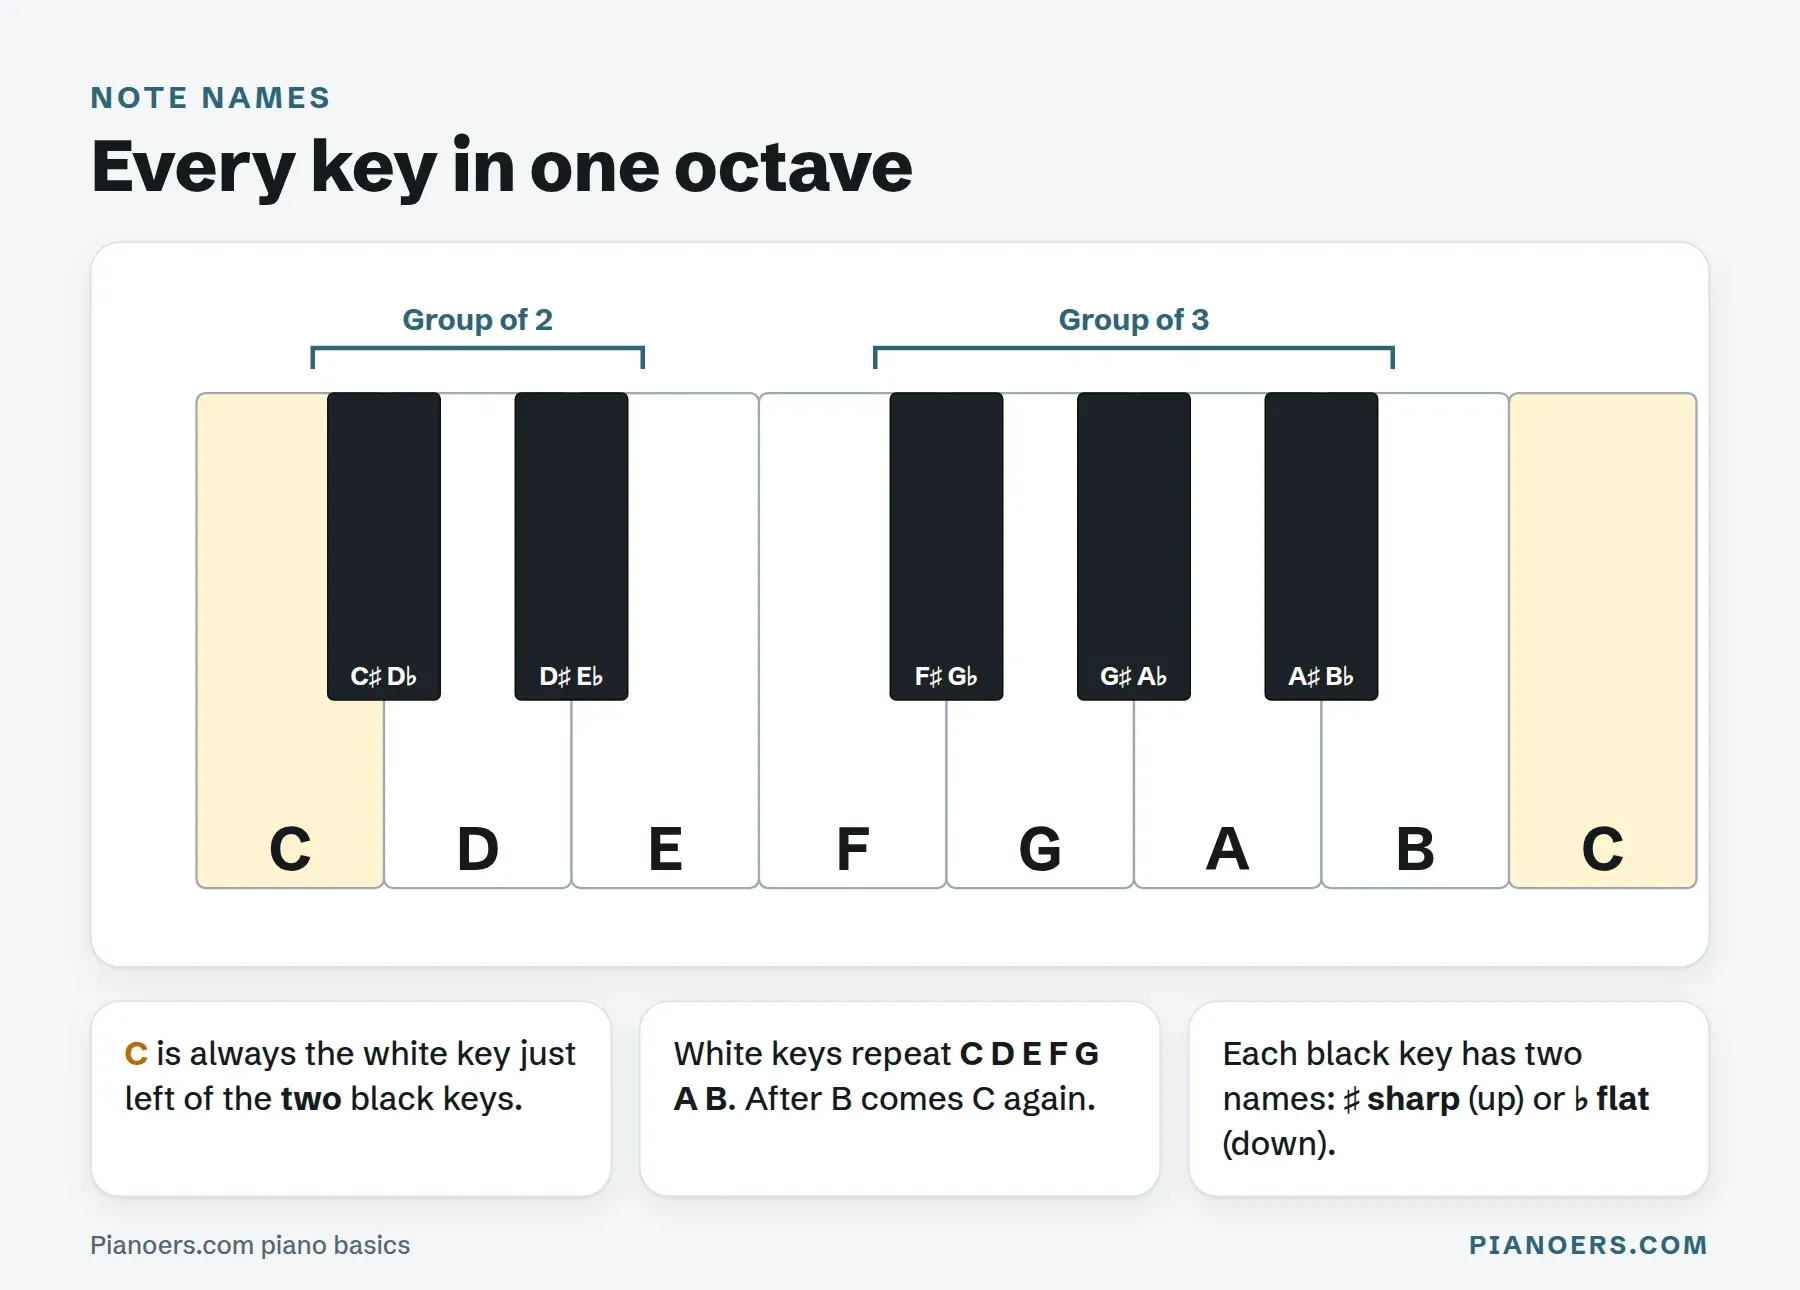
The trick for finding any note is to use the black-key groups as landmarks:
- C is the white key just to the left of the two black keys.
- D sits between the two black keys.
- E is just to the right of the two black keys.
- F is just to the left of the three black keys.
- G and A sit between the three black keys.
- B is just to the right of the three black keys.
Try this now: play every C on your piano, from the bottom to the top. Then every F. Then every D. If you can find any letter in under two seconds without counting up from A, you have learned the keyboard. Most people get there in a single afternoon.
How to find middle C
Middle C is the C nearest the middle of the keyboard. On an 88-key piano it is the fourth C from the left, which is why it is also called C4. On most pianos it sits roughly under the brand name, and on many digital pianos it is right in front of the control panel.
Middle C matters because it is the meeting point of the two hands and of the two clefs in written music. Almost every beginner piece is written around it. When a book says "place your right thumb on C", it means middle C unless it says otherwise.
On a 61-key keyboard, middle C is the third C from the left. On a 76-key keyboard it is also the third C from the left. If in doubt, find the C closest to the middle of your instrument.
Sharps, flats, half steps and whole steps
The distance from any key to the very next key, black or white, is a half step (also called a semitone). Two half steps make a whole step (a tone). Every scale and chord in music is built from these two distances, so they are worth understanding now.
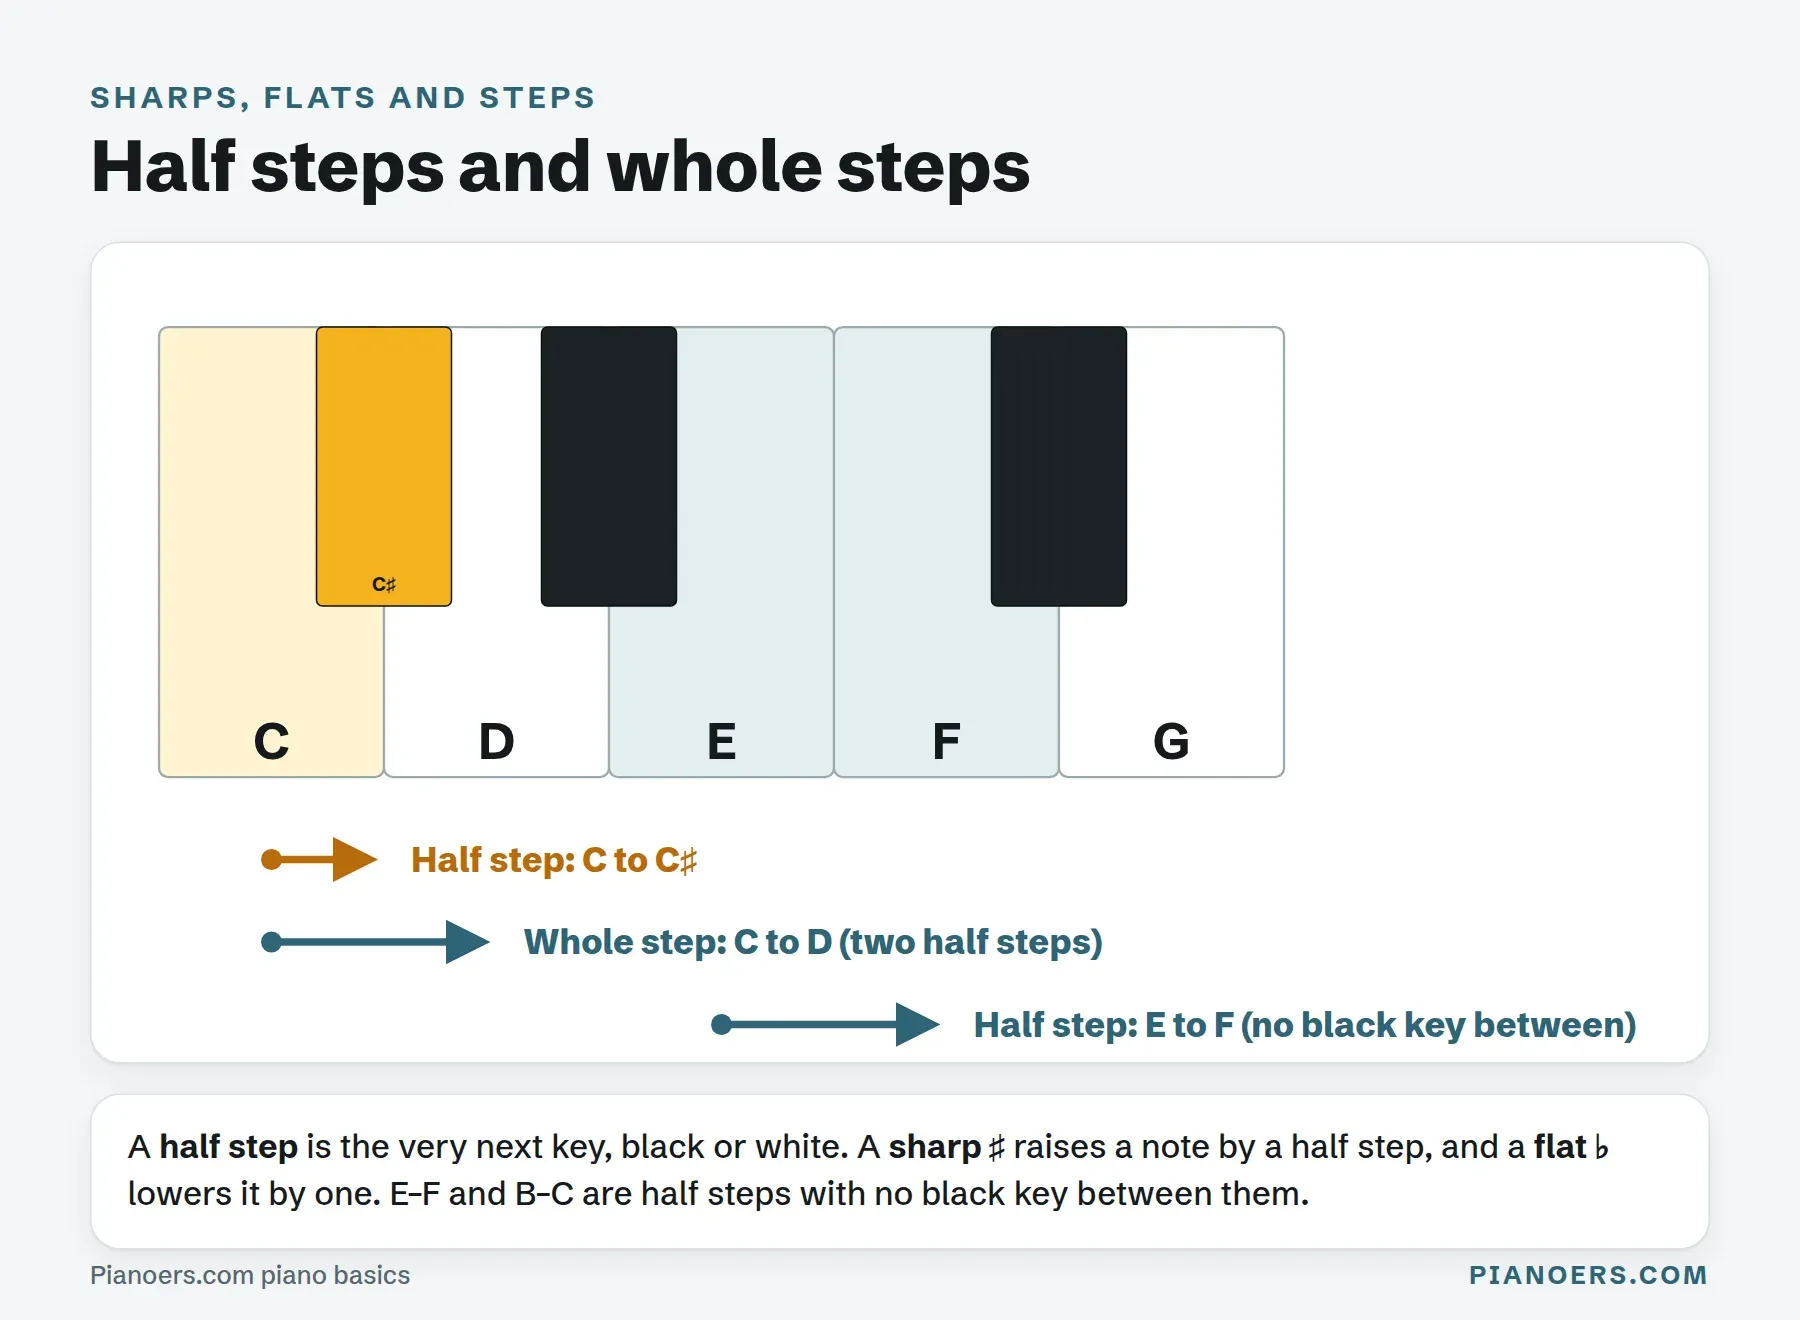
- Sharp (♯) means one half step higher. The black key just right of C is C♯ (C sharp).
- Flat (♭) means one half step lower. That same black key is also D♭ (D flat), because it is just left of D.
- Natural (♮) cancels a sharp or flat and returns to the white key.
So every black key has two names. C♯ and D♭ are the same key: musicians call these enharmonic notes. Which name is used depends on the key of the piece, which you do not need to worry about yet.
Notice two places where there is no black key: between E and F, and between B and C. Those white keys are already a half step apart. This is why the black keys fall into groups of two and three, and it is the reason the C major scale sounds the way it does.
How to sit at the piano
Good posture is not about looking elegant. It is what lets your fingers move freely, keeps your wrists and shoulders from aching, and stops bad habits that are hard to unlearn later. Spend two minutes on this before every practice session for the first few weeks.
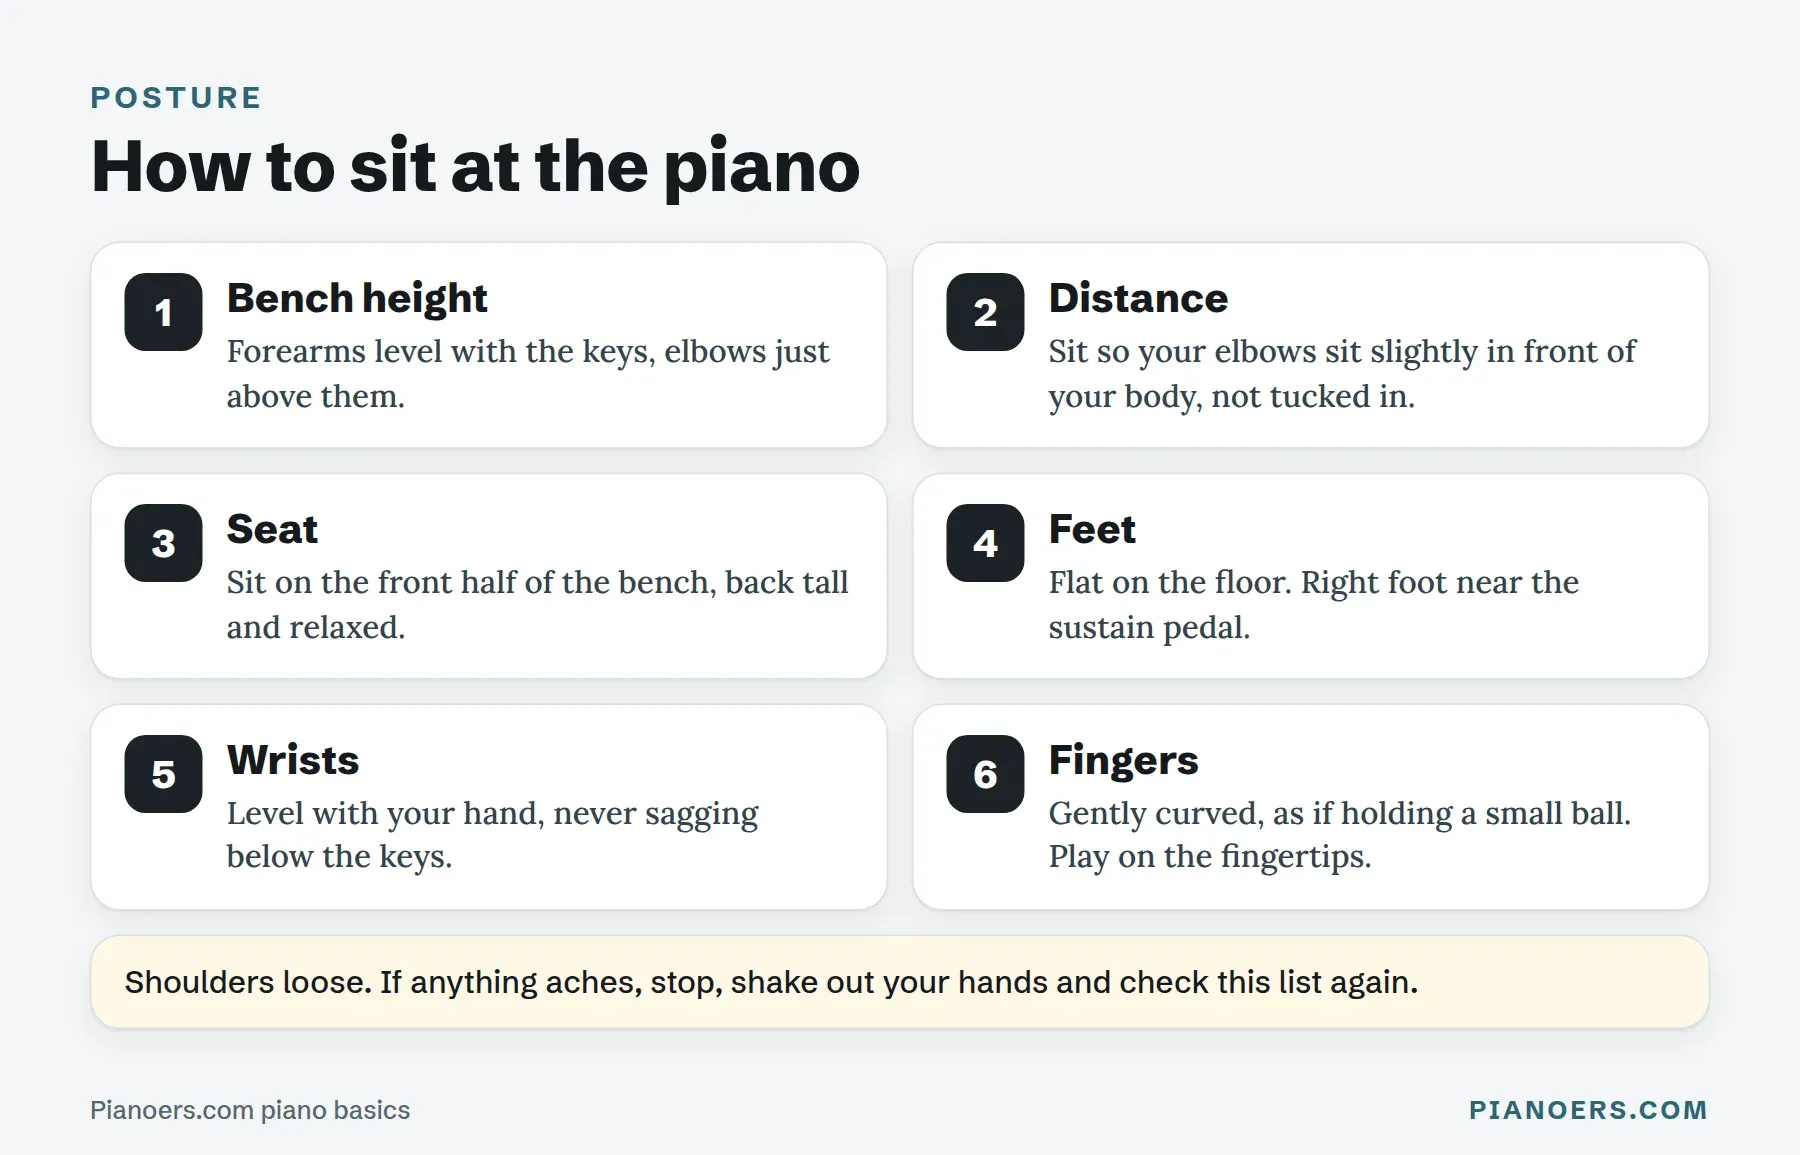
- Bench height: your forearms should be roughly level with the keys, with your elbows just above them. Too low and your wrists sag. Too high and you push down from your shoulders.
- Distance: sit far enough back that your elbows are slightly in front of your body. If they are jammed into your sides, move back.
- Seat: sit on the front half of the bench, back tall but not stiff. This lets you lean and reach the ends of the keyboard.
- Feet: flat on the floor. Your right foot rests near the sustain pedal, heel on the floor.
- Wrists: level with the back of your hand. They should never droop below the keys or arch up high.
- Fingers: gently curved, as if you were holding a small ball or resting your hand on your knee. Play on the pads near your fingertips, not on flat fingers.
Centre yourself on middle C, keep your shoulders loose, and breathe. If anything starts to ache, stop, shake your hands out and check the list again. Pain is never part of learning piano.
Piano finger numbers
Pianists number their fingers 1 to 5, and the numbering is the same on both hands: the thumb is 1, the index finger is 2, the middle finger is 3, the ring finger is 4 and the little finger is 5.
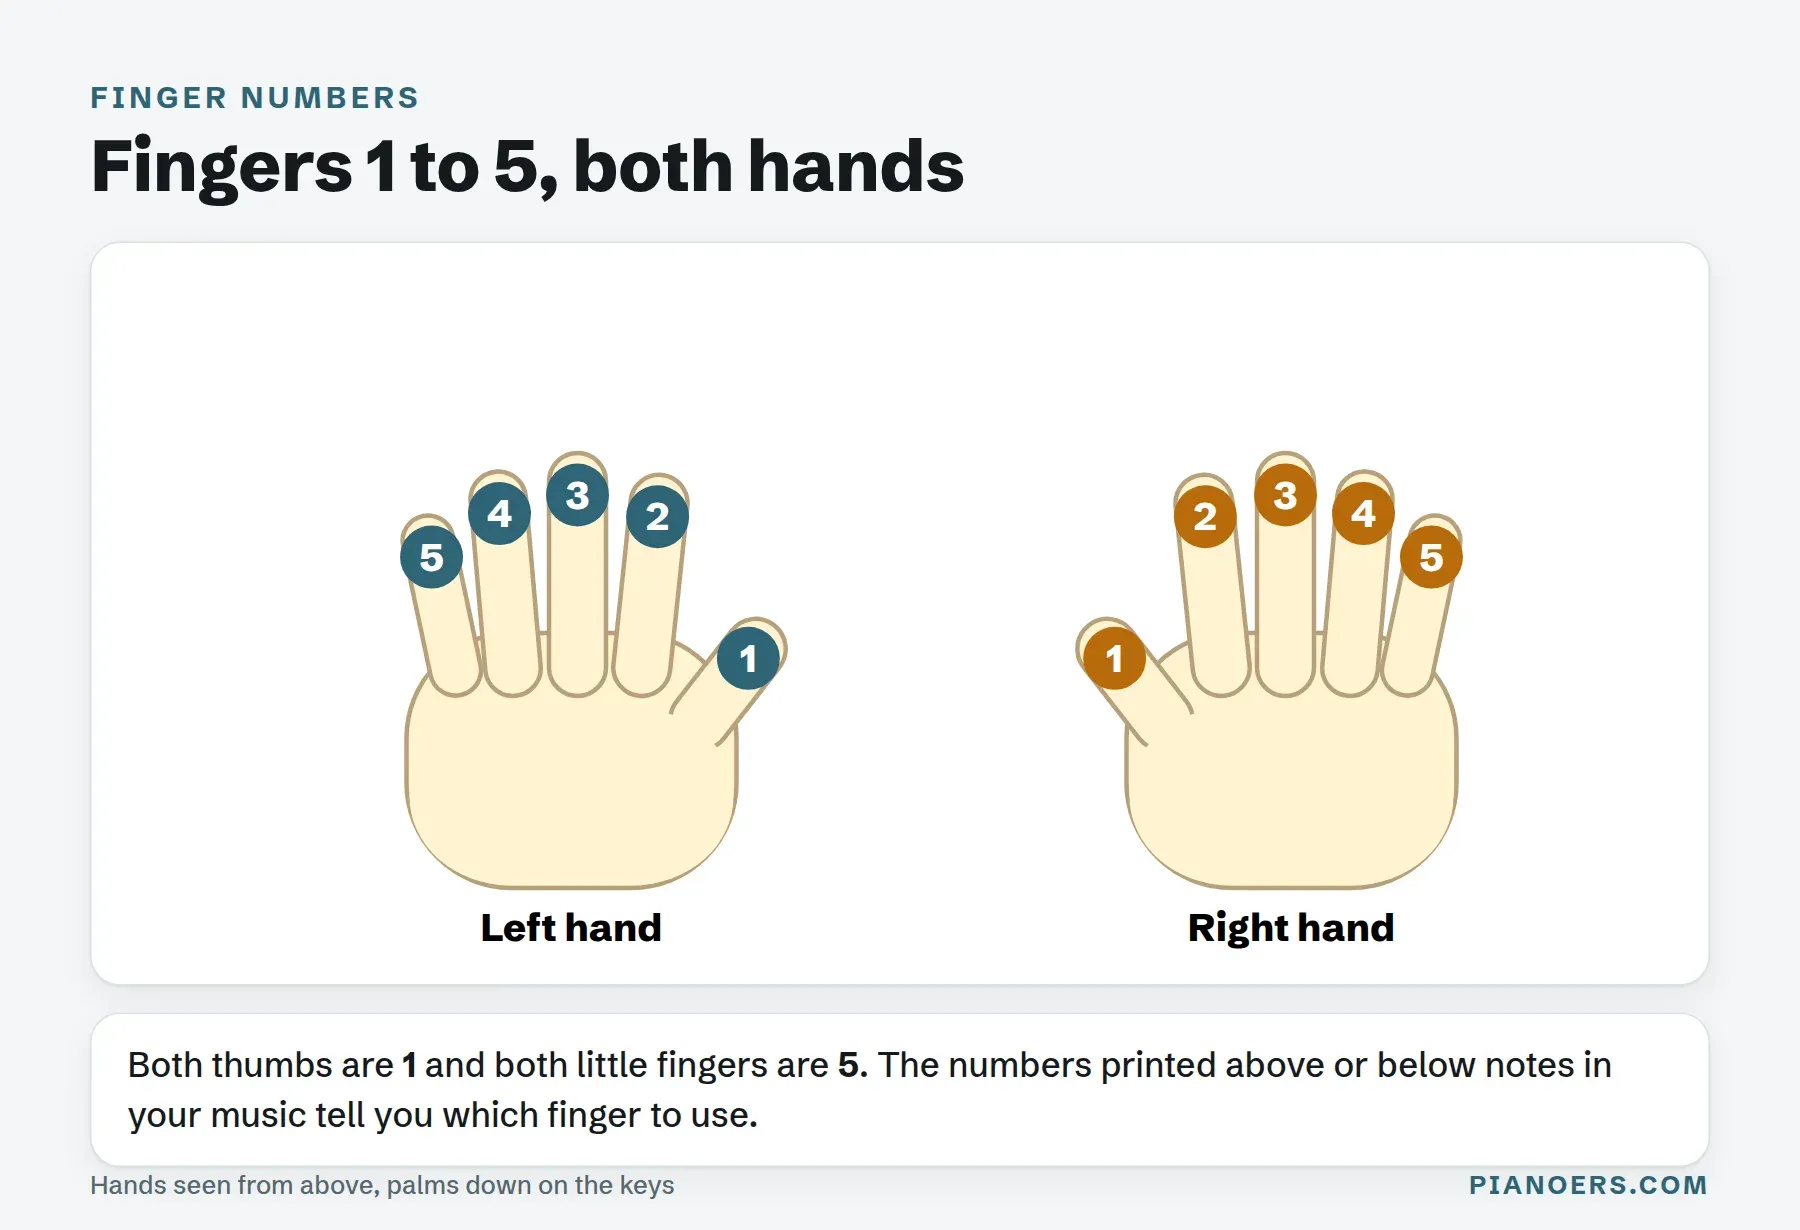
In written music, these numbers appear as small digits above or below a note to tell you which finger to use. Beginners are often tempted to ignore them. Don't: good fingering is what lets you play a passage smoothly, and it is far easier to learn the right fingering from the start than to fix the wrong one later.
Quick drill: rest both hands on your knees. Wiggle finger 3 on both hands. Then 1. Then 4. Then right hand 2 and left hand 5 at the same time. A minute of this a day for a week and the numbers become automatic.
C position and your first exercise
C position is the first hand position most method books teach. Put your right thumb (1) on middle C and let your other fingers fall naturally on D, E, F and G, one finger per key. Your left little finger (5) goes on the C one octave below middle C, with fingers 4, 3, 2 and 1 on D, E, F and G.
In this position you can play five notes in each hand without moving, and an astonishing number of beginner melodies fit inside it.
Your first exercise: five-finger pattern
- Right hand in C position. Play C D E F G, one finger at a time (1 2 3 4 5), then back down G F E D C (5 4 3 2 1).
- Play each note with the same loudness and the same length. Listen for evenness, not speed.
- Lift each finger as the next one goes down, so the notes join smoothly without overlapping.
- Now do the same with the left hand: C D E F G is fingers 5 4 3 2 1.
- Repeat three times with each hand. Then try it with your eyes closed.
It sounds simple, and it is. But this one exercise trains finger independence, evenness and keyboard awareness, the three foundations of everything you will play later.
How to read piano music
You can play piano without reading music, and many great players learned by ear or from chord charts. But reading opens up the whole written repertoire, and the basics are much simpler than they look. You only need a few ideas to begin.
The staff and the grand staff
Music is written on a staff: five horizontal lines with four spaces between them. Each line and each space is a note. The higher a note sits on the staff, the higher it sounds.
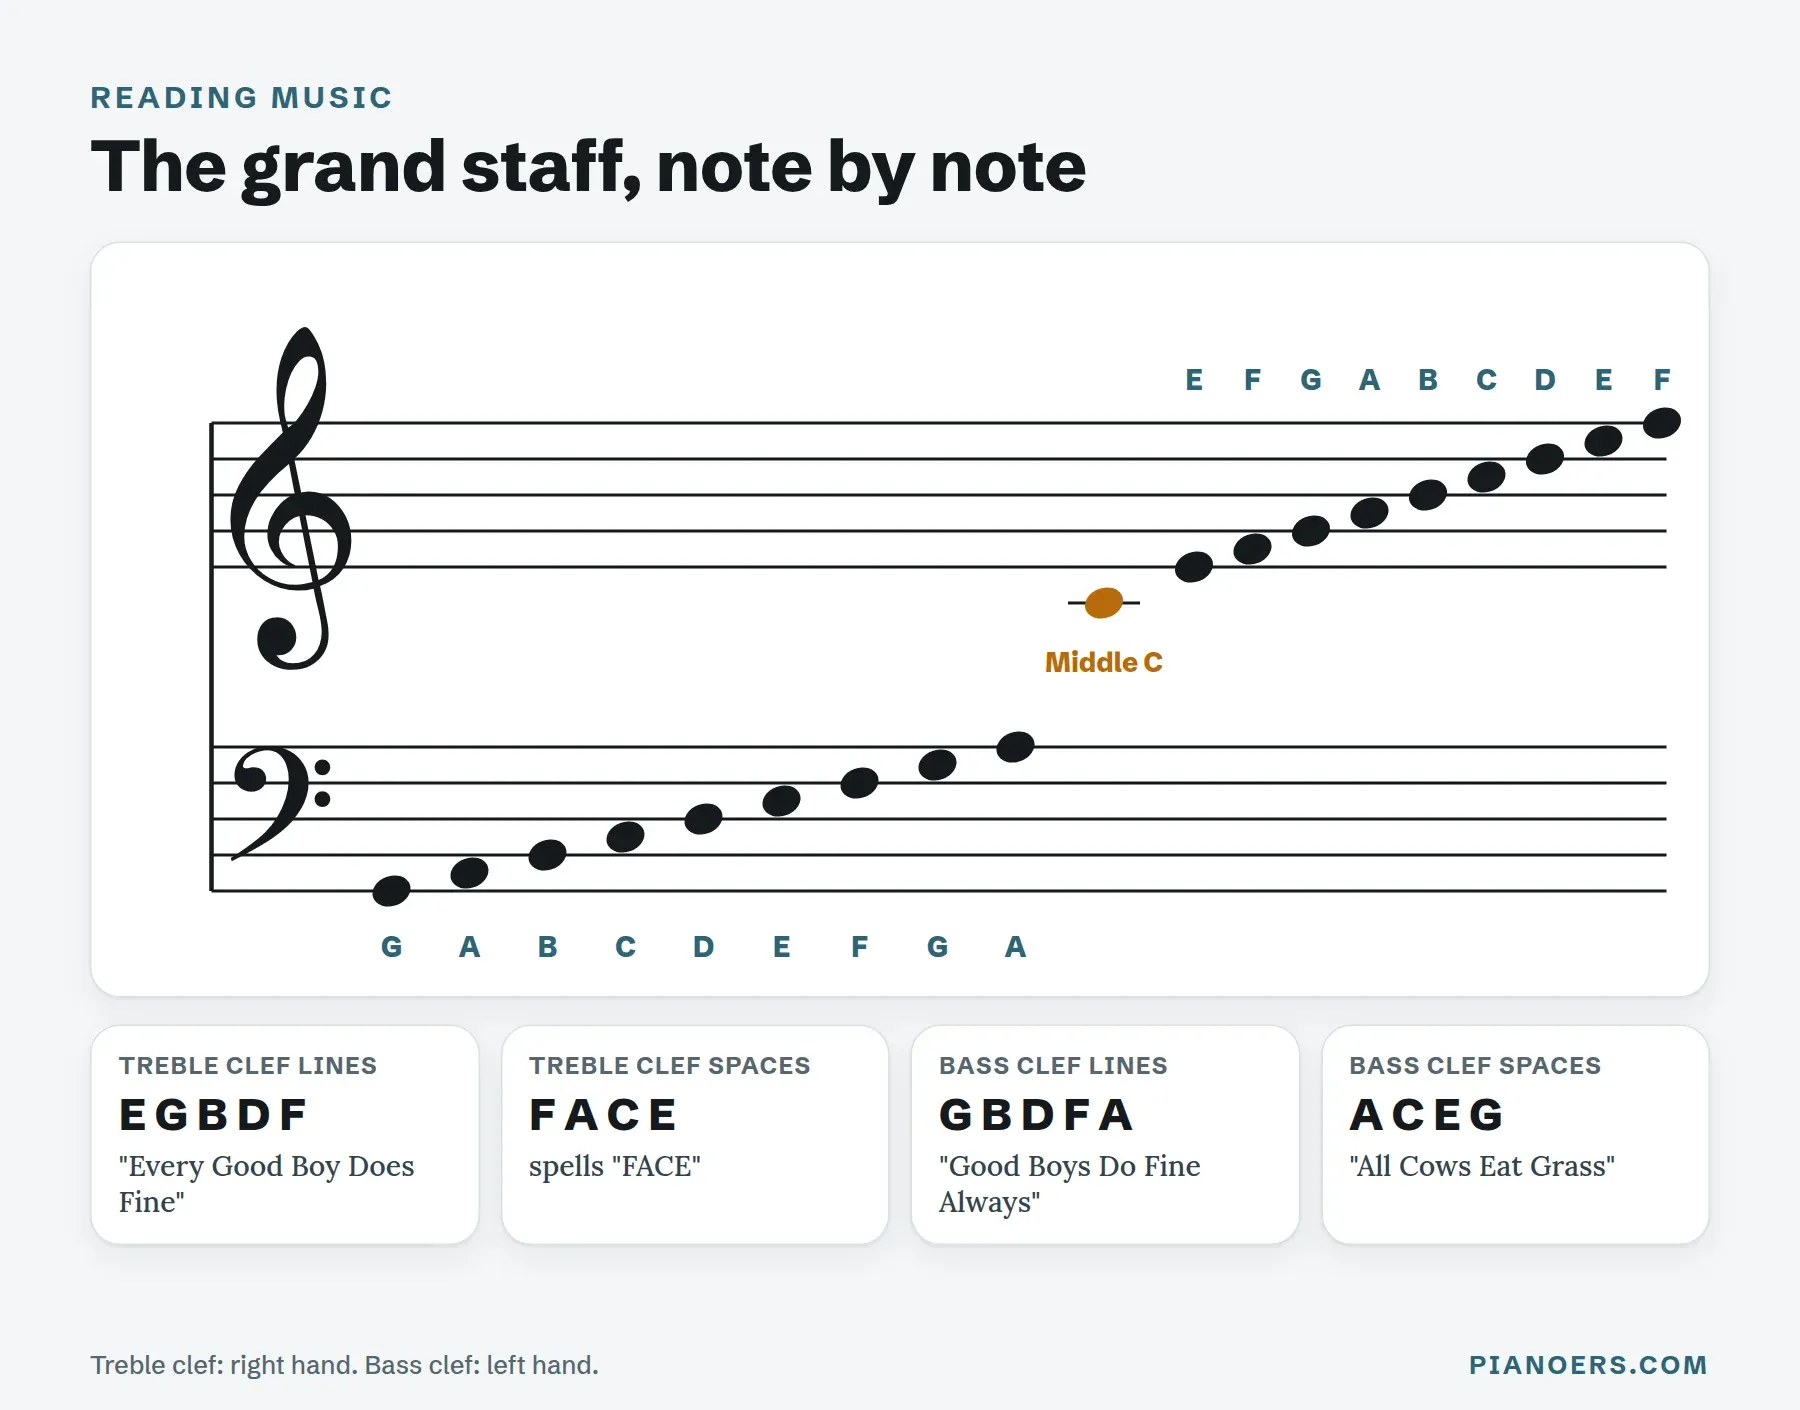
Because the piano covers such a wide range, piano music uses two staffs joined together, called the grand staff. The top staff usually shows the right hand and the bottom staff the left hand.
The treble clef
The treble clef (𝄞) sits on the top staff. It is also called the G clef, because its curl circles the second line, which is the G above middle C. In the treble clef:
- The lines, from bottom to top, are E G B D F: "Every Good Boy Does Fine".
- The spaces, from bottom to top, spell F A C E: "FACE".
The bass clef
The bass clef (𝄢) sits on the bottom staff. It is also called the F clef, because its two dots surround the fourth line, which is the F below middle C. In the bass clef:
- The lines are G B D F A: "Good Boys Do Fine Always".
- The spaces are A C E G: "All Cows Eat Grass".
Ledger lines and middle C
Notes that go above or below the staff get short extra lines called ledger lines. The most important one is middle C, which sits on a single ledger line right between the two staffs. It can be written just below the treble staff or just above the bass staff: it is the same key either way.
Don't rely on mnemonics forever
Mnemonics get you started, but fluent readers don't spell out "Every Good Boy" for each note. The faster method is to learn a few landmark notes by sight (middle C, treble G, bass F, and the Cs above and below) and then read the others by interval: is the next note a step up (line to the next space), a skip (line to the next line), or the same? This is how sight-readers actually read, and it is worth starting early.
If reading music is your main goal, an app that listens to you play and scores your accuracy helps a lot. Piano Marvel is the strongest tool I know for this: see my Piano Marvel review.
Rhythm: note values, rests and time signatures
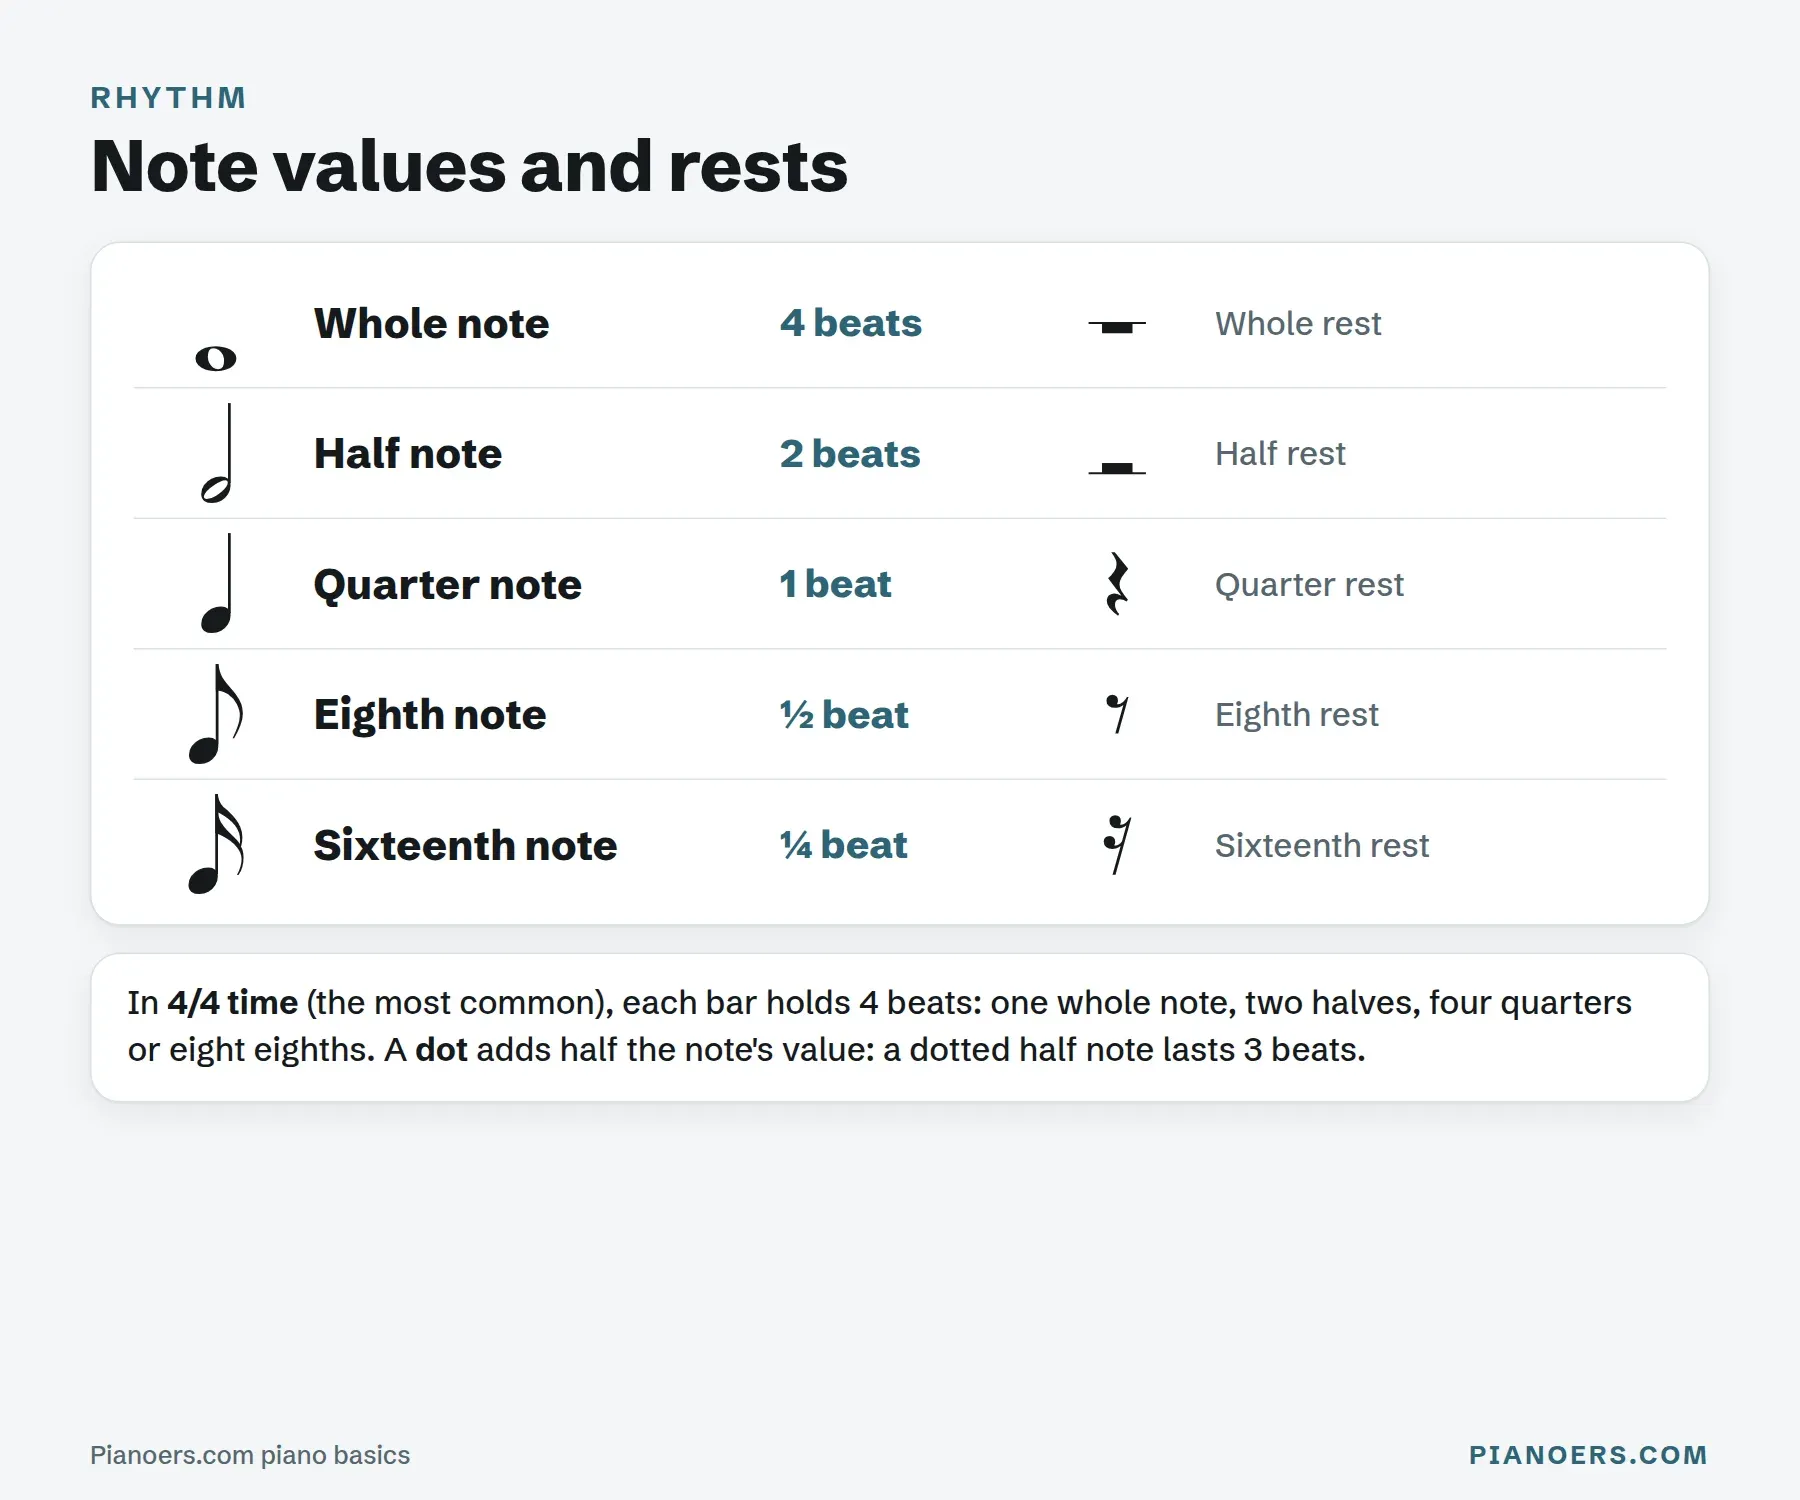
The position of a note on the staff tells you which key to play. Its shape tells you how long to hold it. Rhythm is counted in beats: the steady pulse you would tap your foot to.
| Note | What it looks like | Beats in 4/4 | Count it as |
|---|---|---|---|
| Whole note | Open oval, no stem | 4 | 1 2 3 4 |
| Half note | Open oval with a stem | 2 | 1 2 |
| Quarter note | Filled oval with a stem | 1 | 1 |
| Eighth note | Filled, stem and one flag (or beam) | ½ | 1 and |
| Sixteenth note | Filled, stem and two flags (or beams) | ¼ | 1 e and a |
A dot after a note adds half of its value again. A dotted half note lasts 3 beats (2 + 1), and a dotted quarter lasts 1½ beats. Rests are silences of the same lengths: a whole rest, half rest, quarter rest and so on. Silence is part of the music, so count rests just as carefully as notes.
Bars and time signatures
Music is divided into bars (also called measures) by vertical lines. The time signature at the start, two stacked numbers, tells you how the beats are grouped:
- 4/4 ("common time", sometimes written C): four quarter-note beats per bar. Most pop, rock and beginner music.
- 3/4: three beats per bar. Waltzes and many folk songs. Count "1 2 3, 1 2 3".
- 2/4: two beats per bar. Marches and polkas.
- 6/8: six eighth notes per bar, felt in two groups of three. "1 2 3 4 5 6".
The top number is how many beats are in a bar. The bottom number is which note gets one beat (4 means a quarter note, 8 means an eighth note).
How to count out loud
Counting out loud feels silly for about a day, then it becomes the single best habit for steady rhythm. Say "1, 2, 3, 4" as you play, with each number on a beat. For eighth notes, say "1 and 2 and 3 and 4 and". Use a metronome at a slow speed (60 beats per minute is a good start) and only speed it up when you can play the passage correctly three times in a row.
Your first piano chords
A chord is three or more notes played together. The most common chord, the triad, uses three notes, each a skip apart: play a key, skip one white key, play the next, skip one, play the next. That is all it takes.
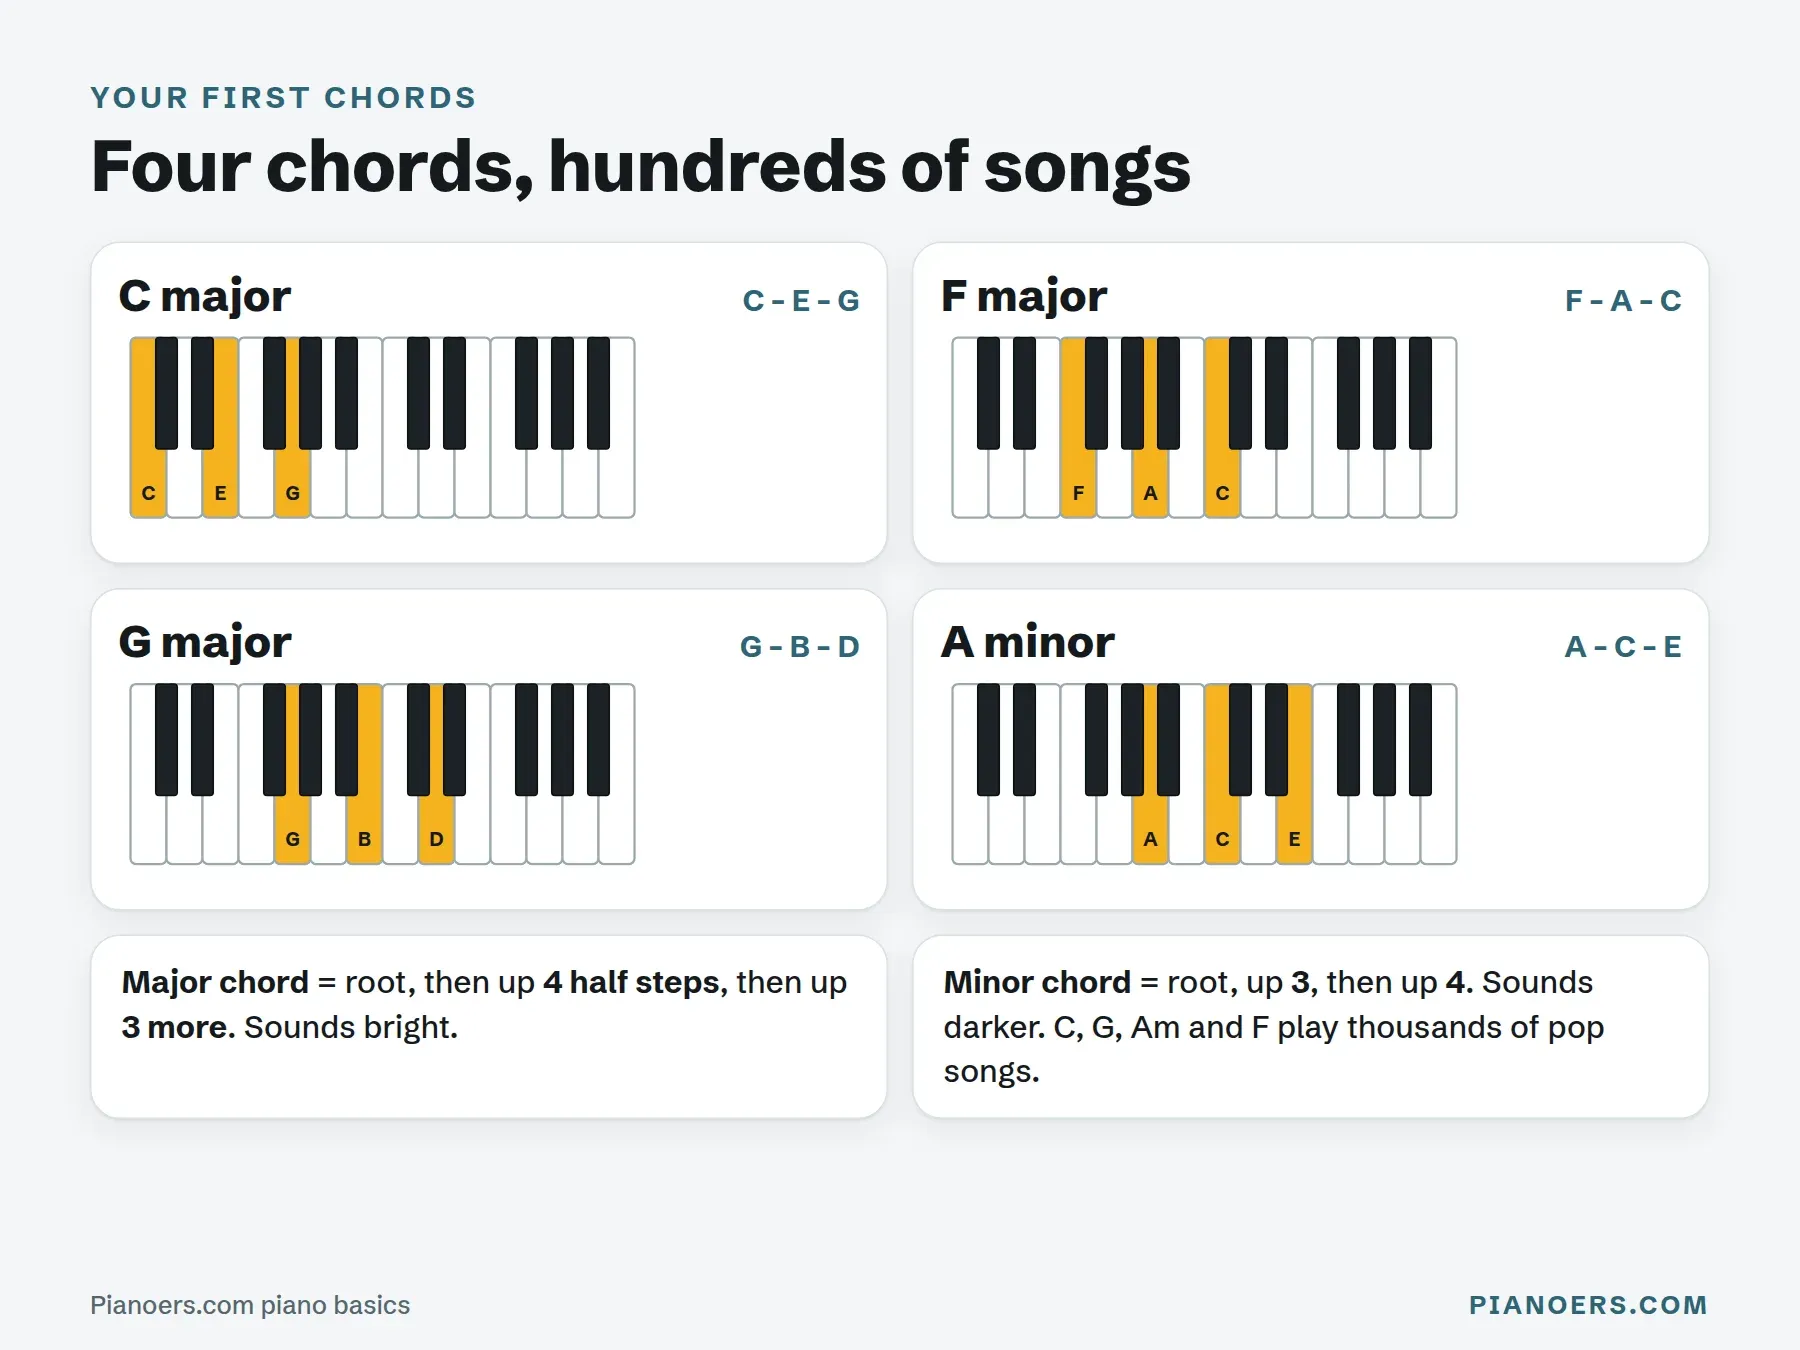
| Chord | Notes | Right-hand fingers | Sound |
|---|---|---|---|
| C major | C E G | 1 3 5 | Bright, settled, "home" |
| F major | F A C | 1 3 5 | Warm, open |
| G major | G B D | 1 3 5 | Bright, wants to move back to C |
| A minor | A C E | 1 3 5 | Darker, wistful |
Hear it for yourself. Press the dotted keys one at a time, then play the full chord:
Try it now
Play your first chord: C major
Press C, then E, then G, then hear all three together. That one hand shape is the start of the chord-first idea: learn a few shapes and you can play along with real songs long before you can read a page of notes.
The three dotted keys make a C major chord: C, E and G.
Major and minor: the half-step rule
The difference between a major and a minor chord is just one half step in the middle note:
- Major chord: root, then up 4 half steps, then up 3 more. C to E is 4 half steps, E to G is 3.
- Minor chord: root, then up 3 half steps, then up 4 more. A to C is 3, C to E is 4.
Lower the middle note of any major chord by one half step and it becomes minor. Try C major (C E G) then C minor (C E♭ G). You will hear the mood change instantly.
Why these four chords matter
C, G, A minor and F, in different orders, are the backbone of a huge number of pop songs. Play them in the order C, G, Am, F with your right hand while your left hand plays the root note (the letter name of the chord) an octave lower, and you are accompanying real music. This chord-first approach is how Pianoforall teaches, and it is one of the fastest routes to playing songs you know: see my Pianoforall review.
Your first scale: C major
A scale is a set of notes played in order, up or down. The C major scale is the simplest: just the white keys from C to the next C, C D E F G A B C. Scales train your fingers, teach you how keys are built, and make up most melodies you will ever play.
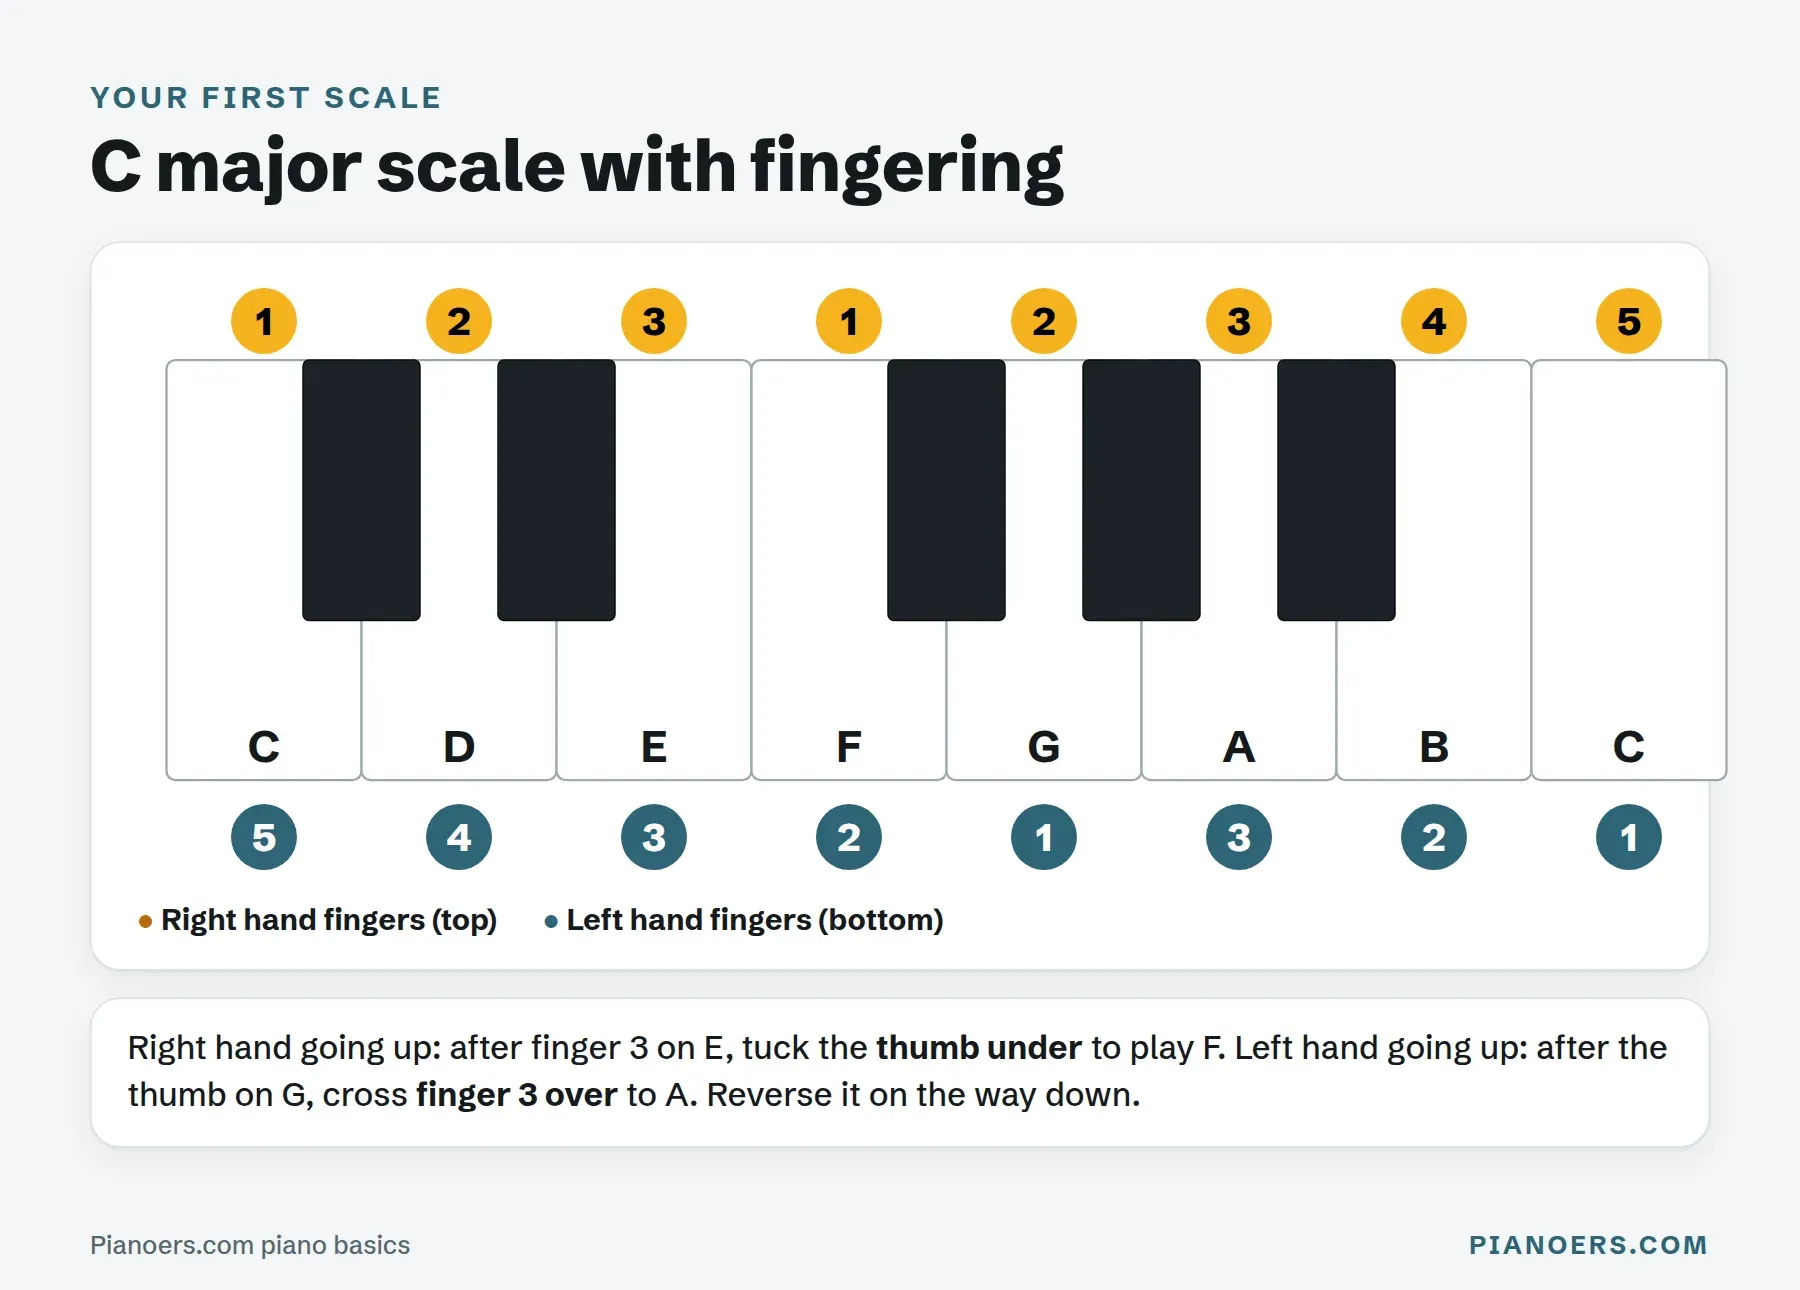
C major scale fingering
- Right hand going up: 1 2 3, then tuck your thumb under to play F with 1, then 2 3 4 5. So: 1 2 3 1 2 3 4 5. Coming down, reverse it and cross finger 3 over your thumb onto E.
- Left hand going up: 5 4 3 2 1, then cross finger 3 over your thumb onto A, then 2 1. So: 5 4 3 2 1 3 2 1. Coming down, reverse it and pass the thumb under.
The thumb-under movement is the first real piano technique most people learn. Keep your wrist level and let the thumb travel under your palm smoothly, rather than twisting your whole hand. Practise one hand at a time, slowly, until the crossing makes no bump in the sound.
The major scale pattern
Every major scale follows the same pattern of steps: whole, whole, half, whole, whole, whole, half. In C major, the half steps fall naturally between E–F and B–C, which is why it needs no black keys. Start the same pattern on G and you will find you need one black key (F♯) to keep the pattern. That is the G major scale, and it is a good second scale to learn.
Playing hands together
Hands together is the moment piano starts to feel hard, and also the moment it starts to feel like real piano. Your brain has to run two parts at once. The secret is to make that job as small as possible.
- Learn each hand alone first until it is easy, not just correct.
- Start with the simplest combination: right hand plays a melody, left hand holds one long note or a chord at the start of each bar.
- Go painfully slowly. Half the speed you think you need. Speed comes from accuracy, never the other way round.
- Look for where the hands line up. Mark in pencil the beats where both hands play together. Those are your anchors.
- Practise in tiny chunks: one bar, then two, then link them. Overlap the chunks by one note so the joins are smooth.
- Keep counting out loud. The count is what keeps the two hands in the same time.
A good first hands-together exercise: right hand plays C D E F G slowly in quarter notes, while the left hand holds a C major chord (C E G, fingers 5 3 1) as a whole note for each bar. Then try it with the left hand playing just the note C on beat 1 of each bar.
Dynamics, pedals and articulation
Once you can play the right notes in the right rhythm, the next step is to make them sound like music. That comes from three things: how loud, how connected, and how you use the pedals.
Dynamics: loud and soft
The piano was originally called the pianoforte, "soft-loud", because it was the first keyboard that could play both depending on how hard you pressed. Dynamics are written in Italian abbreviations:
| Marking | Italian | Meaning |
|---|---|---|
| pp | pianissimo | Very soft |
| p | piano | Soft |
| mp | mezzo-piano | Moderately soft |
| mf | mezzo-forte | Moderately loud |
| f | forte | Loud |
| ff | fortissimo | Very loud |
| cresc. / < | crescendo | Gradually louder |
| dim. / > | diminuendo | Gradually softer |
Loudness comes from the speed of the key going down, not from pressing hard into the key bed. Let the weight of your arm do the work for loud notes, and use a lighter, slower touch for soft ones. If you want to know what is happening inside the instrument when you do this, I explain the hammers and dampers in how the piano works.
The three pedals
- Right pedal: sustain (damper) pedal. Lifts all the dampers so notes keep ringing after you let go of the keys. It is the one you will use most, played with your right foot, heel on the floor.
- Left pedal: soft pedal (una corda). Makes the tone softer and slightly muted.
- Middle pedal: sostenuto on most grands and many digital pianos. Sustains only the notes held down when you press it. On many uprights it is a practice mute instead. Beginners rarely need it.
A basic pedalling skill to learn early is legato (syncopated) pedalling: play a chord, press the pedal, then as you play the next chord, lift the pedal and press it straight down again just after the new chord sounds. This joins chords smoothly without blurring them together. In written music, the pedal is marked "Ped." with a line or bracket showing how long to hold it.
Articulation: how notes connect
- Legato (shown by a curved slur): smooth and connected. Release each key just as the next one goes down.
- Staccato (a dot above or below the note): short and detached. Bounce off the key.
- Accent (> above the note): play that note louder than those around it.
- Tie (a curved line joining two of the same note): hold for the combined length, don't play it twice.
Ear training: learn to hear the notes
Ear training is the most neglected piano skill, and one of the most useful. A good ear lets you catch your own mistakes, play songs you hear, improvise, and learn pieces faster. You can start from day one with a simple game: hear a note and find it.
Name that note
Press play, listen, then tap the key you heard. Every pianist starts here.
Tip: headphones help.
Do a minute of this at the start of each session. Then build on it: sing a note and find it on the piano; play a simple tune you know by ear, starting on C; listen for whether each next note goes up, down or stays the same. These small habits add up fast.
How to practise piano (a 20-minute plan)
How you practise matters far more than how long. Twenty focused minutes, five or six days a week, will move you forward much faster than a two-hour session on Sunday. Short, frequent sessions give your brain time to consolidate what your fingers learned, and that mostly happens between sessions, not during them.
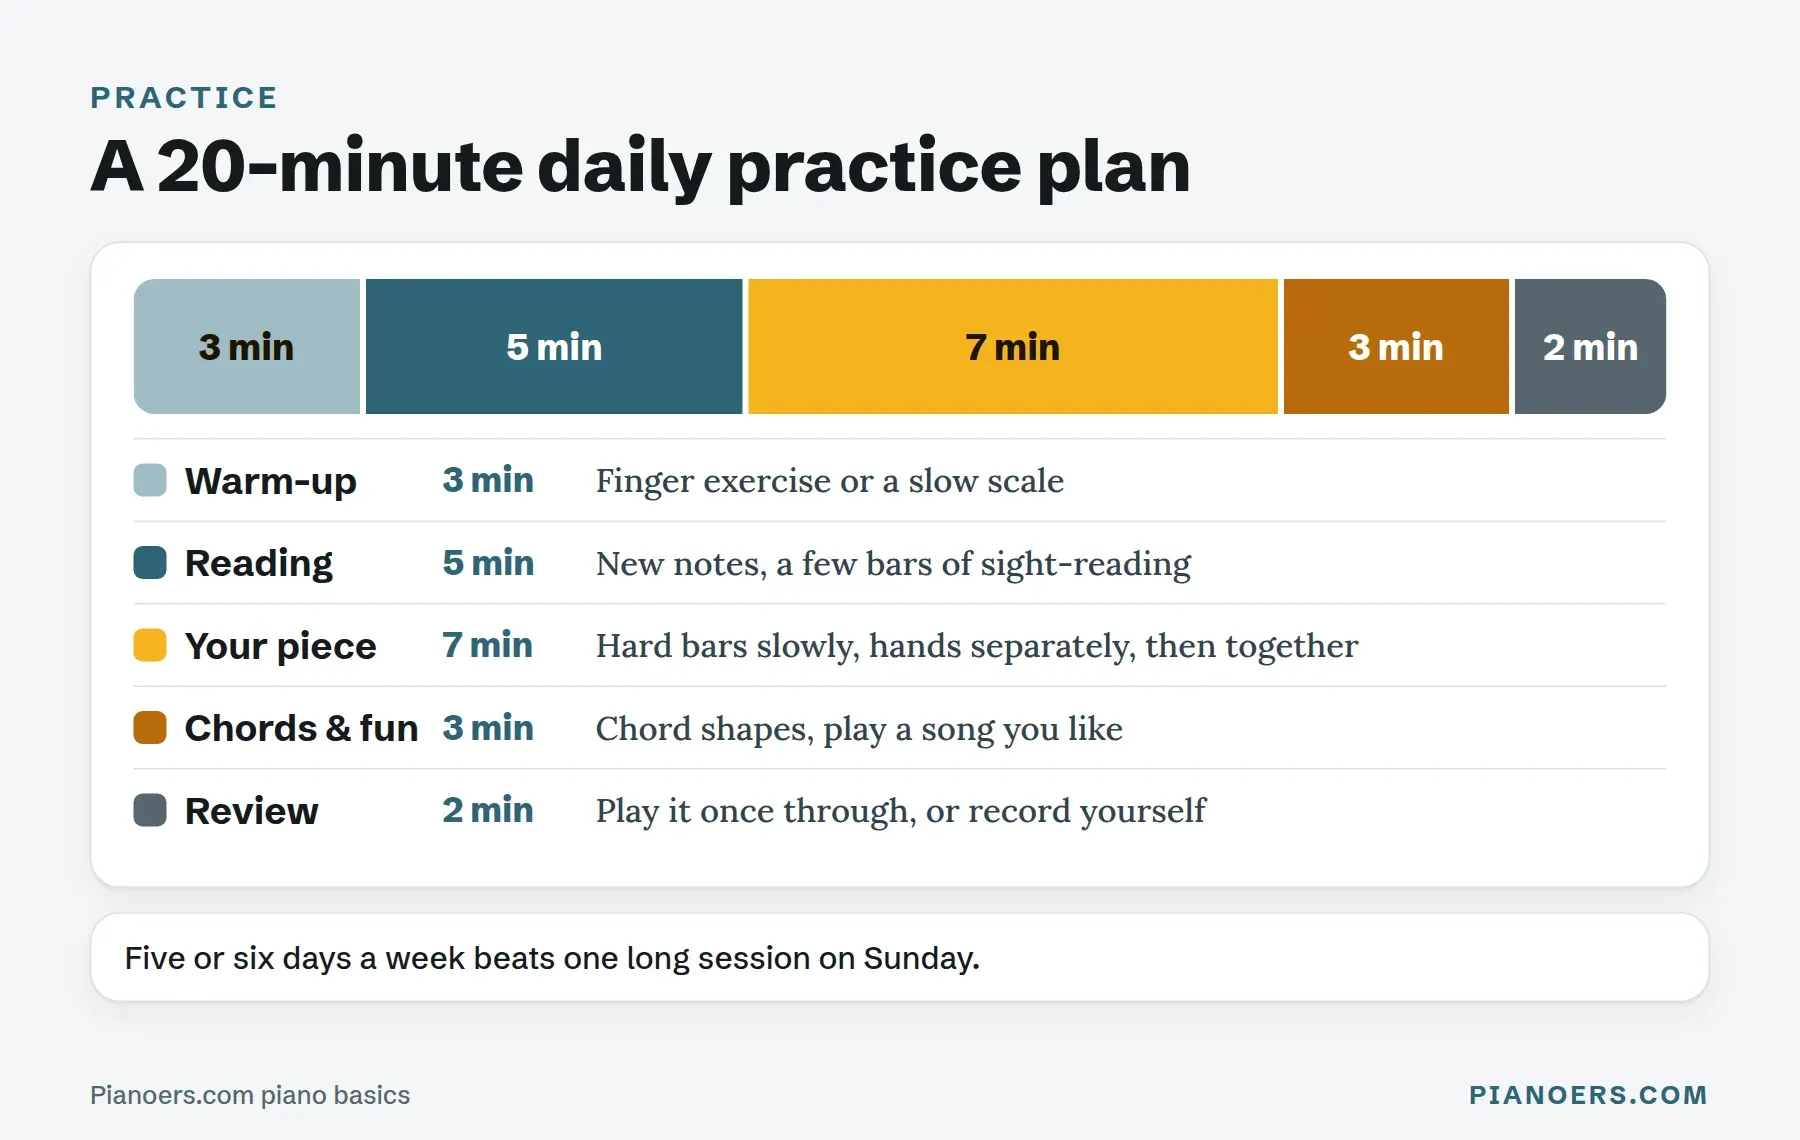
- Warm-up (3 minutes): the five-finger pattern or a slow C major scale, hands separately.
- Reading (5 minutes): a few bars of new, easy music you have never seen. Don't stop for mistakes: keep the beat going.
- Your piece (7 minutes): the main work. Find the hardest bar, practise it slowly and hands separately, then hands together, then put it back in context.
- Chords and fun (3 minutes): play your chord shapes, or a song you love, just for enjoyment.
- Review (2 minutes): play your piece through once without stopping, or record it on your phone and listen back.
Rules that make practice work
- Slow is fast. If you make the same mistake twice, you are playing too fast. Halve the speed.
- Fix the hard bar, not the whole piece. Playing a piece from the top every time means you practise the easy parts most.
- Set a tiny goal for each session: "bars 5–8 hands together at 70 bpm" beats "practise the piece".
- Stop on a good one. End each section with a correct repetition, so that is what your hands remember.
For more on making every session count, see my four piano practice tips for sessions that work.
Easy first songs to play on piano
Here are three melodies that fit entirely in C position with your right hand. Put your thumb on middle C, one finger per key (C D E F G = fingers 1 2 3 4 5), and play the letters in order. The bars (|) show where each bar ends.
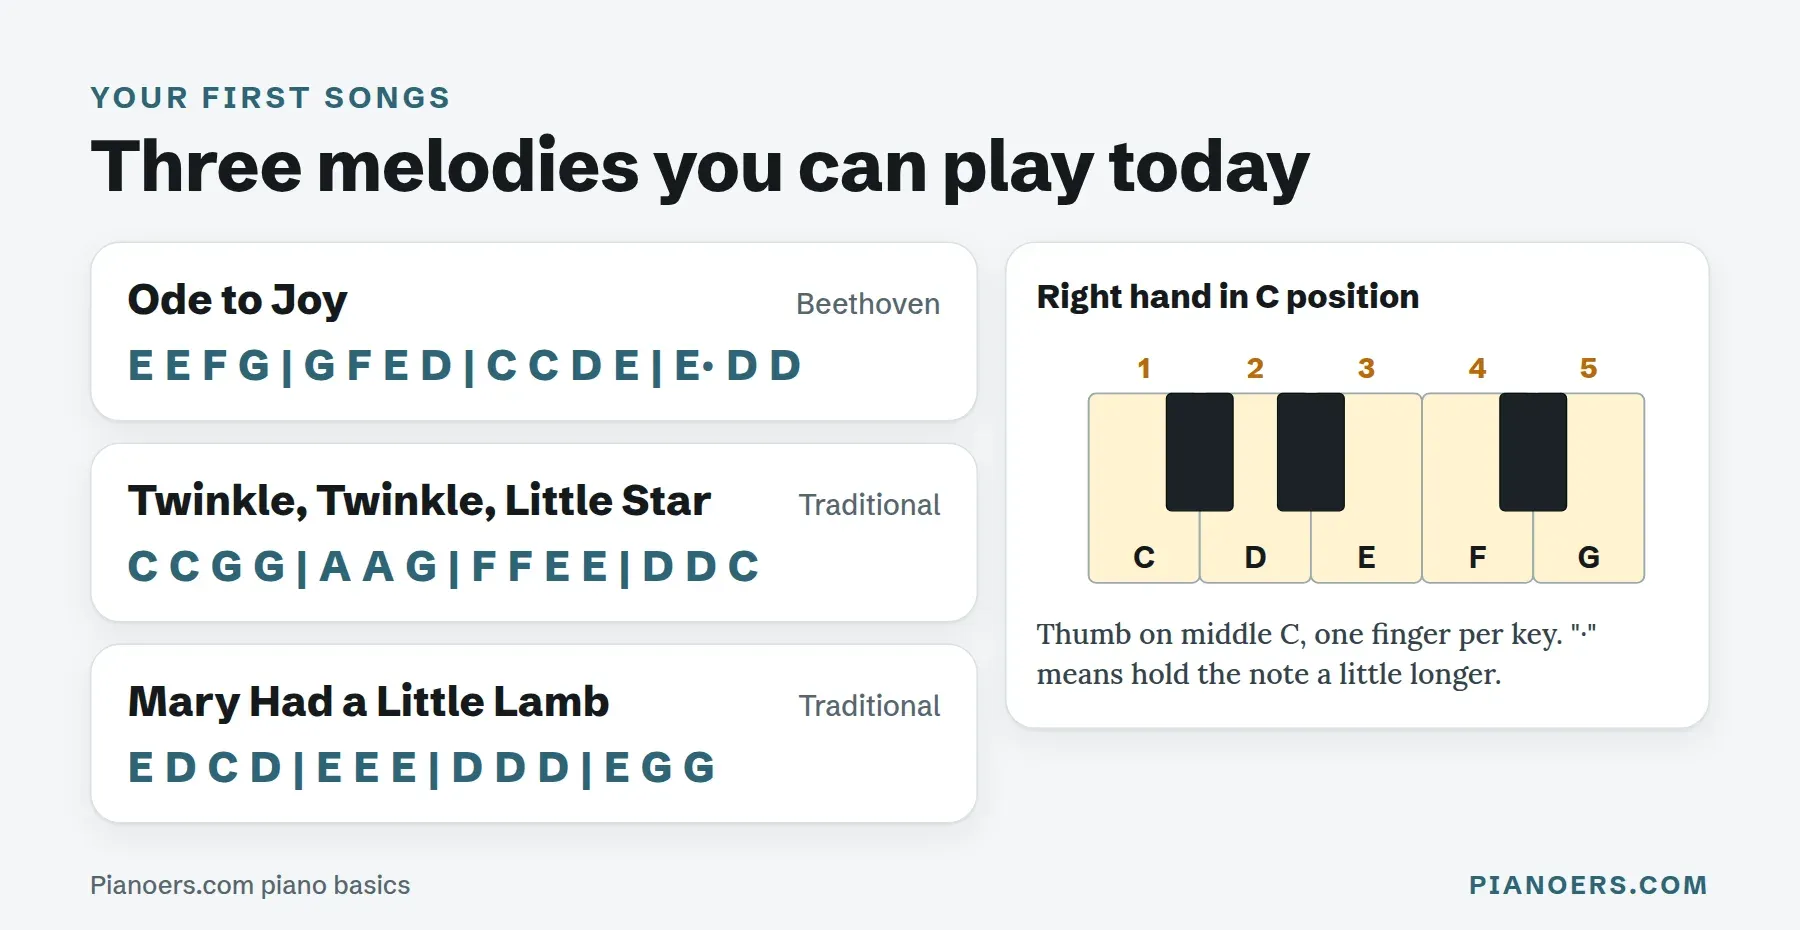
- Ode to Joy (Beethoven): E E F G | G F E D | C C D E | E· D D. The dot means hold that E a little longer.
- Twinkle, Twinkle, Little Star: C C G G | A A G | F F E E | D D C. The A goes just above G: stretch finger 5 over by one key, or shift your hand.
- Mary Had a Little Lamb: E D C D | E E E | D D D | E G G.
Make it a duet with yourself: once the melody is easy, add your left hand playing a low C on the first beat of each bar. For Twinkle, try a left-hand F on the bar that starts with F and a G on the bar that starts with D. You have just harmonised your first song.
What to play next
After C position melodies, good next steps are: simple pop songs with the C–G–Am–F chord pattern; easy classical pieces such as Minuet in G (attributed to Petzold, from the Anna Magdalena Bach notebook); and the first pieces in any good method book. My recommendations for books that actually work for grown-ups are in the best piano books for adult beginners.
Ways to learn piano compared
There is no single right way to learn piano. The best method is the one you will actually stick with, and that depends on your goals, budget and personality. Here is how the main options compare.
| Method | Best for | Cost | Strengths | Weaknesses |
|---|---|---|---|---|
| Private teacher | Classical goals, children, anyone who wants accountability | Highest (weekly lessons) | Personal feedback on posture and technique, catches bad habits early | Expensive, fixed schedule, quality varies |
| Online video course | Self-motivated adults who want songs and understanding | Low to medium, often one-off | Structured path, learn at your own pace, explains the "why" | No one checks your hands |
| Learning app | Busy beginners who like games and instant feedback | Medium (yearly subscription) | Listens and scores your playing, fun, motivating | Can become note-following, not real reading |
| Method book | Readers, tight budgets, pairing with a teacher | Lowest | Proven sequences, great for reading music | No feedback, easy to drift |
Many people do best with a mix: an app or course for structure, plus a few lessons with a teacher to check posture and technique. I have tested the major options in detail:
- The best online piano lessons, my ranked guide to courses and apps.
- The best free and paid piano learning apps, if you want to start without paying.
- Pianoforall for chord-based playing and songs.
- Piano Marvel for sight-reading and classical skills.
- Flowkey and Skoove for learning popular songs with feedback.
- Simply Piano, the best-known app, and where it falls short.
If you want to compare classic teaching approaches (Suzuki, traditional method books, chord-based and more), see the best piano methods to learn quickly.
How long does it take to learn piano?
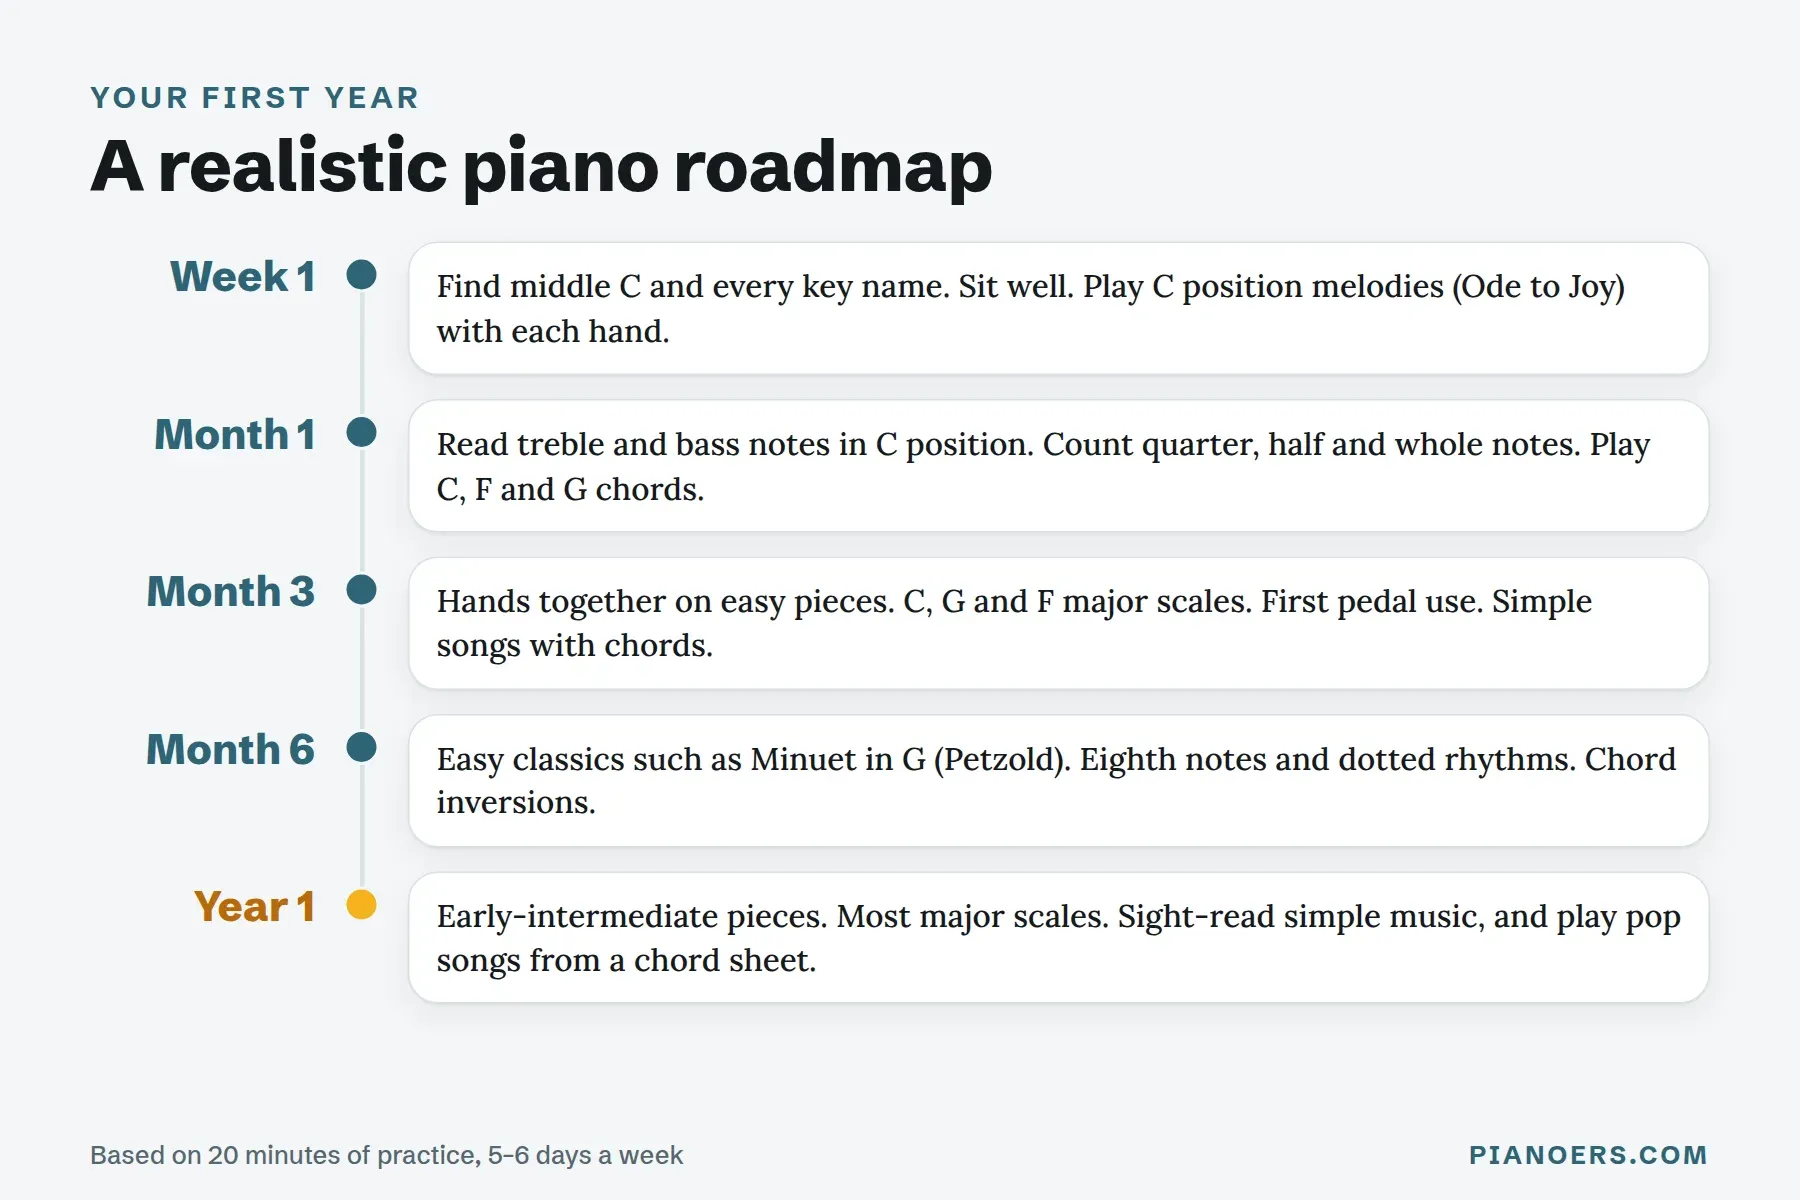
It depends on how you define "learn", and how often you practise. With about 20 minutes a day, five or six days a week, this is a realistic path for an adult beginner:
| When | What you can typically do |
|---|---|
| Week 1 | Find middle C and every key name. Sit well. Play C position melodies such as Ode to Joy with each hand. |
| Month 1 | Read treble and bass notes in C position. Count quarter, half and whole notes. Play C, F and G chords. |
| Month 3 | Play easy pieces hands together. C, G and F major scales. First use of the sustain pedal. Simple songs with chords. |
| Month 6 | Easy classics such as Minuet in G. Eighth notes and dotted rhythms. Chord inversions. |
| Year 1 | Early-intermediate pieces. Most major scales. Sight-read simple music, and play pop songs from a chord sheet. |
Everyone moves at a different pace, and that is fine. Adults often progress faster than children in the first year because they understand concepts quickly; children often catch up later because they practise more freely. The single biggest factor is consistency. For the full step-by-step plan, see how to learn piano by yourself.
Common beginner piano mistakes (and how to fix them)
- Flat fingers and collapsed wrists. Fix: keep the "holding a ball" shape, and check your bench height.
- Ignoring fingering. Fix: write the finger numbers in pencil and follow them every time, even when another finger seems easier.
- Playing too fast. Fix: use a metronome and only speed up after three correct repetitions in a row.
- Always starting from the beginning. Fix: practise the hard bars on their own, then link them back in.
- Not counting. Fix: count out loud, especially through rests and long notes.
- Looking at your hands all the time. Fix: learn the keyboard by feel. Use the black-key groups as landmarks and glance down only when you have to move.
- Holding the sustain pedal down the whole time. Fix: change the pedal with every chord change, and practise without pedal first.
- Tension. Fix: drop your shoulders, breathe, and shake your hands out between repetitions.
- Practising rarely but for a long time. Fix: short daily sessions beat long weekly ones.
- Learning only by following an app's falling notes. Fix: also read real sheet music, even just five minutes a day.
And one non-playing mistake: neglecting the instrument. If you have an acoustic piano, keep it in tune and away from radiators and damp. My guides on cleaning and maintaining your piano and when a piano needs tuning cover the basics.
Piano terms glossary
| Term | Meaning |
|---|---|
| Accidental | A sharp, flat or natural sign added before a note |
| Bar (measure) | A section of music between two bar lines, holding a set number of beats |
| Chord | Three or more notes played at the same time |
| Clef | The symbol at the start of a staff that sets which notes the lines represent |
| Dynamics | How loud or soft the music is played |
| Enharmonic | Two names for the same key, such as C♯ and D♭ |
| Grand staff | The treble and bass staffs joined together for piano music |
| Half step (semitone) | The distance from one key to the very next key |
| Interval | The distance between two notes |
| Inversion | A chord with a note other than the root at the bottom |
| Key signature | Sharps or flats at the start of each line that apply throughout the piece |
| Ledger line | A short extra line for notes above or below the staff |
| Legato | Smooth and connected |
| Metronome | A device or app that clicks a steady beat at a set speed |
| Middle C | The C nearest the middle of the keyboard (C4) |
| Octave | The distance from one note to the next note of the same name, 12 half steps |
| Root | The note a chord is named after |
| Scale | A set of notes played in order, up or down |
| Staccato | Short and detached |
| Tempo | The speed of the music, often in beats per minute (bpm) |
| Time signature | The two numbers that show how many beats are in each bar and which note gets the beat |
| Triad | A three-note chord built from alternating keys, such as C E G |
| Whole step (tone) | Two half steps |
Piano basics FAQ
What should a beginner learn first on piano?
Start with the layout of the keyboard: find middle C and learn the names of the white keys using the groups of two and three black keys. Then learn good posture and finger numbers, and play five-finger melodies in C position. Reading music, rhythm and chords build on those foundations.
How many keys does a piano have?
A standard piano has 88 keys: 52 white keys and 36 black keys, covering just over seven octaves from A0 to C8. Smaller keyboards have 61 or 76 keys.
Where is middle C on a piano?
Middle C is the C closest to the centre of the keyboard. On an 88-key piano it is the fourth C from the left, which is why it is called C4. Every C is the white key just to the left of a group of two black keys.
Can I teach myself piano?
Yes. Many adults teach themselves with online courses, apps and method books. The main risks are bad posture and skipped fundamentals, so follow a structured course and consider a few lessons with a teacher to check your technique. My guide to learning piano by yourself lays out a full plan.
How long does it take to learn piano?
With 20 minutes of practice five or six days a week, most adult beginners can play simple songs with both hands in two to three months, easy classical pieces in about six months, and early-intermediate music within a year.
Do I need to read music to play piano?
No, you can play from chord charts or by ear, and many pop and jazz pianists do. But reading music opens up the full written repertoire and speeds up learning new pieces, so it is worth learning the basics.
Is a 61-key keyboard enough for a beginner?
It is fine for the first few months. For long-term learning, an 88-key digital piano with weighted, touch-sensitive keys and a sustain pedal is much better, because it feels and responds like a real piano.
Is piano hard to learn for adults?
Piano is one of the most beginner-friendly instruments: every key produces a correct note, and you can see the whole pattern of notes in front of you. Adults usually learn concepts faster than children. The hardest part is coordinating both hands, which improves steadily with slow, regular practice.
How many hours a day should I practise piano?
For beginners, 15 to 30 minutes a day is enough. Consistency matters more than length: daily short sessions build skills faster than occasional long ones.
What are the easiest songs to learn on piano?
Ode to Joy, Twinkle Twinkle Little Star and Mary Had a Little Lamb all fit in C position with one hand. After those, try simple pop songs built on the C, G, A minor and F chords.
Your next steps
You now know more about the piano than most people who have owned one for years. Here is what to do next:
- Today: find every C, F and D on your keyboard, check your posture, and play the five-finger pattern in C position with each hand.
- This week: play Ode to Joy with your right hand, and learn the C, F and G chords.
- This month: start the 20-minute practice plan, learn the treble and bass clef notes in C position, and try your first piece hands together.
- Choose how you will keep learning: compare the options in my guide to the best online piano lessons, or follow the free plan in how to learn piano by yourself.
- Need an instrument? Start with my tested beginner pianos.
- Print it: download the free PDF version of this guide, with a worksheet and practice log.
Bookmark this page and come back to the diagrams whenever you need them. Every pianist started exactly where you are now.



Comments ()