
Piano Scales for Beginners: The First 9 Scales to Learn (With Fingerings and a Free Chart)
Which piano scales to learn first, in what order, and with which fingers. A piano teacher's guide with a play-along scale player and a free printable chart.
On this page
Quick answer
Which piano scales should beginners learn first?
Start with C major (all white keys) and its relative minor, A minor. Then learn G major and E minor (one sharp, F♯), F major and D minor (one flat, B♭), and finally D, A and E major. Play each one octave, hands separately, with the standard fingering: right hand 1 2 3 1 2 3 4 5, left hand 5 4 3 2 1 3 2 1. That one fingering works for 8 of these 9 scales; only F major's right hand changes (1 2 3 4 1 2 3 4). Ten minutes a day is enough, and most beginners get through all nine in two to three months.
Scales have a bad reputation. Most adults I teach remember them as the boring bit, the thing you did before you were allowed to play actual music. I understand. But when a student tells me a piece "just won't go into my fingers", the fix is almost always hiding in a scale. Scales are where your hand learns the shape of a key, where your thumb learns to tuck under without a bump, and where your ear learns what "in tune with the key" sounds like.
The good news is that beginners don't need many. You need about nine basic piano scales, in a sensible order, with the right fingers, practised for a few minutes a day. This guide gives you exactly that: the order I use with my own students, a fingering diagram for every scale, a scale player you can try right here, a 10-minute routine, and a printable chart for your music stand.
If the keyboard itself still feels like a sea of identical keys, read my piano basics guide first. It shows you how to find every note in a few minutes, and everything below will make more sense.
What is a piano scale?
A piano scale is a set of notes played one after another, going up or down, that follows a fixed pattern of steps. Most of the scales beginners learn have seven different notes, and you finish on the note you started from, one octave higher. So C major is C D E F G A B, then C again.
The name tells you two things. The letter is the starting note, also called the key note or tonic. The word after it, "major" or "minor", tells you which pattern of steps to follow. Major scales tend to sound bright and settled. Minor scales sound darker or more wistful. Play C major and then A minor and you'll hear the difference straight away, even though both use only white keys.
Why bother? Because nearly every piece you'll play is built from a scale. A piece "in G major" uses the notes of the G major scale most of the time. When your fingers already know that scale, the piece feels familiar before you've even started reading it.
Which piano scale should you learn first?
Learn C major first. It uses only white keys, so you can think about one thing: your fingers. There are no sharps or flats to remember and no black keys to aim for. Every other scale is easier once your hand has learned C major's fingering, because most of them use the same finger pattern.
Your second scale should be A minor. It uses exactly the same notes as C major, just starting on A, so it's the gentlest possible introduction to minor scales. Pairs like this are called relative major and minor scales, and they're a lovely shortcut: learn one, and you already know the notes of the other.
The best order to learn piano scales
Here's the order I give beginners. It adds one sharp or one flat at a time, keeps the fingering the same for as long as possible, and pairs each major scale with its relative minor so you learn two scales from one set of notes.
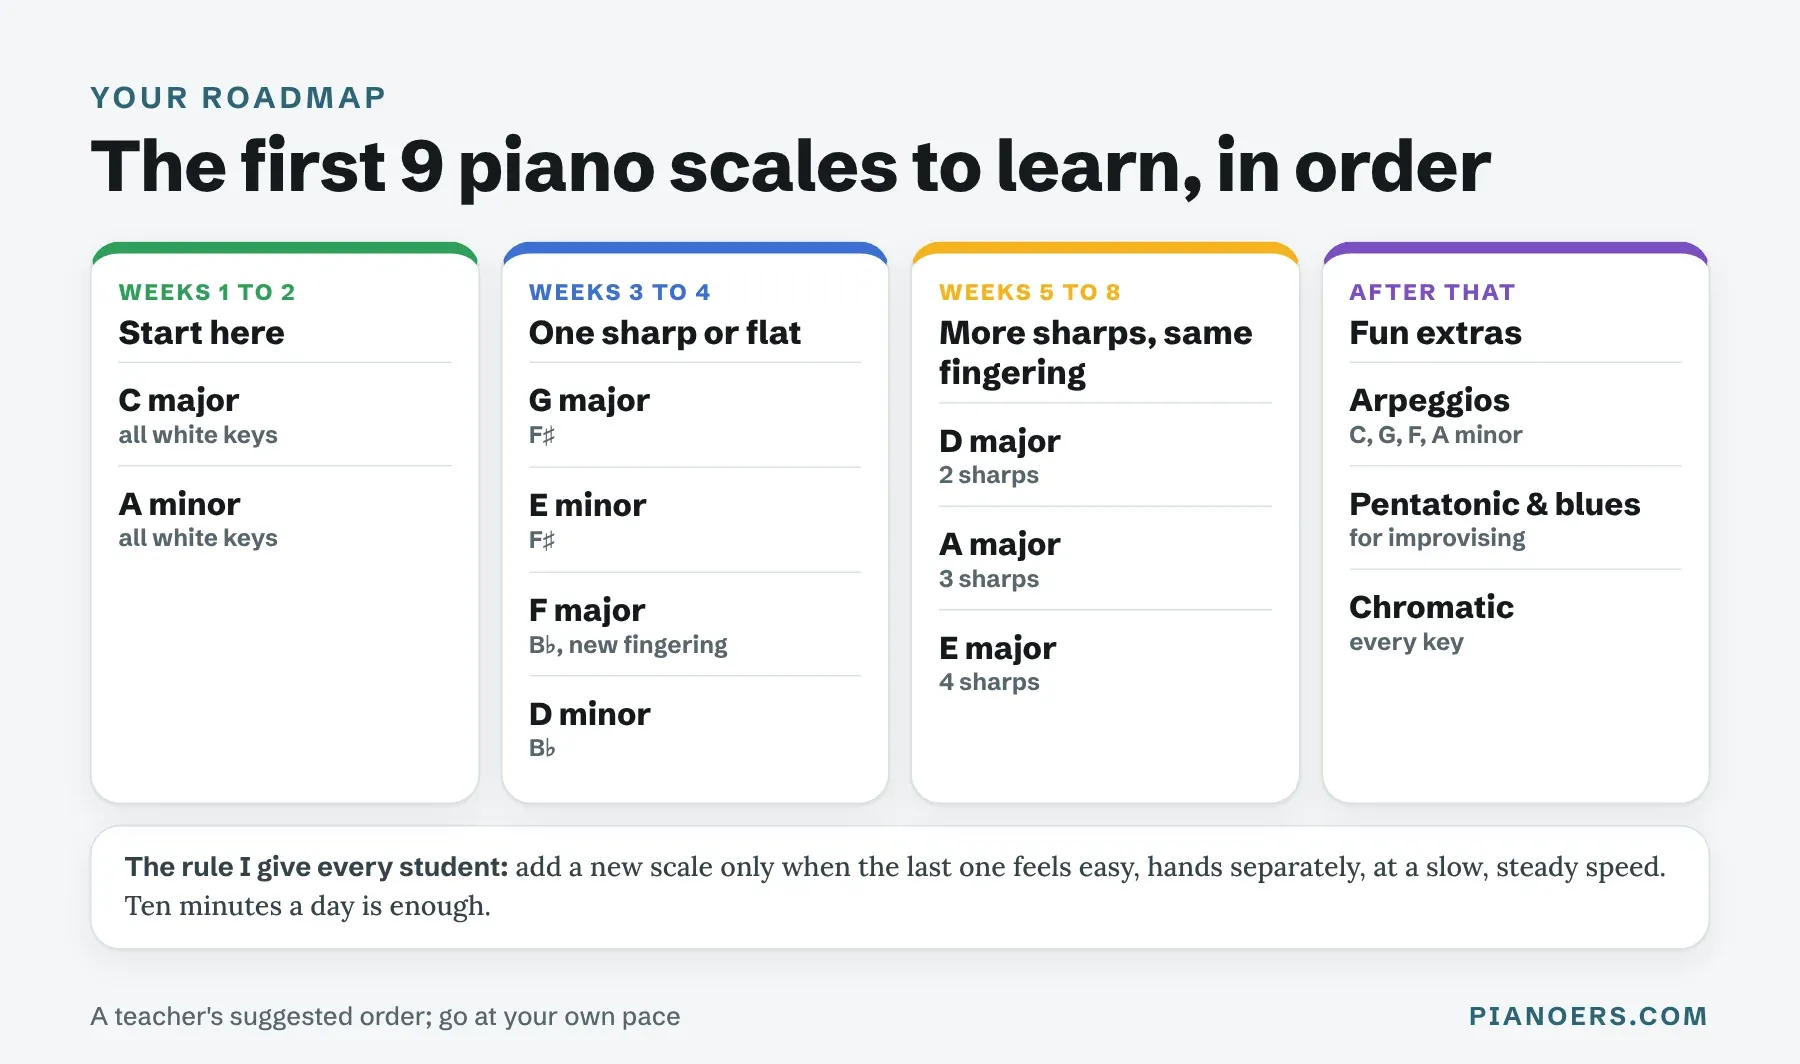
- Weeks 1 to 2: C major and A minor. All white keys. Your only job is the fingering and an even sound.
- Weeks 3 to 4: G major, E minor, F major and D minor. One sharp (F♯) or one flat (B♭) each. F major brings the only new fingering on this list.
- Weeks 5 to 8: D major, A major and E major. Two, three, then four sharps, with the same fingering as C major. These feel surprisingly comfortable, because the black keys sit right under your longer fingers.
- After that: arpeggios, the pentatonic and blues scales, and the chromatic scale. They're covered further down.
The rule I give every student: add a new scale only when the last one feels easy, hands separately, at a slow and steady speed. If week 3 takes you three weeks, that's fine. Rushing ahead with a shaky C major just means carrying the same wobble into every scale after it.
Try it: play along with any of the 9 scales
Pick a scale and a hand, then press Play. The player shows the finger number for every note and plays the scale up and down at the speed you choose. Start slowly, and play along on your own piano: watch the finger, hear the note, copy it.
Tip: tap any key to hear it.
How to play the C major scale on piano
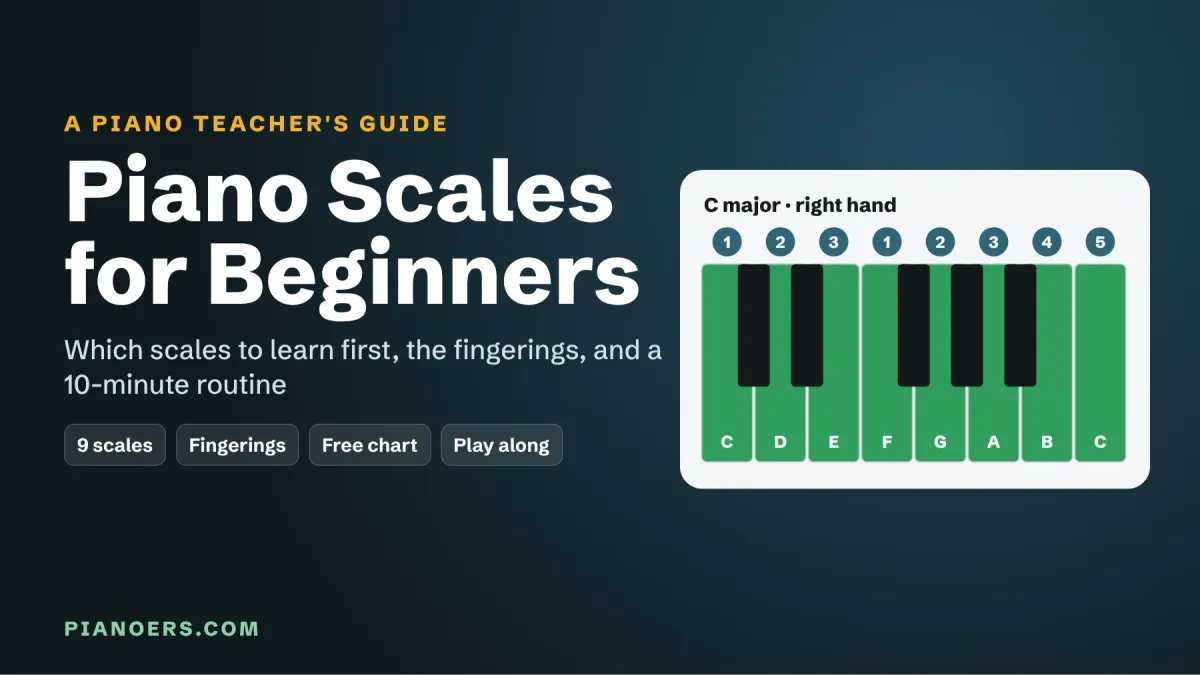
To play the C major scale, start on middle C and play every white key up to the next C: C D E F G A B C. With the right hand, use fingers 1 2 3 on C D E, tuck your thumb under to play F, then use 1 2 3 4 5 on F G A B C. With the left hand, start with your little finger: 5 4 3 2 1 on C D E F G, cross finger 3 over your thumb onto A, then play 2 1 on B and C.
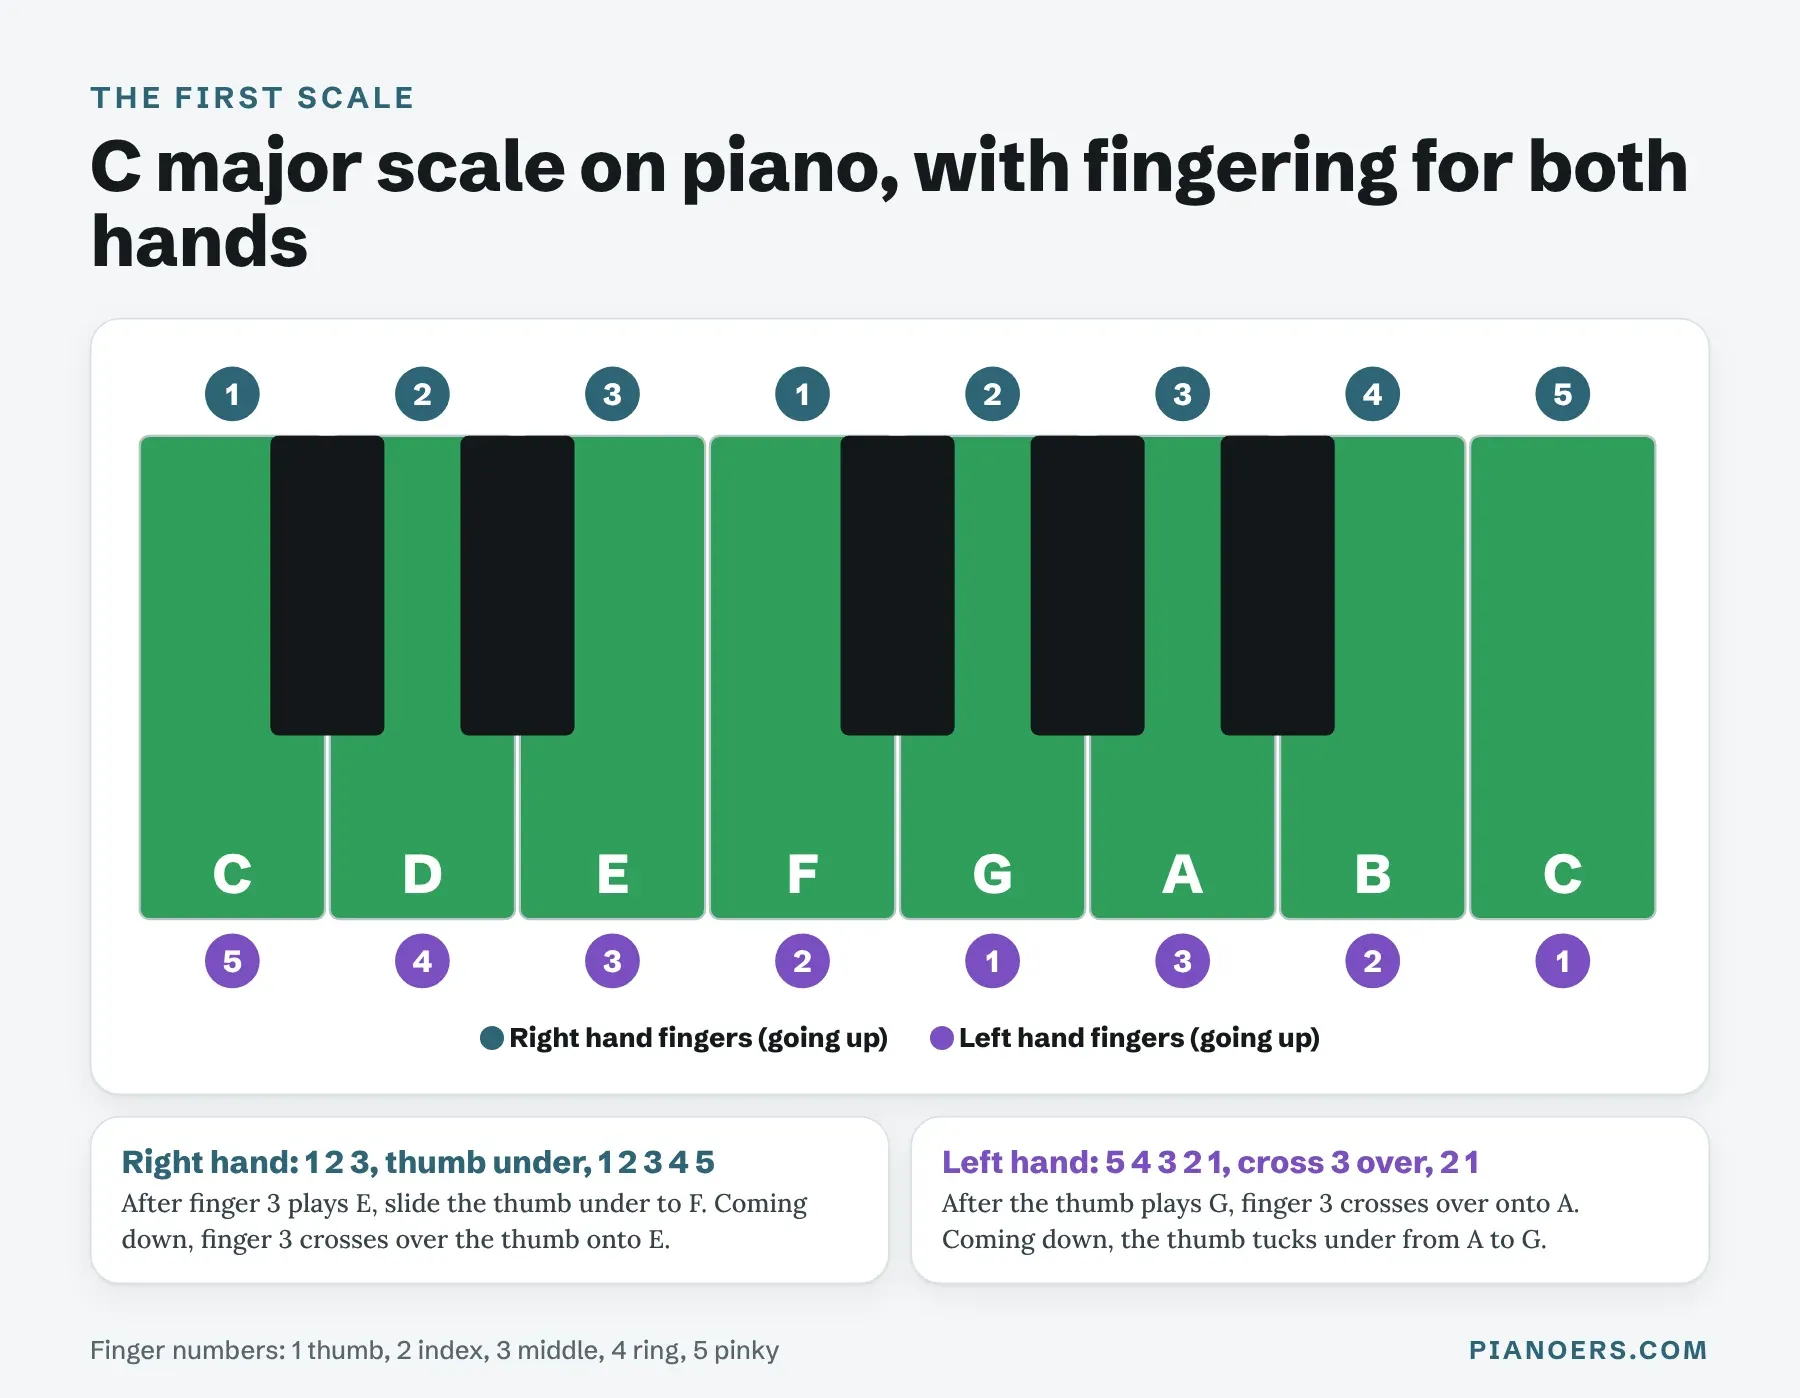
Finger numbers are the same for both hands: 1 is the thumb, 2 the index finger, 3 the middle finger, 4 the ring finger and 5 the little finger. Because your hands are mirror images, the left hand starts the scale with its little finger, while the right hand starts with its thumb.
Coming down, reverse everything. The right hand plays 5 4 3 2 1, then finger 3 crosses over the thumb onto E. The left hand plays 1 2, then tucks the thumb under to G, and finishes 1 2 3 4 5.
 Play video: C Major Scale Fingering (1 Octave, Hands Separately) (YouTube)
The pattern behind every major and minor scale
Every major scale follows the same pattern of whole steps (W) and half steps (H): W W H W W W H. Every natural minor scale follows W H W W H W W. A half step is the very next key, black or white, with nothing in between. A whole step is two half steps, so you skip one key.
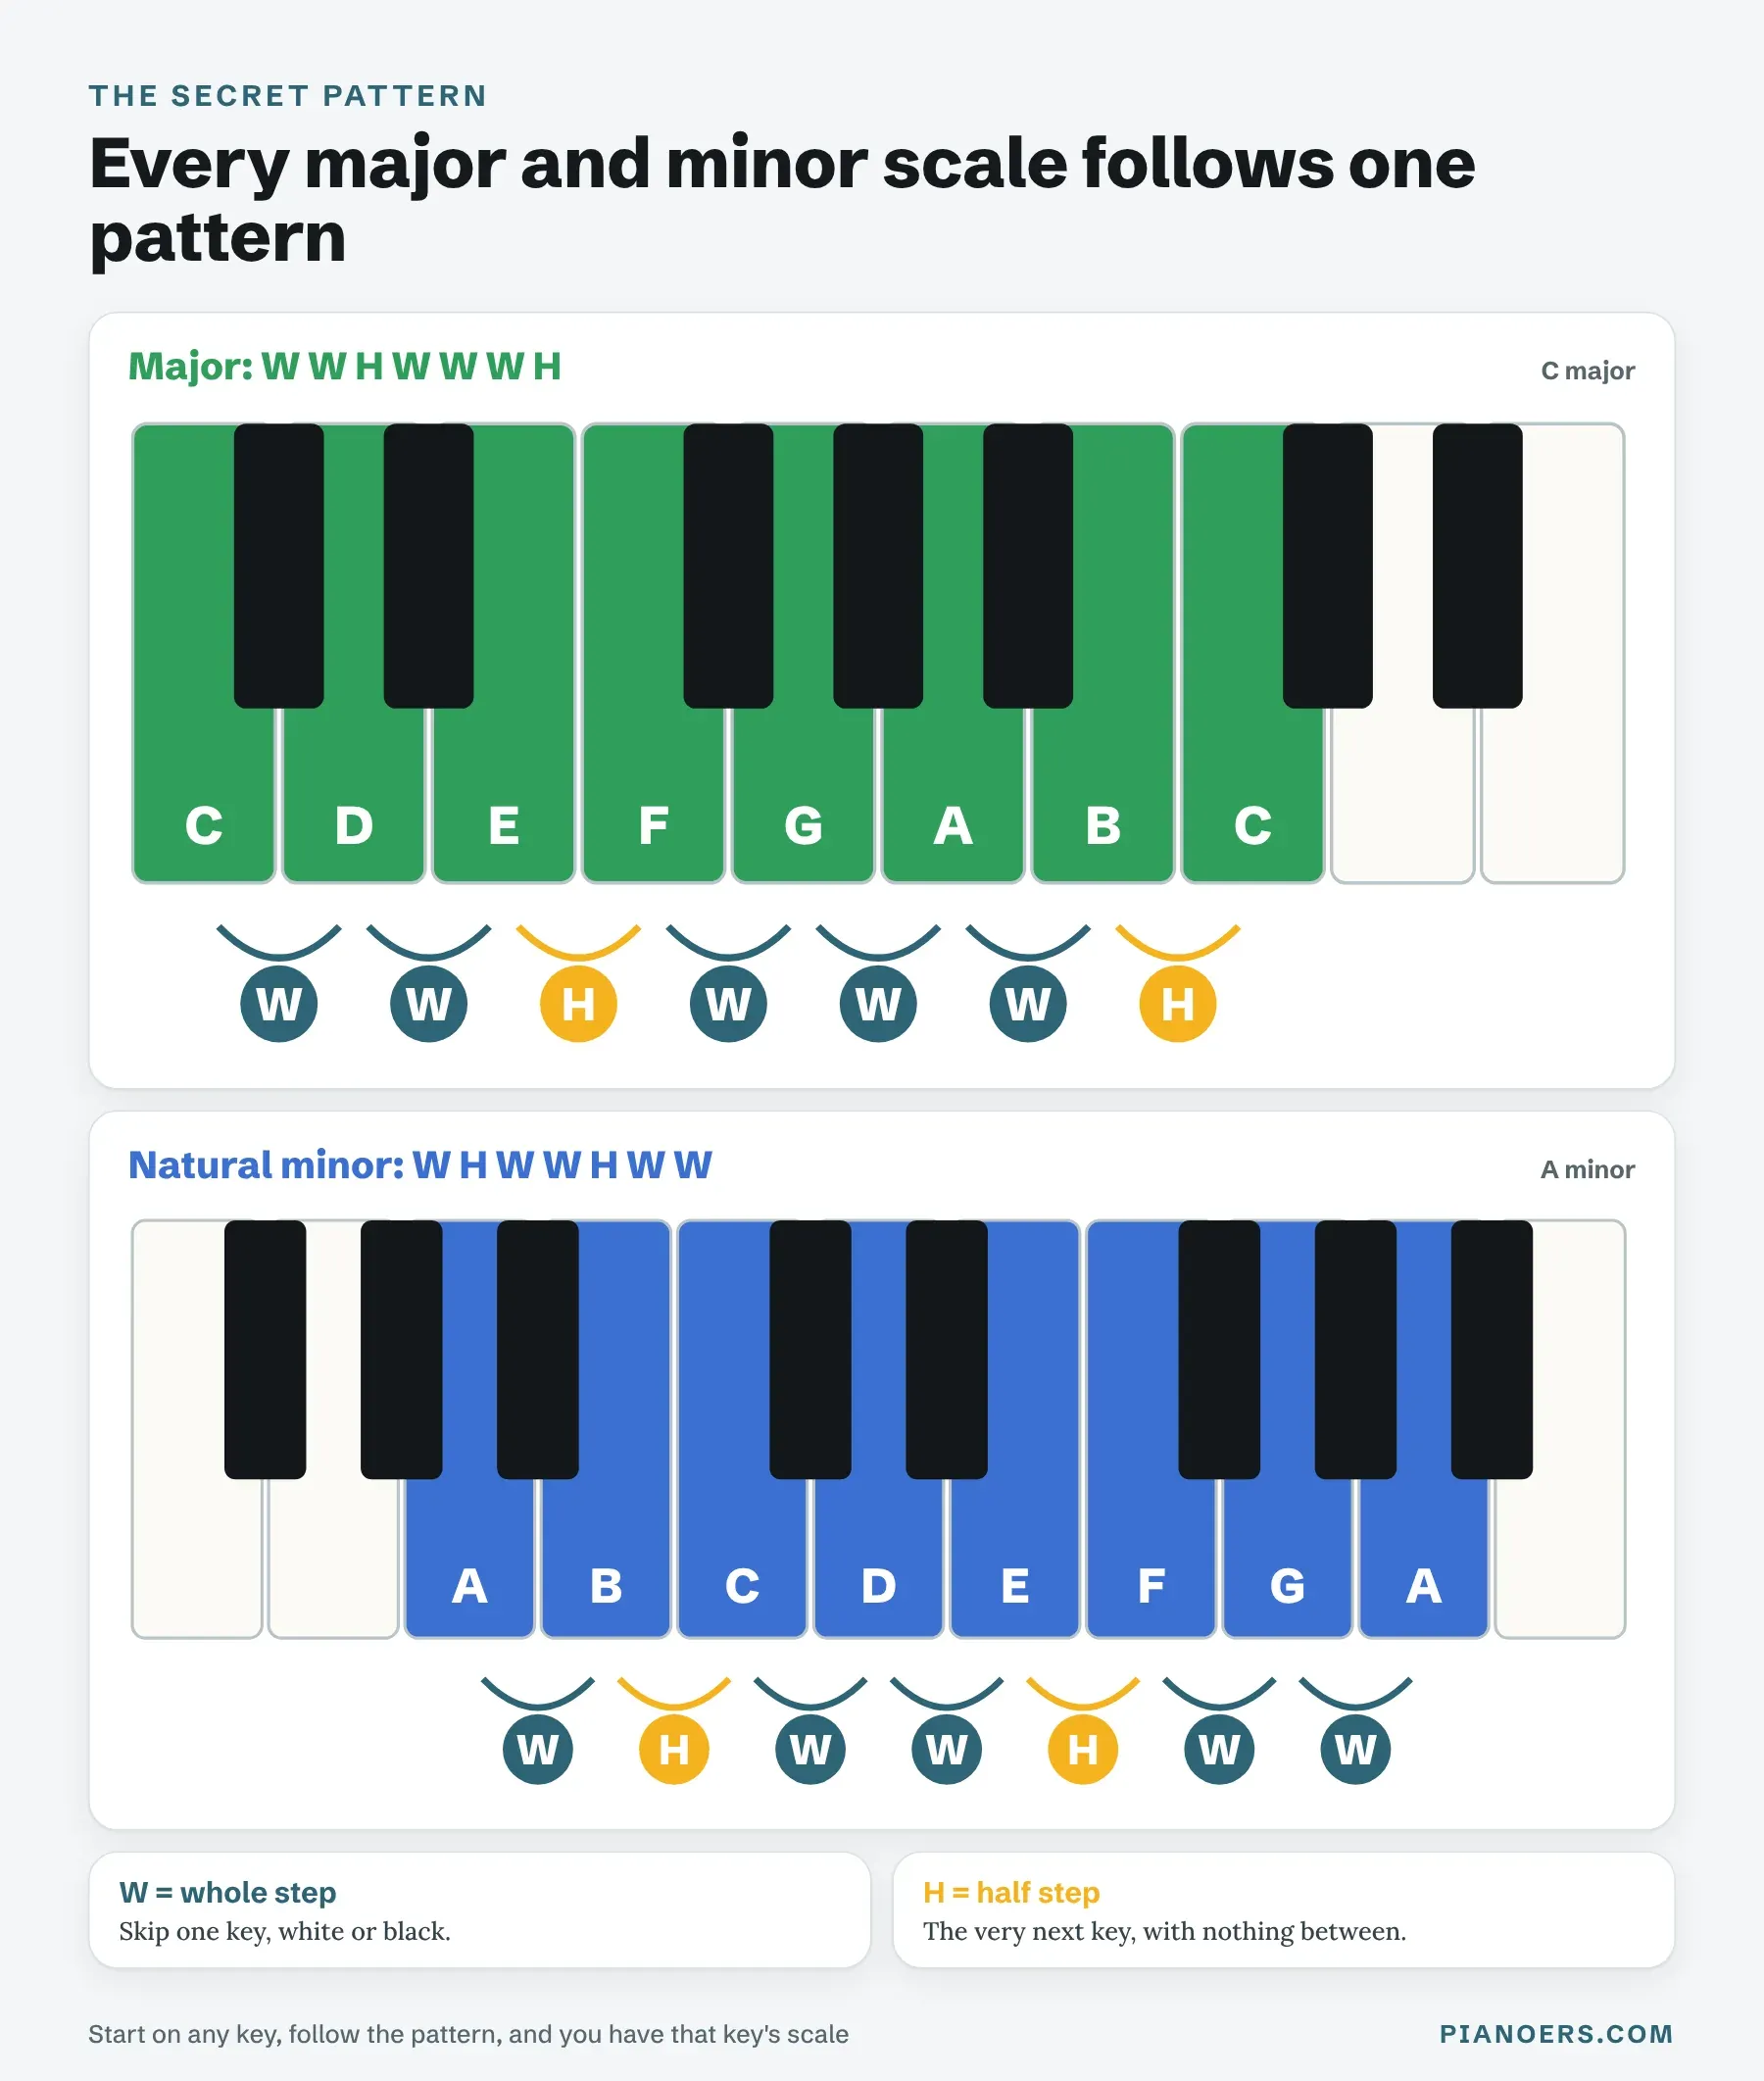
This is the part that changes how students think about scales. You don't have to memorise 24 separate lists of notes. Start on any key, follow the pattern, and the pattern tells you which black keys you need. Start on G and follow W W H W W W H: G, A, B, C, D, E, and then a whole step up from E lands on F♯, not F. That's why G major has one sharp.
Try it yourself with D. You'll find you need two black keys, F♯ and C♯. Working out a scale this way once is worth more than reading the answer, because you'll never wonder again where the sharps come from.
Piano scale fingering: one pattern covers 8 of your first 9 scales
Here's what nobody told me when I started: for the first nine scales, you mostly need one fingering. C, G, D, A and E major, and A, E and D minor, all use right hand 1 2 3 1 2 3 4 5 and left hand 5 4 3 2 1 3 2 1 for one octave. The only exception is F major, whose right hand plays 1 2 3 4 1 2 3 4.
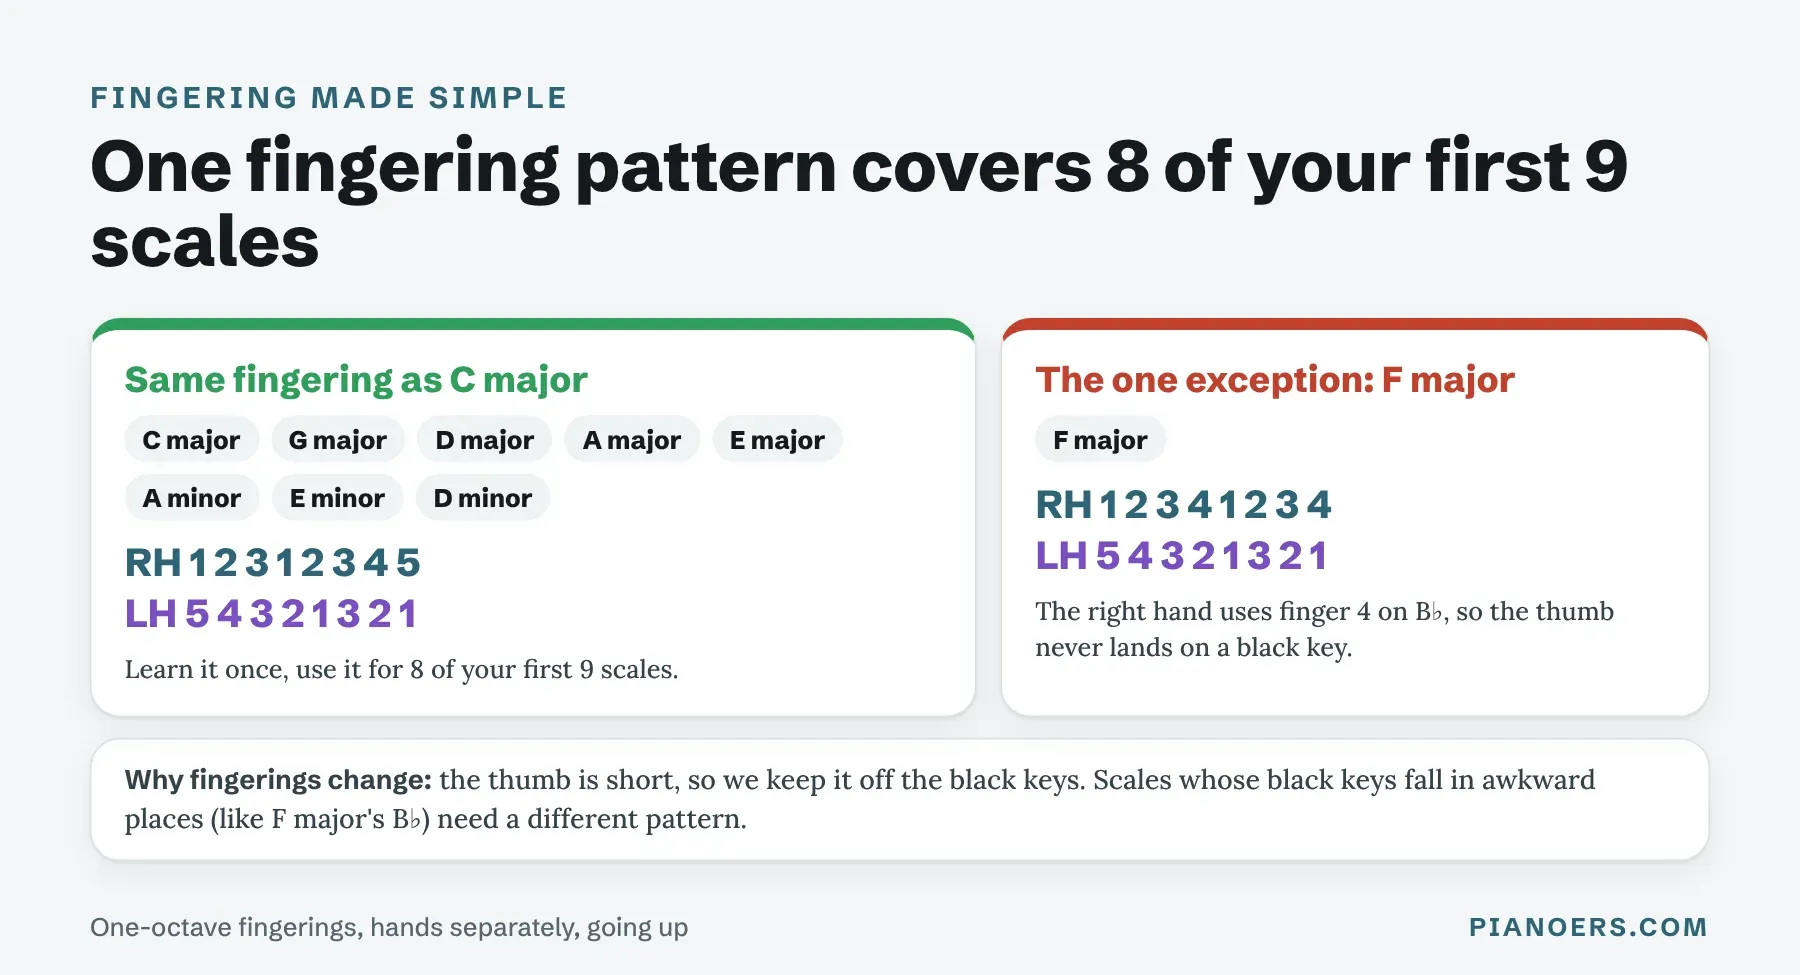
Why does F major break the rule? The guiding principle of scale fingering is simple: keep the thumb off the black keys. Your thumb is short, and placing it on a raised black key twists your hand. In F major, the standard fingering would put the right thumb right on B♭. Using finger 4 on B♭ and tucking the thumb under to C solves it.
Fingerings in this guide are for one octave, hands separately, which is where every beginner should start. When you later play two octaves, the fingers continue the same idea, and some scales change slightly at the top. Your teacher or method book will show you when you get there.
How to play the thumb-under move smoothly
The hardest part of any scale is the moment your thumb passes under your hand. In the right hand going up, it happens after finger 3: you play E with finger 3, and your thumb slides under to play F. Done badly, it creates a bump, a little accent or gap that makes the scale sound uneven.
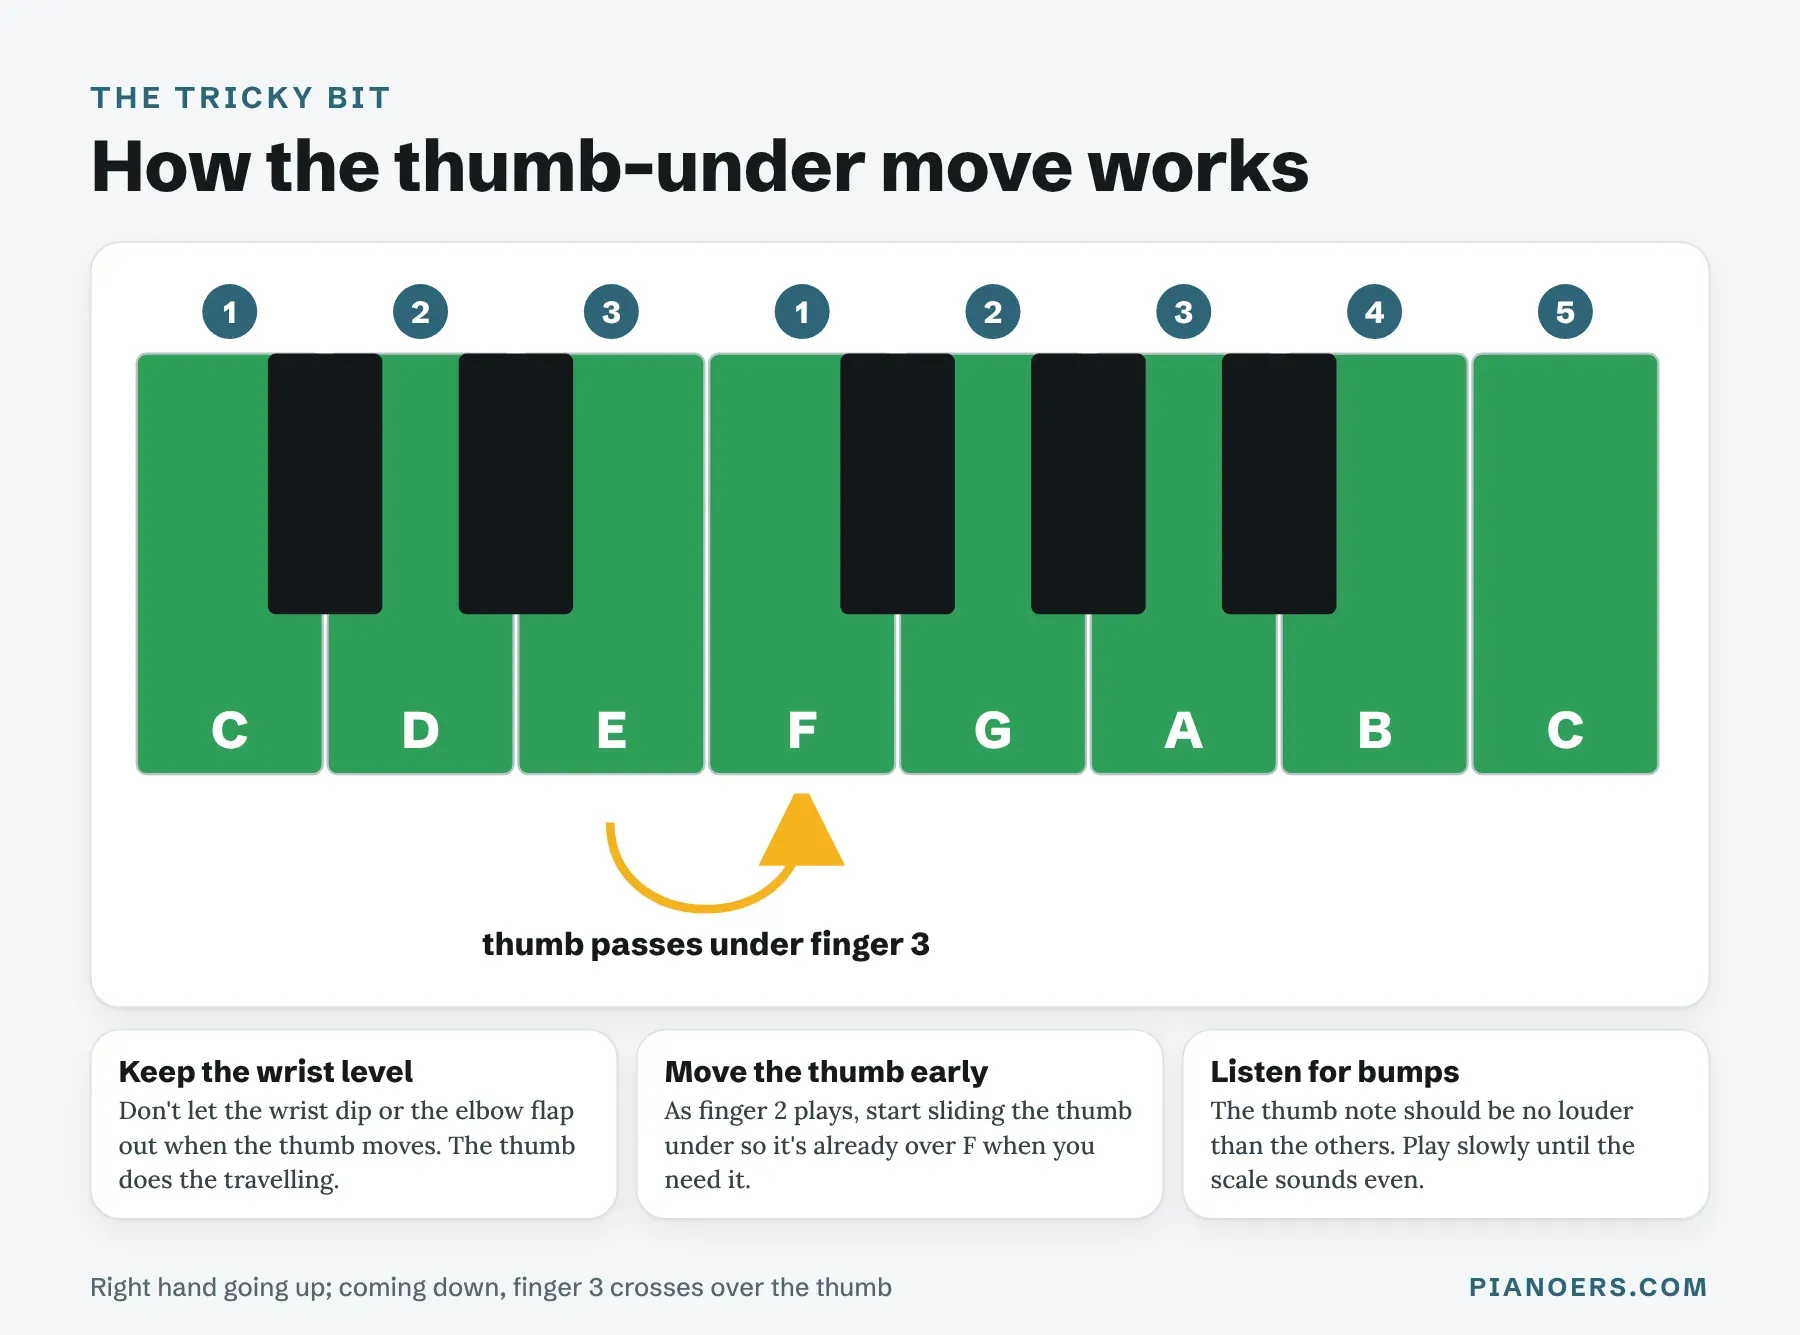
Three things fix it:
- Move the thumb early. As finger 2 plays D, start drifting your thumb under your palm toward F. By the time finger 3 plays E, the thumb should already be hovering over F.
- Keep your wrist level. Watch for the wrist dropping or the elbow flapping out to the side. The thumb does the travelling; the rest of your arm just glides sideways.
- Listen for the bump. The thumb note is often louder than the others, because the thumb is the heaviest finger. Play very slowly and try to make F sound exactly like E and G.
The left hand has the mirror-image problem. Going up, finger 3 crosses over the thumb, from G to A. Coming down, the thumb tucks under again. Practise just those two notes back and forth for a minute before you play the whole scale.
 Play video: Thumb under technique in scales, right hand (YouTube)
Beginner piano scales chart: notes and fingerings
Once C major feels easy, here are the rest of your first nine scales. The table gives you everything at a glance; the chart below shows where each scale sits on the keyboard.
| Scale | Notes | Sharps or flats | Right hand | Left hand |
|---|---|---|---|---|
| C major | C D E F G A B C | No sharps or flats | 1 2 3 1 2 3 4 5 | 5 4 3 2 1 3 2 1 |
| A minor | A B C D E F G A | No sharps or flats | 1 2 3 1 2 3 4 5 | 5 4 3 2 1 3 2 1 |
| G major | G A B C D E F♯ G | 1 sharp: F♯ | 1 2 3 1 2 3 4 5 | 5 4 3 2 1 3 2 1 |
| E minor | E F♯ G A B C D E | 1 sharp: F♯ | 1 2 3 1 2 3 4 5 | 5 4 3 2 1 3 2 1 |
| F major | F G A B♭ C D E F | 1 flat: B♭ | 1 2 3 4 1 2 3 4 | 5 4 3 2 1 3 2 1 |
| D minor | D E F G A B♭ C D | 1 flat: B♭ | 1 2 3 1 2 3 4 5 | 5 4 3 2 1 3 2 1 |
| D major | D E F♯ G A B C♯ D | 2 sharps: F♯, C♯ | 1 2 3 1 2 3 4 5 | 5 4 3 2 1 3 2 1 |
| A major | A B C♯ D E F♯ G♯ A | 3 sharps: F♯, C♯, G♯ | 1 2 3 1 2 3 4 5 | 5 4 3 2 1 3 2 1 |
| E major | E F♯ G♯ A B C♯ D♯ E | 4 sharps: F♯, C♯, G♯, D♯ | 1 2 3 1 2 3 4 5 | 5 4 3 2 1 3 2 1 |
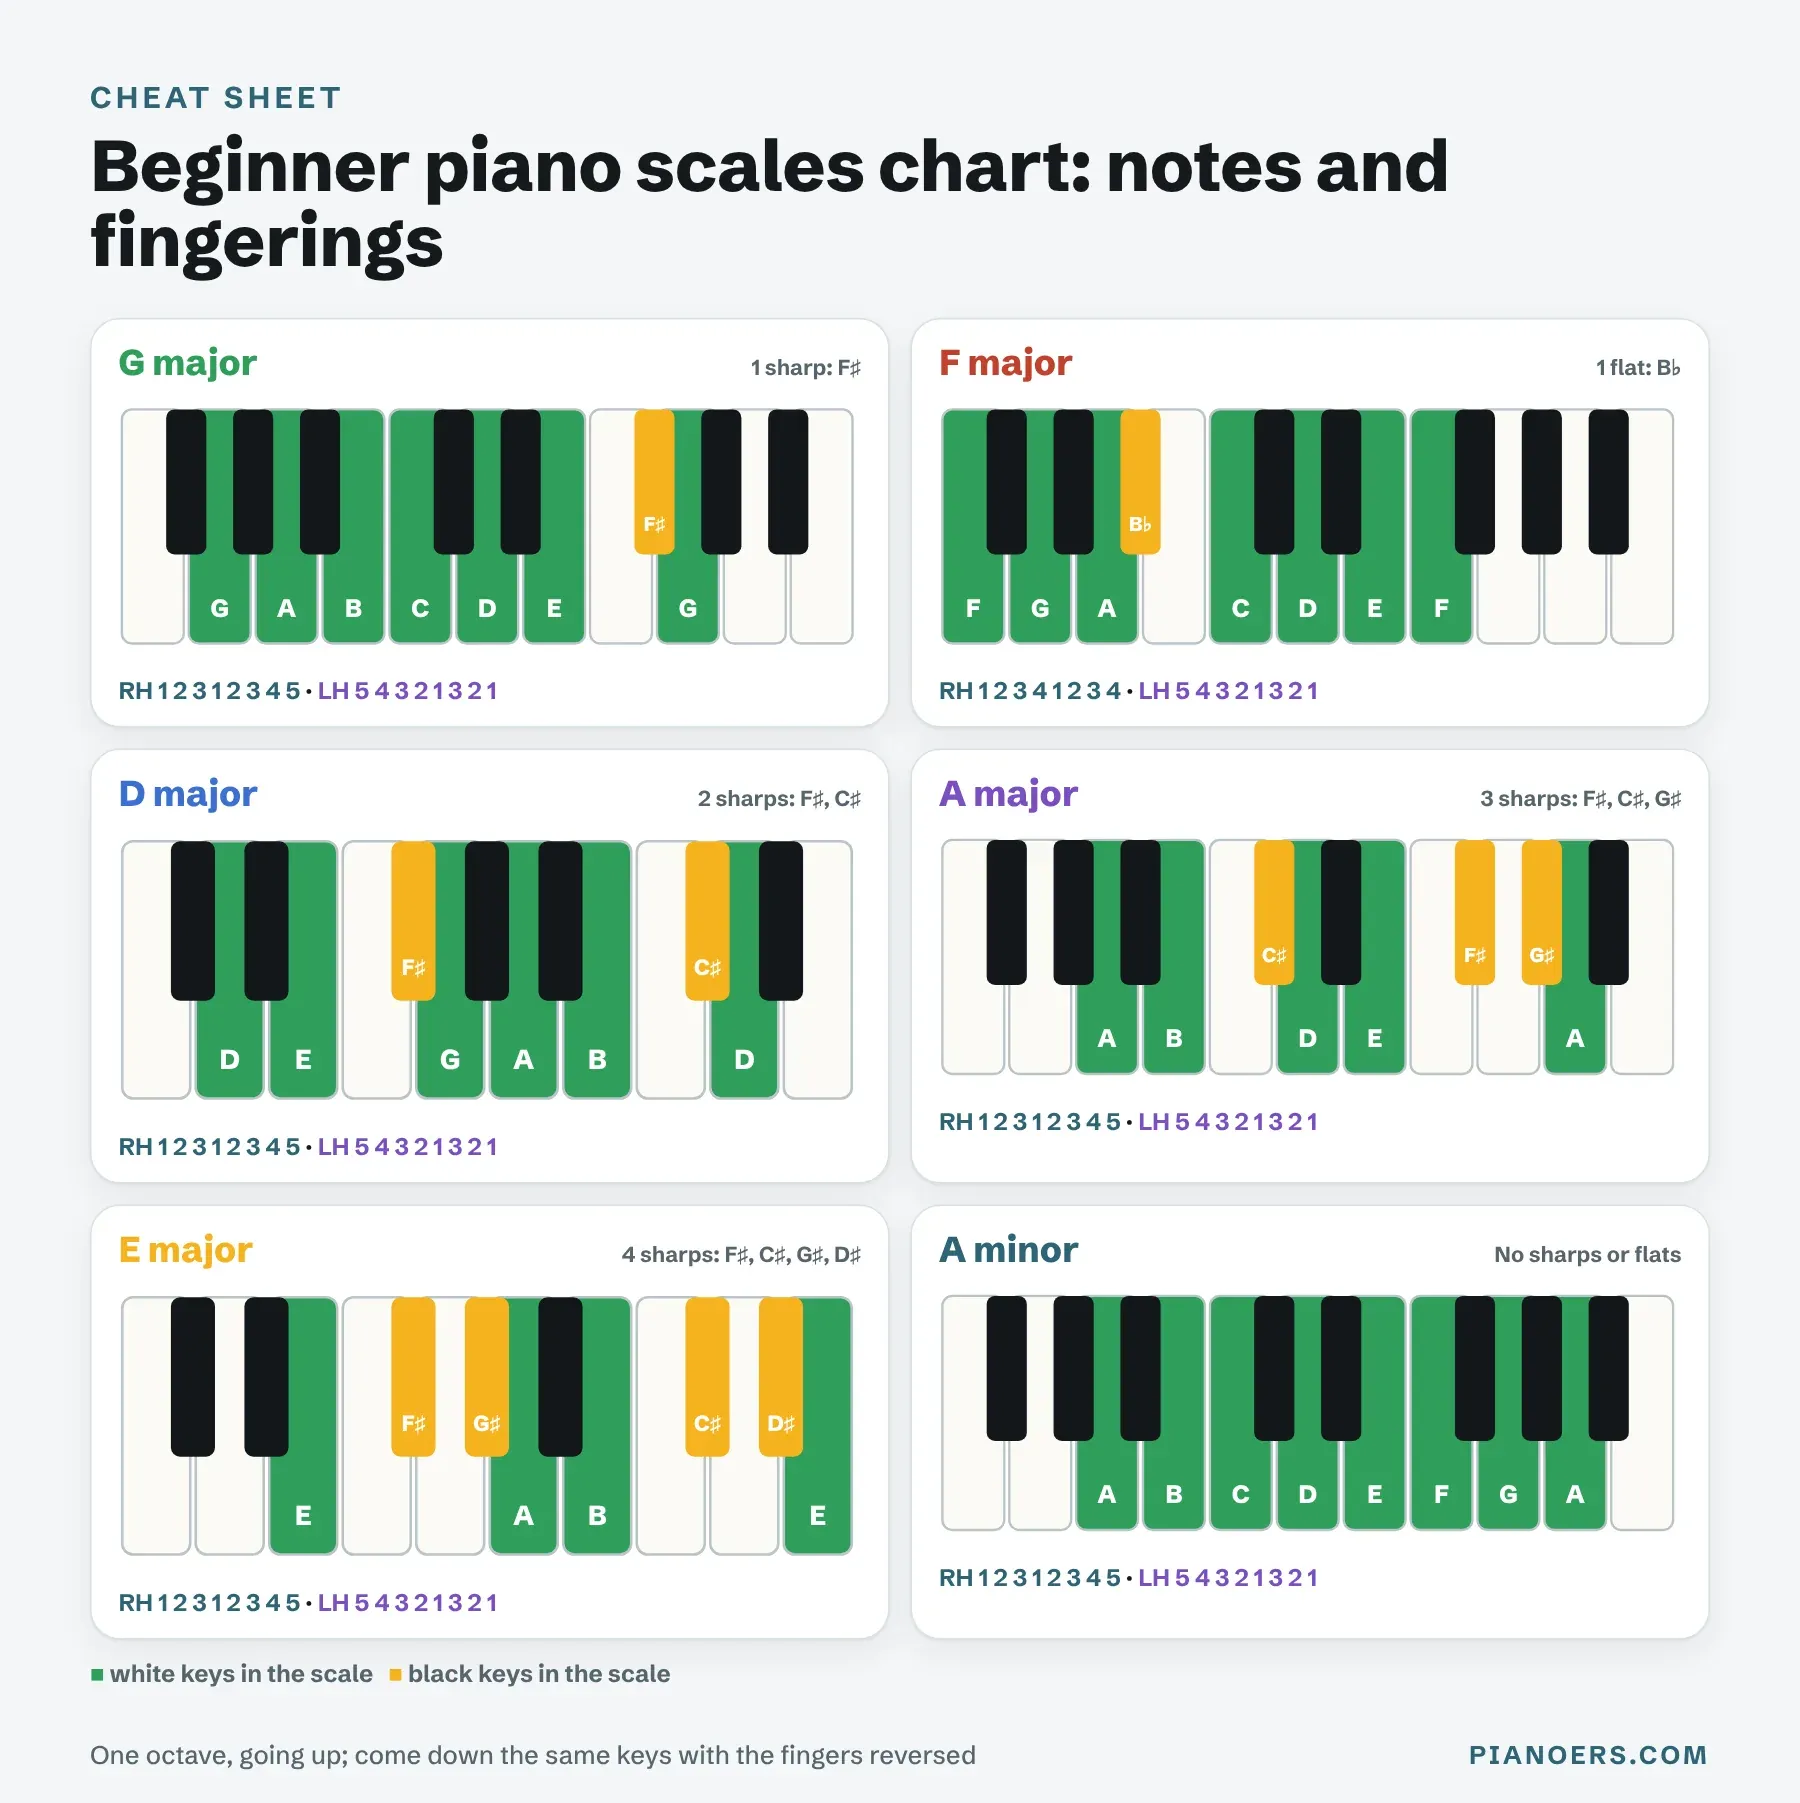
G major: one sharp, F♯
G major is G A B C D E F♯ G. Same fingering as C major. The only new thing is F♯, which falls under finger 4 in the right hand and finger 2 in the left. Your fourth finger is the weakest, so listen for whether F♯ sounds as strong as the other notes.
F major: one flat, B♭
F major is F G A B♭ C D E F. The left hand uses the usual 5 4 3 2 1 3 2 1. The right hand plays 1 2 3 4 1 2 3 4: finger 4 on B♭, then the thumb tucks under to C. Expect this one to feel strange for a few days. Your fingers will keep trying to put the thumb on B♭, and that's normal.
D major: two sharps, F♯ and C♯
D major is D E F♯ G A B C♯ D. In the right hand, F♯ falls under finger 3 and C♯ under finger 4, both long fingers that sit naturally on the black keys. Most students find D major more comfortable than they expected.
A major: three sharps, F♯, C♯ and G♯
A major is A B C♯ D E F♯ G♯ A. The fingering is the same again. With three black keys, your hand sits a little further into the keyboard, which actually helps the thumb pass under.
E major: four sharps, F♯, C♯, G♯ and D♯
E major is E F♯ G♯ A B C♯ D♯ E. Four sharps sounds frightening, but the fingering hasn't changed since C major. If you can play A major, give yourself a week with E major and you'll be surprised.
A minor, E minor and D minor
The three natural minor scales share their notes with a major scale. A minor (A B C D E F G A) uses the notes of C major. E minor (E F♯ G A B C D E) uses the notes of G major. D minor (D E F G A B♭ C D) uses the notes of F major. All three use the main fingering, right hand 1 2 3 1 2 3 4 5 and left hand 5 4 3 2 1 3 2 1.
Free printable
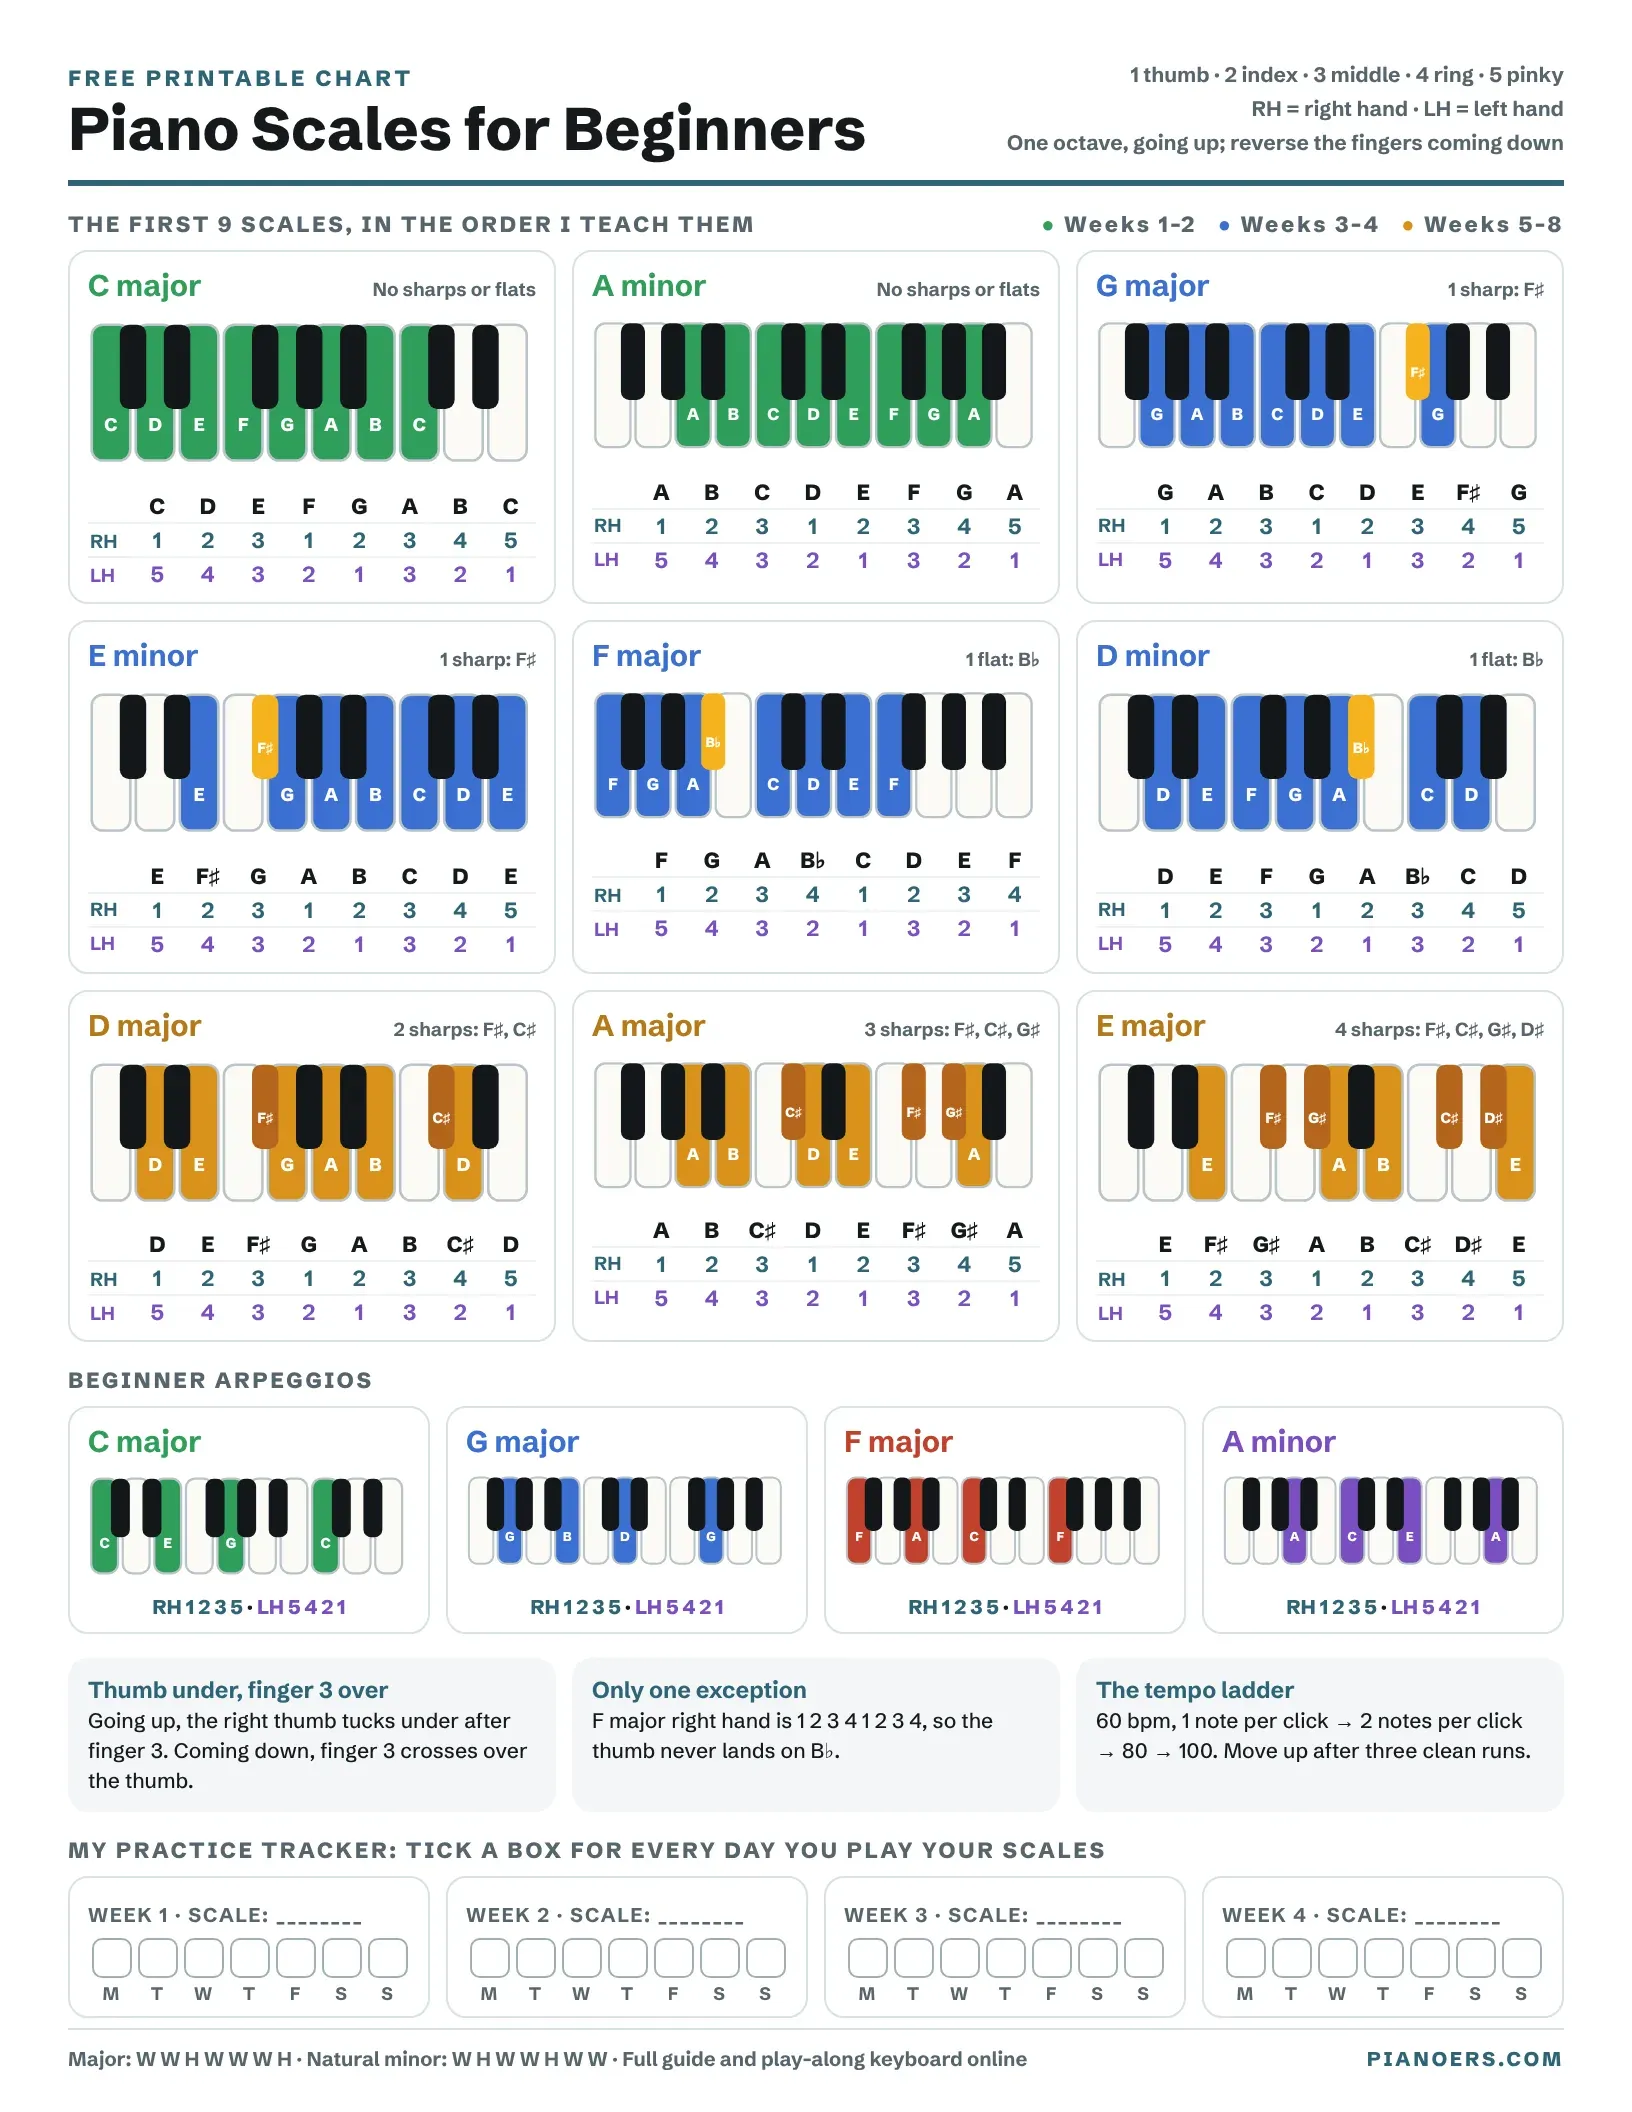
Want this on your music stand? Download the one-page piano scales chart for beginners: all nine scales with keyboard diagrams and both hands' fingerings, four beginner arpeggios, the tempo ladder and a four-week practice tracker. It's free, with no sign-up.
Natural, harmonic and melodic minor: what's the difference?
There are three kinds of minor scale, and beginners only need the first one at the start. The natural minor uses the notes of its relative major. The harmonic minor raises the 7th note by a half step. The melodic minor raises both the 6th and 7th notes going up, then comes down as a natural minor.
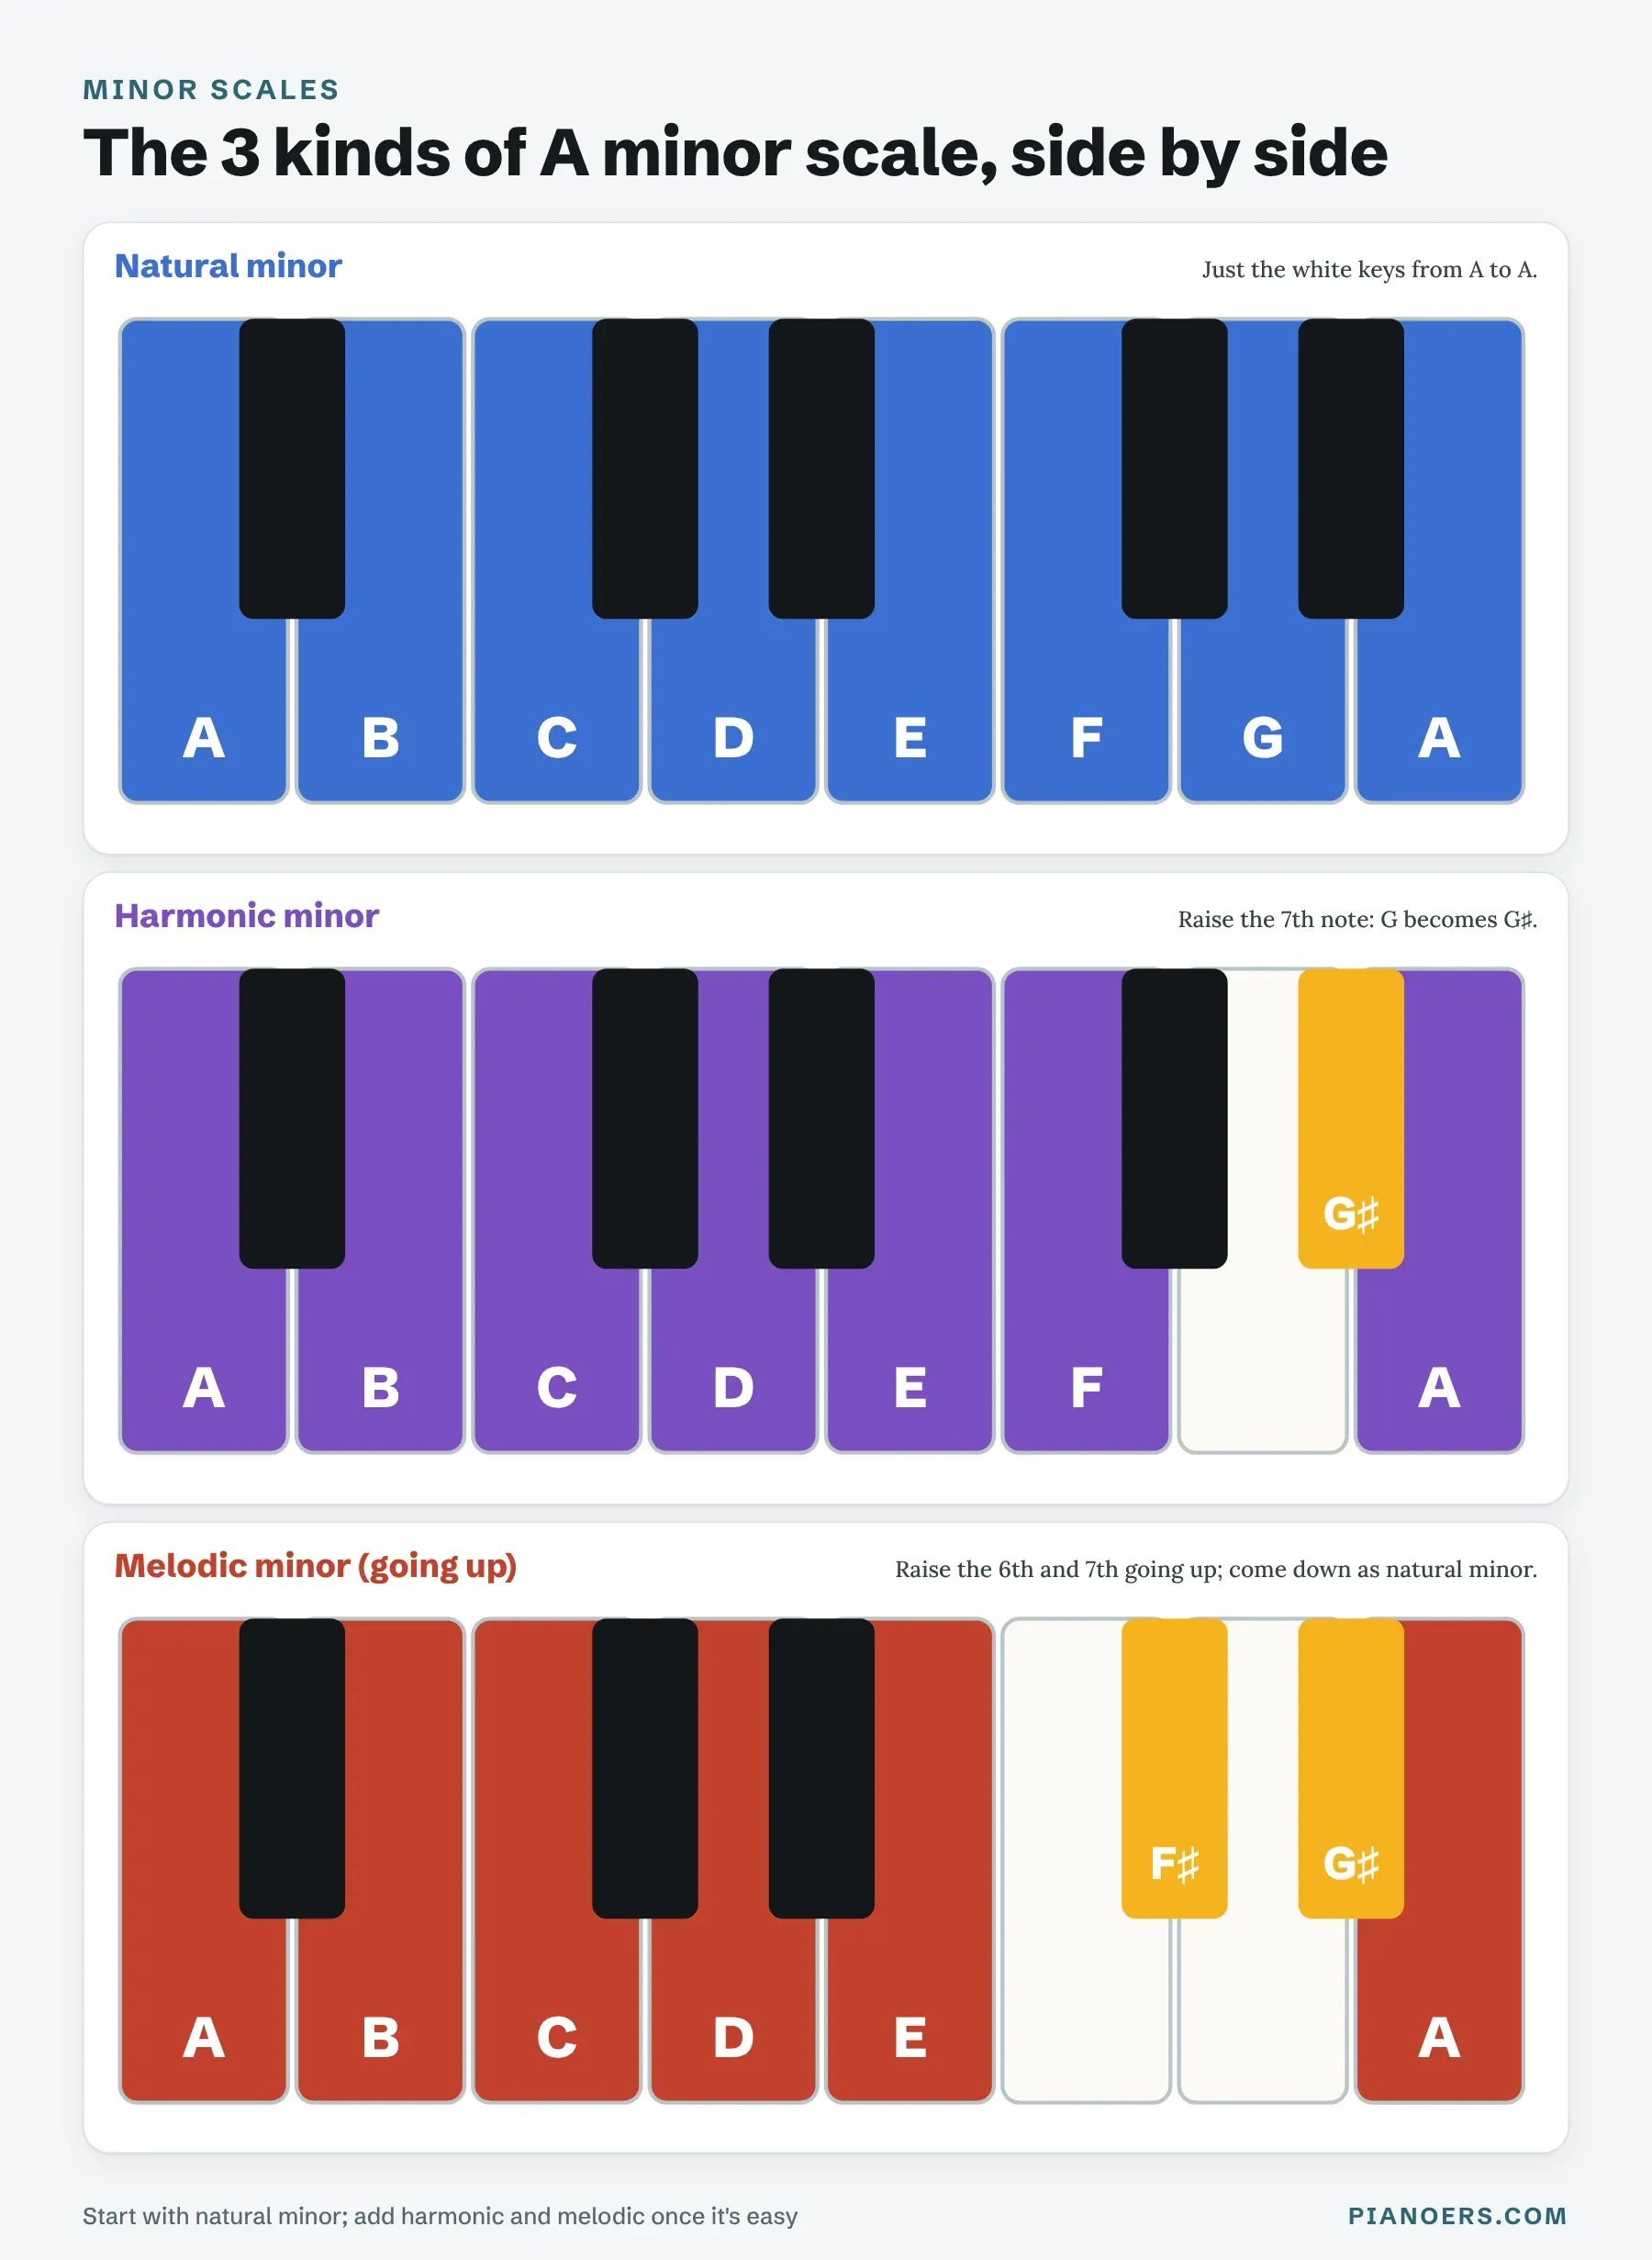
Why raise the 7th? It makes the 7th note pull strongly back up to the key note, which gives minor music its characteristic tension. Play A harmonic minor and listen to the gap between F and G♯: it's a slightly exotic-sounding step and a good ear test. My advice is to learn each minor scale as a natural minor first, then add the harmonic version a few weeks later, and leave the melodic minor until the other two feel easy.
Piano arpeggios for beginners
An arpeggio is a chord played one note at a time. The C major arpeggio is C E G C, the notes of the C major chord plus the top C. Arpeggios are the natural next step after scales, because they teach your hand to stretch and jump while staying relaxed.
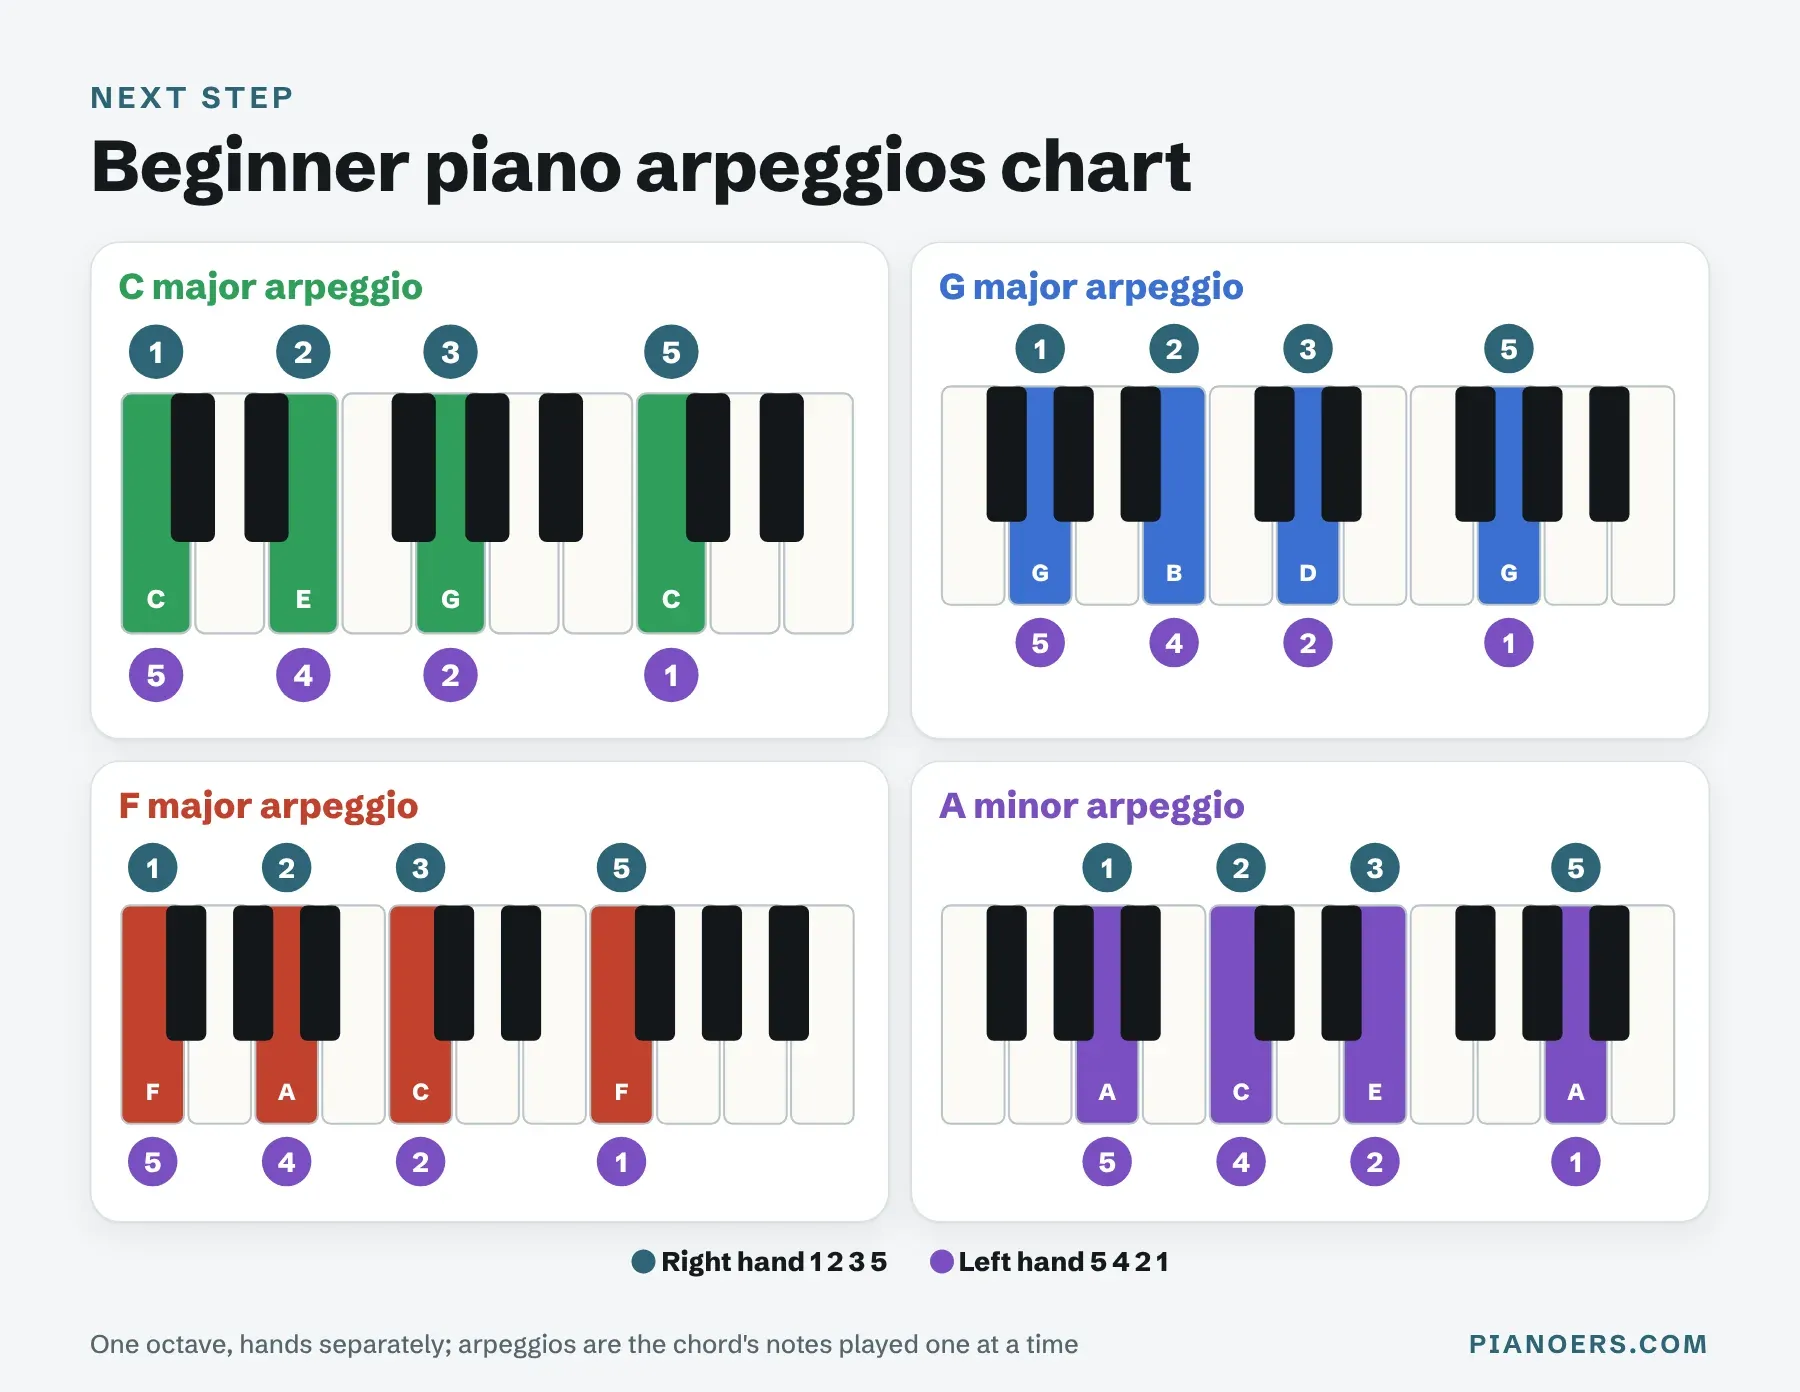
Start with C major, G major, F major and A minor, one octave, hands separately. Use 1 2 3 5 in the right hand and 5 4 2 1 in the left. Don't stretch with tense fingers; let your wrist move sideways a little so your hand follows the notes. When an arpeggio sounds smooth and even, you're ready to play the chord's notes together as a block chord, which is a great bridge into accompanying songs.
Pentatonic and blues scales: the fun ones
If you want to improvise, these are your first scales. The major pentatonic has five notes: the major scale without its 4th and 7th notes. C major pentatonic is C D E G A. The minor pentatonic uses the same five notes starting on the relative minor, so A minor pentatonic is A C D E G. The blues scale adds one extra "blue" note to the minor pentatonic: C blues is C E♭ F F♯ G B♭ C.
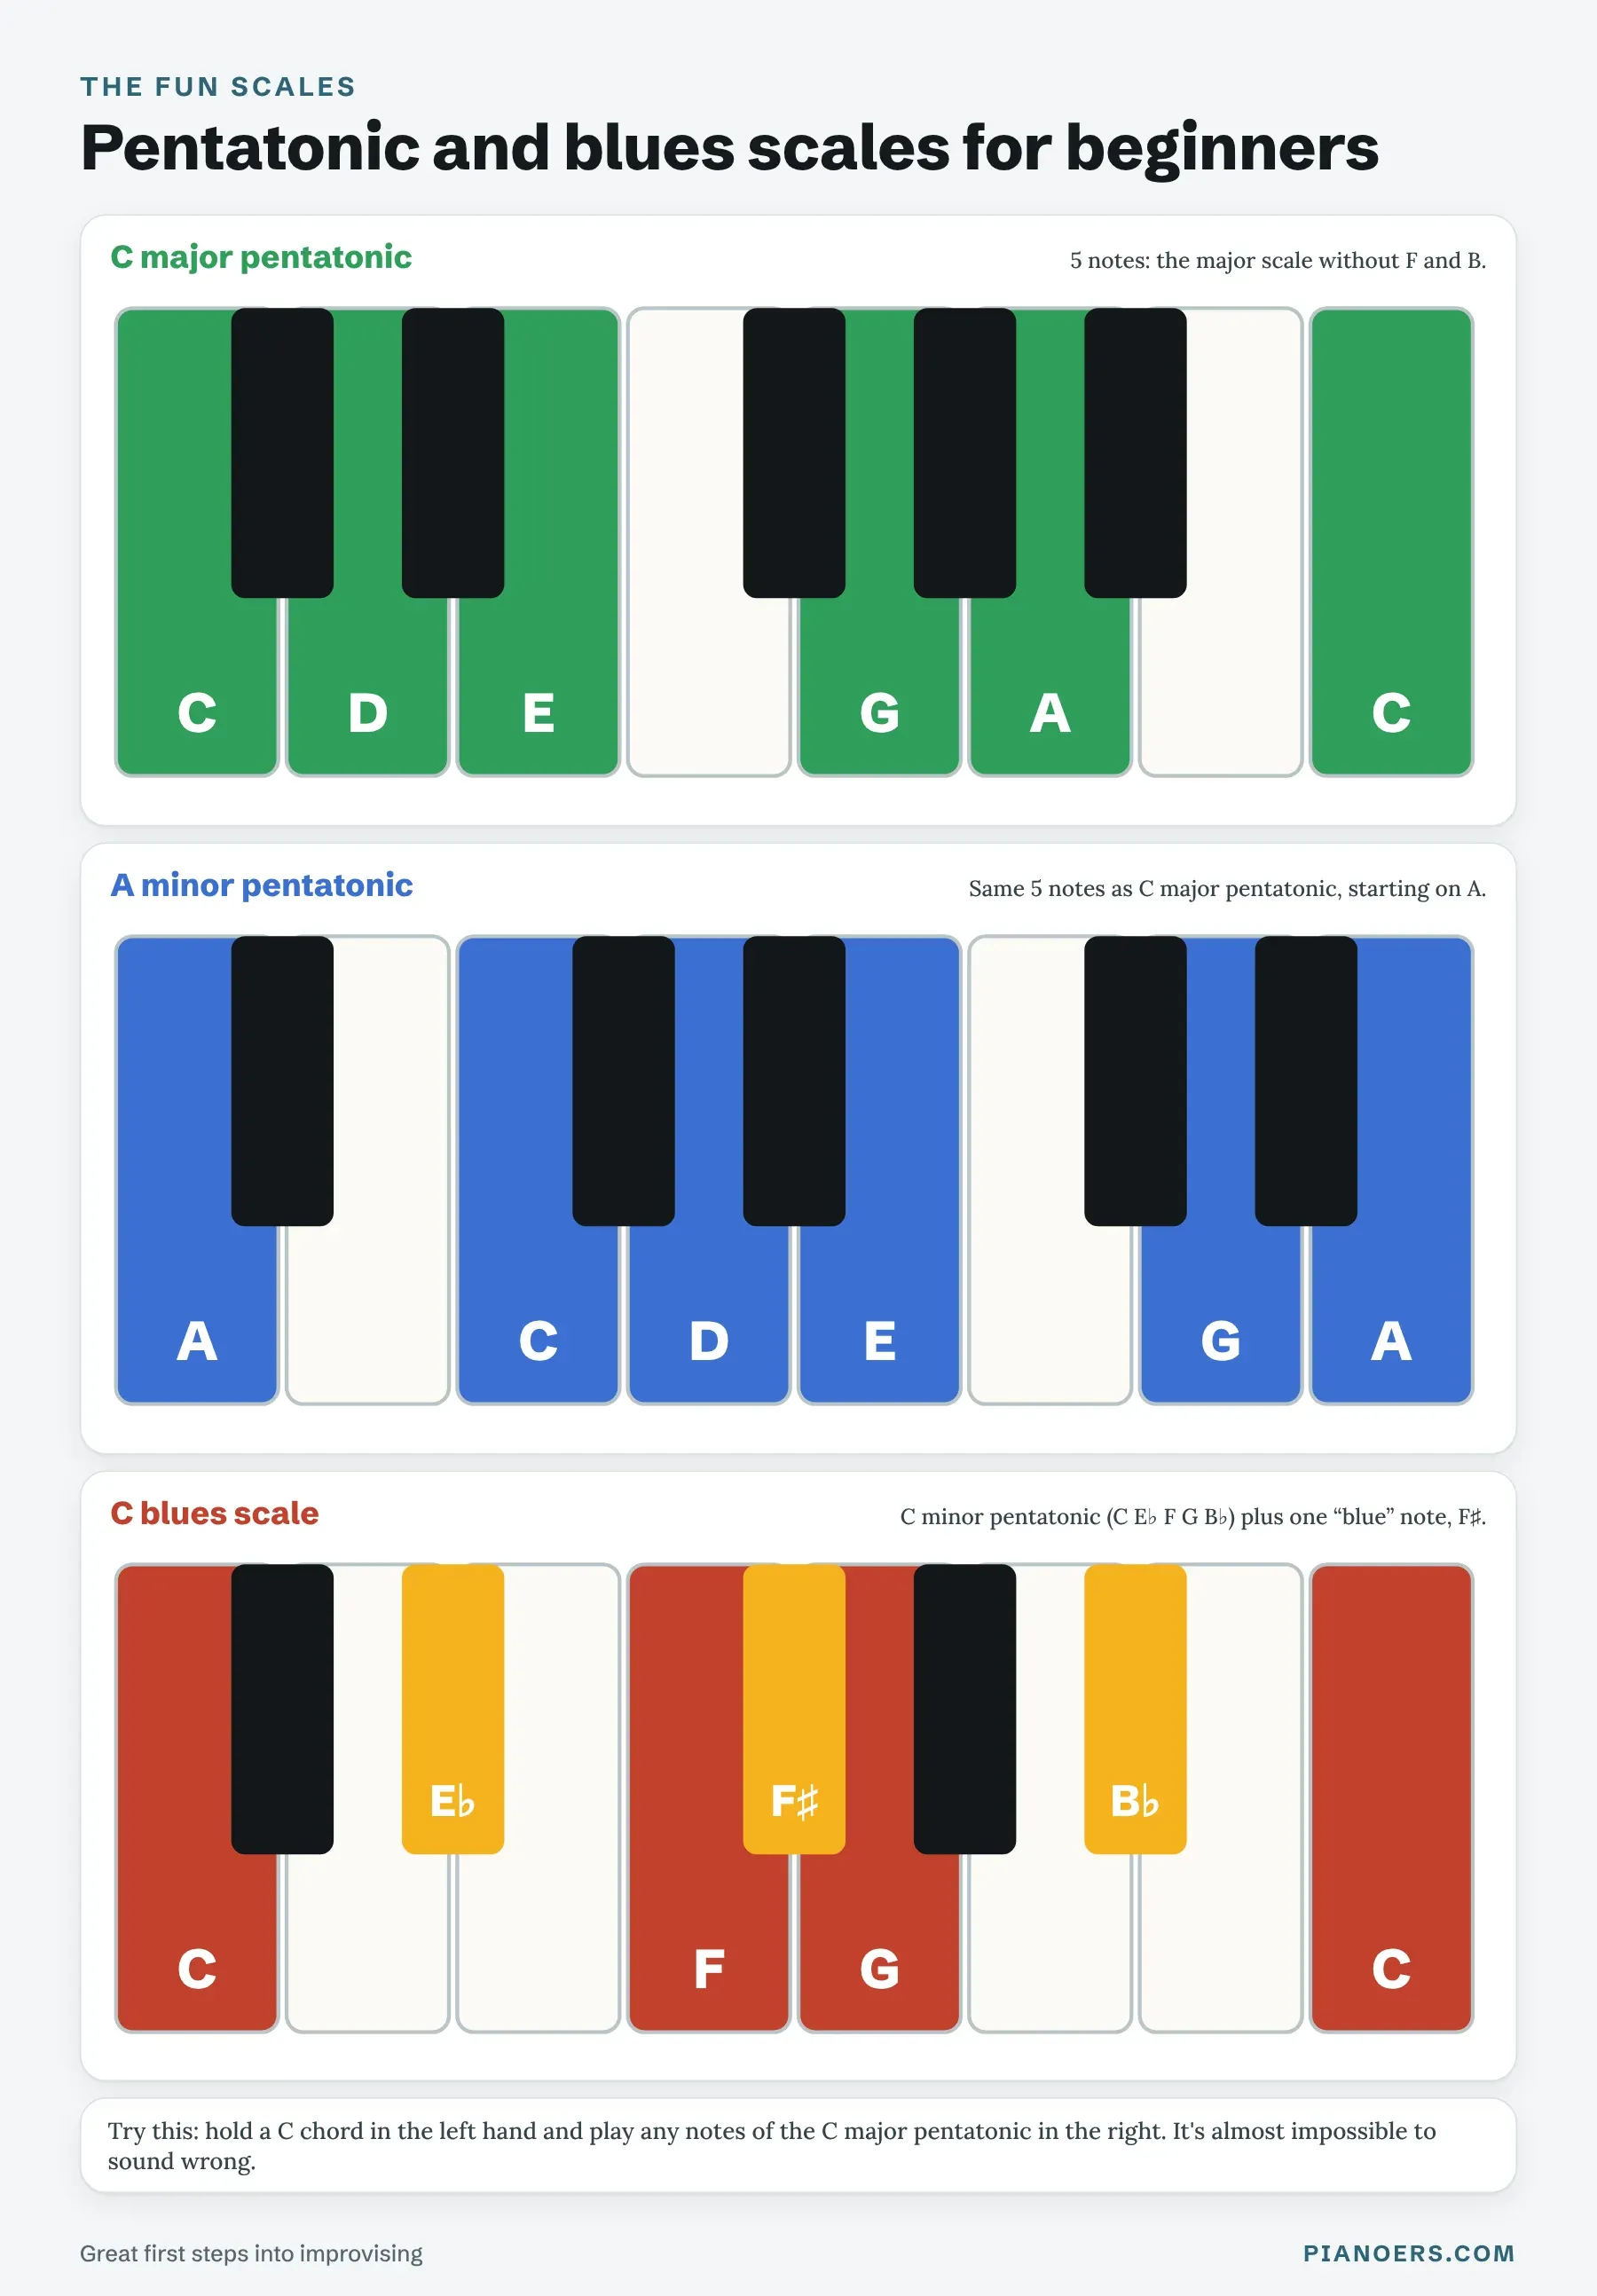
Here's a five-minute experiment I do with almost every beginner. Hold a C major chord in your left hand. With your right hand, play any notes of the C major pentatonic, in any order, with any rhythm. It's very hard to make it sound wrong, and for a lot of students it's the first time the piano feels like play rather than work.
The chromatic scale
The chromatic scale plays every key, black and white, one after another, so it moves in half steps only. Its fingering is pleasingly logical. In the right hand going up, use finger 3 on every black key, the thumb on most white keys, and finger 2 on F and C, where two white keys sit side by side.
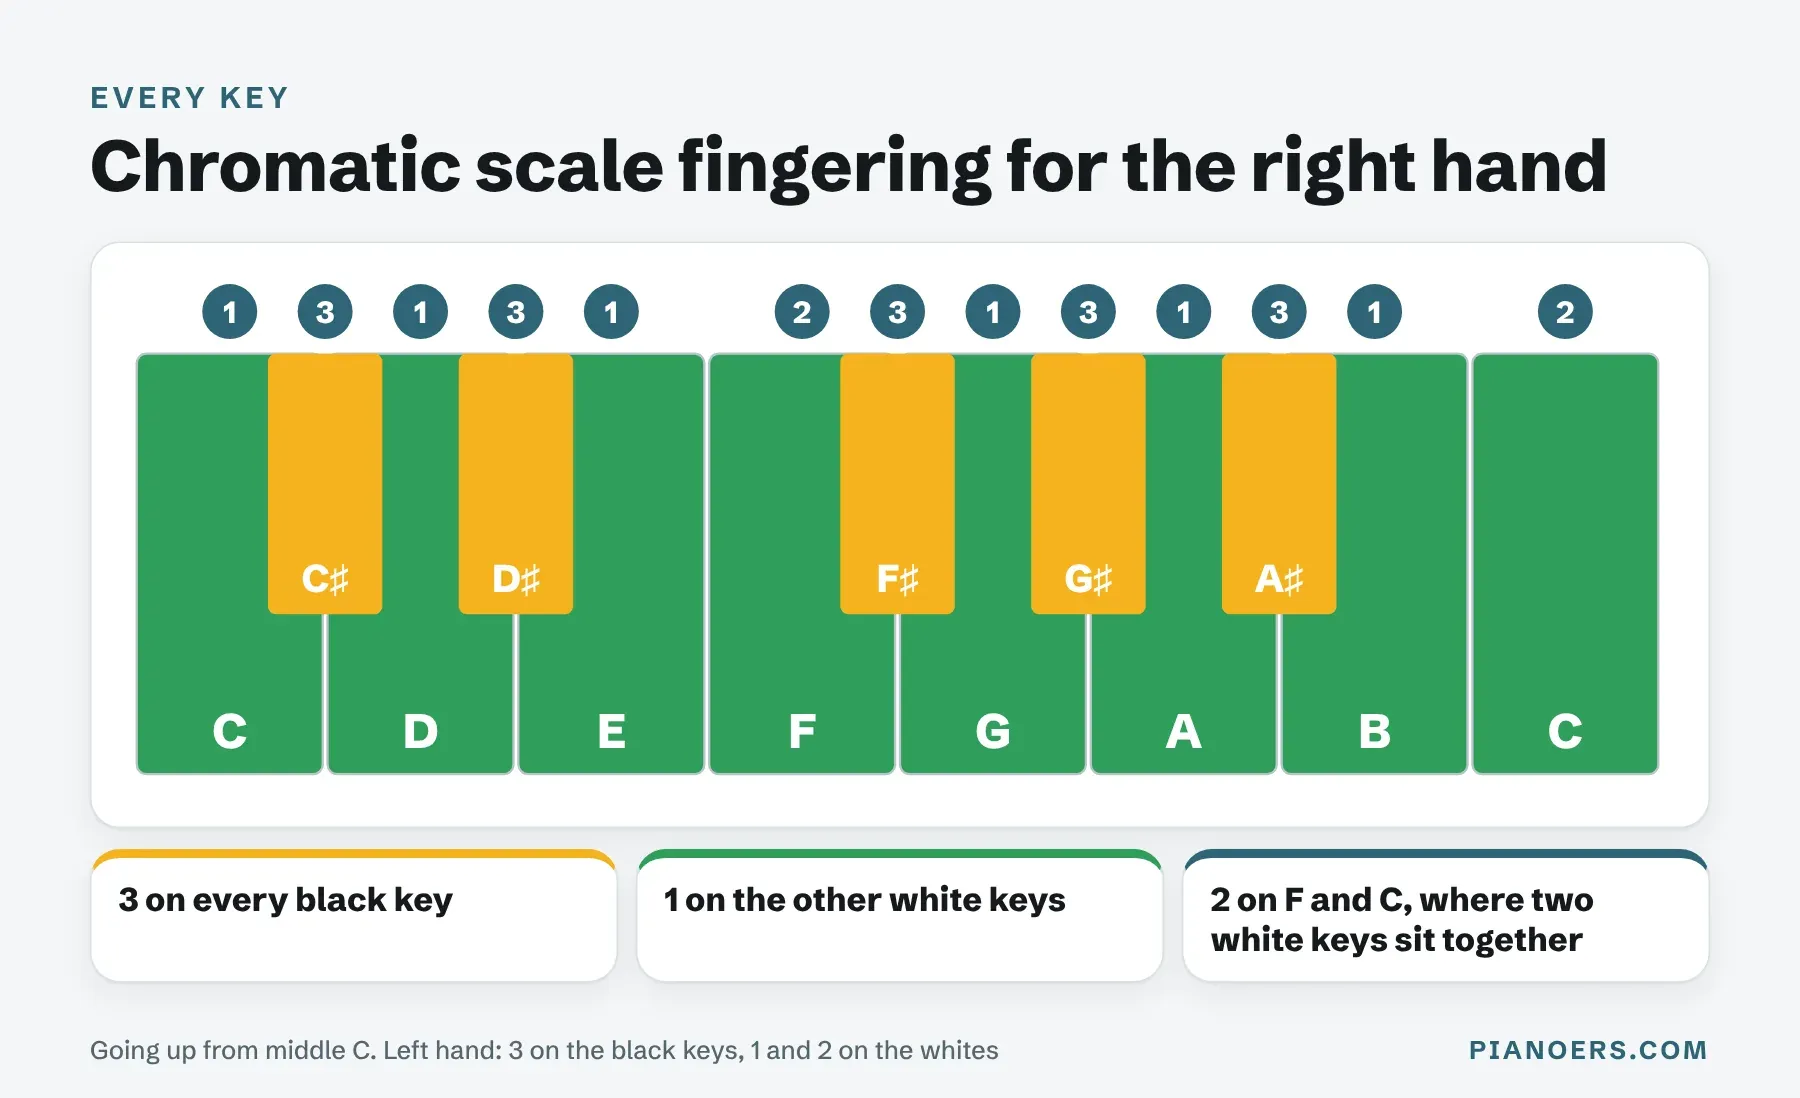
The chromatic scale is excellent for thumb control and for keeping your hand quiet, because the hand barely needs to move. In the left hand, the idea is the same: 3 on the black keys, 1 and 2 on the white keys.
How to practise piano scales: a 10-minute routine
The best way to learn piano scales is a few focused minutes every day, hands separately, slowly, with a metronome. Ten minutes a day beats an hour on Sunday, because your hands learn through repetition and rest. Here's the routine I give students:
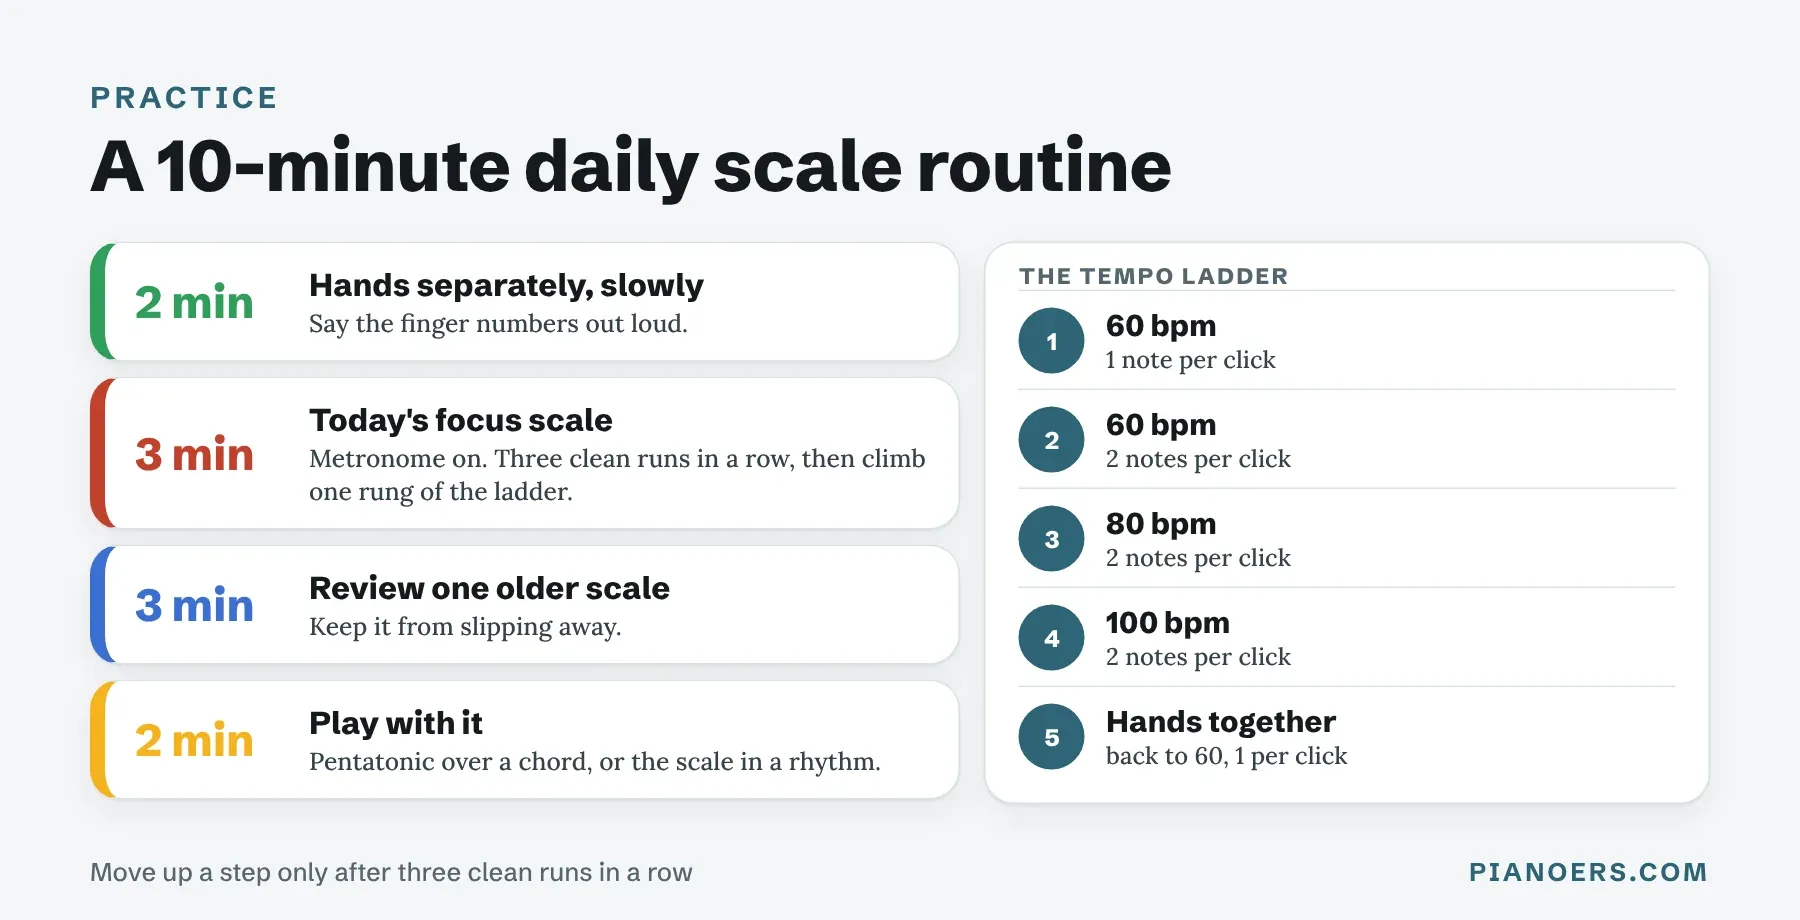
- 2 minutes: hands separately, slowly. Play today's scales without a metronome and say the finger numbers out loud. It sounds silly, but it locks the fingering in faster than anything else I know.
- 3 minutes: your focus scale. Turn on the metronome. When you can play the scale three times in a row without a stumble, move up one rung of the tempo ladder.
- 3 minutes: review one older scale. Scales you stop playing fade quickly. Rotate through the ones you already know.
- 2 minutes: play with it. Improvise with the pentatonic over a chord, or play your scale in a rhythm: long-short, short-long, or in groups of three.
The tempo ladder
Speed comes from steadiness, not from trying to go fast. Climb this ladder one rung at a time, and only move up after three clean runs in a row:
- 60 bpm, one note per click
- 60 bpm, two notes per click
- 80 bpm, two notes per click
- 100 bpm, two notes per click
- Hands together: back down to 60 bpm, one note per click
Don't worry if a rung takes a week. The goal is a scale that sounds even, with every note the same length and volume. That's what makes scales useful in real music; speed is just a side effect.
For more on making short practice sessions count, read my piano practice tips.
 Play video: Practicing scales can be FUN (YouTube)
When to play scales hands together
Play scales hands together once a scale is solid at the second or third rung of the tempo ladder with each hand alone. Before that, hands together usually turns into a tangle, because your two hands change fingers at different moments: in C major, the right thumb tucks under after E, while the left hand's finger 3 crosses over after G.
My favourite way in is contrary motion. Put both thumbs on middle C. The right hand goes up while the left hand goes down, and because the notes mirror each other, both hands use the same finger at the same time: 1 2 3, both thumbs tuck under, 1 2 3 4 5. It feels almost magical the first time, and it's a great confidence boost before you try the usual parallel motion, with both hands going the same way an octave apart.
When you do try parallel motion, go back to 60 bpm with one note per click, and practise just the first five notes until the hands agree.
Common mistakes when learning scales
- Making up your own fingering. It works at slow speeds and then falls apart. The standard fingerings exist because they keep working when you speed up.
- Going too fast too soon. If you stumble at the same place every time, the speed is too high. Drop two rungs and rebuild.
- Looking at your hands for every note. Glancing is fine at first. As soon as you can, look at the music or straight ahead, and let your hand find the keys by feel.
- Flat or collapsed fingers. Keep a gentle curve, as if your hand were resting on a ball, and play on the fingertips.
- Thumbs that thump. Listen for the thumb notes in particular and make them match their neighbours.
- Only ever playing up. Coming down is a different set of movements, and it needs as much attention as going up.
- Learning scales without using them. Notice the scale inside the pieces you play. When a piece is in G major, play G major before you start it.
Should you learn scales or chords first?
Learn them side by side. Scales and chords come from the same notes: the C major chord is the 1st, 3rd and 5th notes of the C major scale (C, E and G). A simple routine is to play a scale, then its arpeggio, then its chord. In five minutes you'll know a key three different ways.
If your main goal is accompanying songs from chord sheets, you might lean more on chords at first, and that's perfectly fine. Our free Hover Chords browser extension shows any chord on a mini keyboard when you hover over its name, which makes chord charts much less intimidating. Just keep a few minutes of scales in your day: they're what make your fingers fluent enough to move between chords smoothly.
Where to go from here
Once your first nine scales feel comfortable, the usual next steps are two-octave scales, the remaining major and minor keys, harmonic minors for every minor key, and hands together in parallel motion. If you're learning on your own, a structured course or method book will tell you when each step makes sense. My guides to teaching yourself piano, the best online piano lessons, the best piano methods and the best piano books for adult beginners can help you choose.
One more thing: scales feel much better on a piano with weighted, full-size keys, because your fingers learn the same weight they'll meet on a real piano. If you're practising on a small or unweighted keyboard and thinking about an upgrade, see my picks for the best beginner pianos and the best digital pianos.
Piano scales for beginners: frequently asked questions
What is the easiest scale to play on piano?
C major is the easiest scale on the piano because it uses only white keys: C D E F G A B C. A minor is just as easy, since it uses the same white keys starting on A. Both use the standard fingering, right hand 1 2 3 1 2 3 4 5 and left hand 5 4 3 2 1 3 2 1.
What order should I learn piano scales in?
A good order for beginners is C major and A minor first, then G major and E minor (one sharp), F major and D minor (one flat), then D, A and E major (two, three and four sharps). This adds one sharp or flat at a time and keeps the same fingering for 8 of the 9 scales.
How many piano scales are there?
There are 12 major scales and 12 natural minor scales, one starting on each of the 12 keys in an octave, and some can be written in two ways, such as F♯ major and G♭ major. Each minor key also has a harmonic and a melodic form. On top of these come pentatonic, blues, chromatic and modal scales. Beginners only need about nine to start.
Do I need to learn all 12 major scales?
Not at the start. The nine scales in this guide cover the keys most beginner pieces are written in. Learn all 12 major and minor scales gradually over your first year or two, as your pieces start to use more sharps and flats.
How long does it take to learn piano scales?
With about ten minutes of practice a day, most beginners can play C major evenly, hands separately, within one to two weeks, and all nine beginner scales within two to three months. Playing them fluently hands together usually takes a few months more.
What is the correct fingering for piano scales?
For one octave of C, G, D, A and E major and A, E and D minor, the right hand plays 1 2 3 1 2 3 4 5 and the left hand plays 5 4 3 2 1 3 2 1, where 1 is the thumb and 5 the little finger. F major's right hand is the exception: 1 2 3 4 1 2 3 4, so the thumb avoids B♭.
When should I start playing scales hands together?
Start hands together once you can play a scale evenly with each hand alone at a steady speed, roughly 60 bpm with two notes per click. Contrary motion, where both hands start on middle C and move apart, is the easiest way in, because both hands use the same fingers at the same time.
How fast should a beginner play scales?
Start at 60 bpm with one note per click, and only speed up after three clean runs in a row. A good target for a beginner after a few months is about 80 to 100 bpm with two notes per click, hands separately. Evenness matters much more than speed.
How often should I practise scales?
Practise scales for about ten minutes a day, five or six days a week. Short daily practice works much better than one long session a week, because your hands learn fingerings through repetition and rest.
Are piano scales really necessary?
Scales aren't the only path to playing music, but they're one of the fastest ways to build finger independence, even technique, and a feel for keys. Most pieces are built from scales and arpeggios, so a few minutes a day of scales makes new pieces quicker to learn.



Comments ()